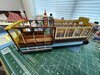
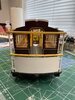
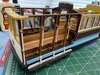
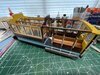
I have been working on my version of the Powell Street Cable car off and on, for over a year. The "stops" typically occurred when I reached a point of confusion interpreting the very challenging Artesania Latina's instructions. Fortunately I discovered this forum and in particular, flyjoe's version of the same project, about 25% further along than mine. This has been SO much help to me in proceeding successfully with my build. So thank you all, but special thanks to flyjoe180. So here is my cable car, at the roof construction and fitting stage. Hopefully I don't botch the act of posting; this is not something I am adept at...View attachment 426290View attachment 426291View attachment 426292View attachment 426293

You are using an out of date browser. It may not display this or other websites correctly.
You should upgrade or use an alternative browser.
You should upgrade or use an alternative browser.
Chris' 1/22 Artesania Latina San Francisco Cable Car build
- Thread starter DrDemento
- Start date
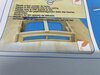
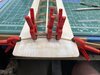
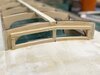
And now for the roof. I referred to Joe's thread frequently, for guidance (and some courage) to proceed and actually innovate a little. "A.L." does not devote much time or space with the "how" of accomplishing model building tasks. You must study their photo's, and squint to find YOUR language in amongst the 7-or-so others with incredibly brief guidance. In short, you must learn to build this thing. I used a different method of framing the front & rear roof windows: I cut the bottom piece to the desired finished length, scribed a few Xacto knife gashes & micro saw cuts to the contact (bottom) side - to facilitate the arc - and used a full length version of the same type of wood to clamp the actual part into place as the glue set. First shot is of the furnished plans; second is of the arc forming. The longer piece - the one that is clamped - is not glued. It's length allows it to arc w/out breaking, holding down the shorter piece that is glued to the roof of the cable car, forming a window frame. Final version added (sometimes a good cameras reveal too much - thankfully there are sanding sticks, putty & paint!) View attachment 426294View attachment 426295View attachment 426346
Attachments
G
Guest
Guest
Excellent build
Hi Chris, excellent to see your cable car build coming along. Yours is looking great. There is a lot of room for improvisation in this build, and I'm glad my posts are of use to you. Looking forward to seeing more :thumb2:
G
Guest
Guest
Not an easy build remembering Joe's, but progressing well. Going to look perfect .
Vey nice photos, what camera are you using please Chris.
Vey nice photos, what camera are you using please Chris.
Hi John, I am using my new iPhone 12 Pro. Thank you for your comments.Not an easy build remembering Joe's, but progressing well. Going to look perfect .
Vey nice photos, what camera are you using please Chris.
Joe, right after I complete the construction and apply the decals I plan to tackle the expanding gate - you know, the one with the ridiculous assembly method of using the furnished (w/no extras for inevitable failure) brass plated nails as rivets. I had not even considered your idea of using screws & nuts from an eyeglass repair kit. Genius.Hi Chris, excellent to see your cable car build coming along. Yours is looking great. There is a lot of room for improvisation in this build, and I'm glad my posts are of use to you. Looking forward to seeing more :thumb2:
G
Guest
Guest
Thank you, just been reading about it, no wonder it takes such good photos Chris.Hi John, I am using my new iPhone 12 Pro. Thank you for your comments.
You can get very cheap repair kits online. The down side of the nuts and bolts is they loosen if you exercise the gate too often. And yes, I have also repaired my glasses with the kit :nerd:Joe, right after I complete the construction and apply the decals I plan to tackle the expanding gate - you know, the one with the ridiculous assembly method of using the furnished (w/no extras for inevitable failure) brass plated nails as rivets. I had not even considered your idea of using screws & nuts from an eyeglass repair kit. Genius.
As it happens, I purchased the exact same kit (from Amazon) that you did. I am saving this effort for last - it sidelined me for a very long time.You can get very cheap repair kits online. The down side of the nuts and bolts is they loosen if you exercise the gate too often. And yes, I have also repaired my glasses with the kit :nerd:
Hi Chris, just been reading through your thread.....if you end up going with Joe's method of securing the accordion gate, I would like to suggest just a touch of Loctite thread sealant for final assembly. The "blue" formula works the Bomb and will allow you to disassemble it if you need to, down the road. Enjoying this one as much as I did Joe's build. Rick H.
Thanks Rick, I will do as you suggest.Hi Chris, just been reading through your thread.....if you end up going with Joe's method of securing the accordion gate, I would like to suggest just a touch of Loctite thread sealant for final assembly. The "blue" formula works the Bomb and will allow you to disassemble it if you need to, down the road. Enjoying this one as much as I did Joe's build. Rick H.
Chris
Coming on well this model and looking good so far.
I think I read that Joe got his at some sort of clearance sale.
The Artesania Latina San Farncisco Cable Car kit appears to be out of production. Could not find one for sale unfortunately. Not sure why they chose 1/22nd instead of 1/24th scale though.
However, Occre make a SF Cable Car kit in 1/24th scale where the closed carriage part is in the middle. Nice subject matter for a model.
Legal Notice
scalemodelling.co.uk is a privately operated online discussion forum. All content posted by members reflects their own views and opinions and does not necessarily represent those of the forum owners or administrators. While reasonable efforts are made to moderate content, no responsibility is accepted for user-generated material. By using this site, you agree to comply with UK law and the forum rules.