
You are using an out of date browser. It may not display this or other websites correctly.
You should upgrade or use an alternative browser.
You should upgrade or use an alternative browser.
Colin's English Electric Lightning 1/32 Trumpeter
- Thread starter Bigfoot57
- Start date
- Status
- Not open for further replies.
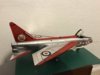
Latest update started painting yellow markings on canopy frame and initial coat on the missiles followed by the top coat which is slightly yellowish which is deliberate before detailing begins with control surfaces in light grey with red edging on the main fins and some white banding around the body of the missile to give it some detail other than just plain white
Regards
Colin
Regards
Colin
Attachments
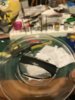
Disaster with cockpit canopy whilst gluing on pe to inside cockpit canopy fogged and cracked
Have read about various repair scenarios best I can come up with is to polish with toothpaste then coat with kleer which I have and see if that helps as for the crack no idea worst case I can improvise some sort of canopy cover to simulate a tarpaulin or similar oh bugger as the old git would say from the fast show on tv
Regards
Colin
Dave
Don’t know at the moment as I’m at work this happened last night so I have just put it to one side for the moment if I recall the crack is on the inside of the canopy and hasn’t gone all the way through but it is visible from the outside
Don’t know at the moment as I’m at work this happened last night so I have just put it to one side for the moment if I recall the crack is on the inside of the canopy and hasn’t gone all the way through but it is visible from the outside
Result of about an hour buffing with cotton buds / q tips and the a layer of pledge floor care finish if it stays like that I’m well satisfied to what it looked like the crack is visible as a hairline fracture on the top left hand side towards the front so will have to live with that
Regards
Colin
Regards
Colin
Attachments

Yea might just give it another go just to see if I can improve it but hopefully the rest of the plane will take attention away from the canopy and it will merge into the background so to speak
Regards
Colin
Regards
Colin
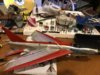
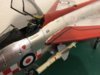
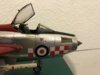
Final assembly approaching just have the ejector seat to do the rest is finished except the pitot tube which goes on last
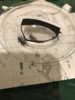
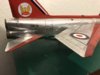
Plane has had a coat of pledge floor care finish ready for the decals attached here is a photo of the completed canopy minus a couple of small inside pieces and I might do a rear view mirror inside the front part of the canopy just to finish it off considering the amount of fogging and cracking it’s come out pretty good
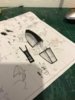
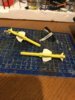
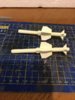
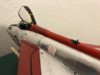
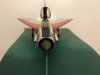
Also attached are my interpretation of 2 Red Top Missiles the seeker heads are coloured using a dark violet / silver / blue combination of sharpie coloured markers this was done to give a translucent effect instead of just painting them I did the nav lights the same way only using red & green
Regards
Colin
Plane has had a coat of pledge floor care finish ready for the decals attached here is a photo of the completed canopy minus a couple of small inside pieces and I might do a rear view mirror inside the front part of the canopy just to finish it off considering the amount of fogging and cracking it’s come out pretty good
Also attached are my interpretation of 2 Red Top Missiles the seeker heads are coloured using a dark violet / silver / blue combination of sharpie coloured markers this was done to give a translucent effect instead of just painting them I did the nav lights the same way only using red & green
Regards
Colin
Attachments

Hello me again I was hoping this would be this model is complete update but it isn’t due to the catastrophic failure of the black walkway markings so much so I have binned them in favour of the old fashioned way namely thin tape and a brush oh well can’t do anything more till the paint has dried it will then need a second coat and dry before anything further can happen
Regards
Colin
Regards
Colin
Attachments
")
Me again a word of warning to anybody making this particular kit the transfers /decals are as bad as the kit itself watch out for the serial no which goes on the underside of the wings mine folded over themselves and when I straightened them out they fractured into tiny pieces the roundels were ok but anything long and thin like walkway markings etc are in my mind suspect and probably best painted this kit has been a pia from the word go
Regards
Colin
Regards
Colin
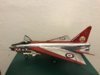
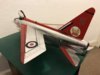
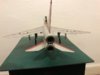
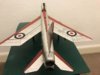
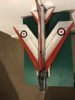
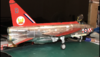
Well folks I’m calling this finished it’s not perfect by any means the main reason was to try out foiling instead of paint
I haven’t bothered with such things as undercarriage legs wrong length or shape etc. or wrong shape fuel belly tank I did extend the fuselage by 5mm as that seemed to be the norm with this kit across the net
The fit was ok with a few problems such as the tail fin refusing the stick properly the decals were a disaster about 25% had problems long lines and long detail decals just folded in on themselves Trumpeter take note you need to clean your act up with this type of stuff it’s not good enough
The pe that I managed to add was good again some of this stuff is too small to manipulate yet alone stick in place so it didn’t get added the placement instructions from eduard are not sufficiently clear to enable accurate placement of the pe on 25% of items again this needs improving anyway that’s the synopsis here are the photo’s
Regards
Colin
Attachments
-
 C189D56D-EC03-4D22-A2F6-B7BA79F49F4E.jpeg2.9 KB · Views: 0
 -
 D2730439-B97C-409A-887E-415CF3B2577C.jpeg2 KB · Views: 0
 -
 AF71F045-14A3-40B4-AD13-36387C512223.jpeg2.5 KB · Views: 0
 -
 420DE3C7-1E27-4E17-B871-8216FE7529F5.jpeg2.2 KB · Views: 0
 -
 01CBEF6F-9533-417E-9CA4-26229F9F1B00.jpeg1.9 KB · Views: 0
 -
 16CAB64E-3361-4A25-80FB-D440F6E1F0B7.jpeg2.4 KB · Views: 0
 -
 46370D1B-2DC8-4295-99E7-0FF78ABC18AE.jpeg1.8 KB · Views: 0
 -
 6A054F88-005A-440A-92F1-CC807EEFDF68.jpeg2.4 KB · Views: 0
 -
 87C5477F-A7A6-497D-B449-2DD13B7033B4.jpeg2.6 KB · Views: 0
 -
 D368F189-4670-4E23-9919-AC9CA11AD9E4.jpeg2.1 KB · Views: 0
 -
 6EA4B55C-6D46-4BA0-8758-0FDF18987FDC.jpeg2.3 KB · Views: 0
 -
 FEB214DC-F955-48B5-9AA8-FFBD0CE05AB7.jpeg2.1 KB · Views: 0
 -
 B5E10966-70E6-4AA3-841A-EACC9F887C4B.jpeg2.5 KB · Views: 0
")
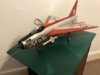
Thanks guys it may look a little rough around the edges but I’m reasonably satisfied with result the metallics work great and any other bare metal models will have the foil treatment from now on here is one final picture not in the ideal location but it shows it off rather well
Attachments
- Status
- Not open for further replies.
Legal Notice
scalemodelling.co.uk is a privately operated online discussion forum. All content posted by members reflects their own views and opinions and does not necessarily represent those of the forum owners or administrators. While reasonable efforts are made to moderate content, no responsibility is accepted for user-generated material. By using this site, you agree to comply with UK law and the forum rules.