
You are using an out of date browser. It may not display this or other websites correctly.
You should upgrade or use an alternative browser.
You should upgrade or use an alternative browser.
Currently building for practice
- Thread starter Richi72
- Start date
- Status
- Not open for further replies.
G
Guest
Guest
Very interesting thread Richard.
This will be a great lovely build!
Cheers
This will be a great lovely build!
Cheers
Hi Guys,
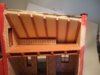
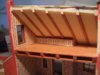
here is a little update on my build.
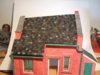
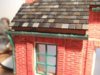
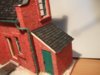
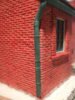
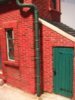
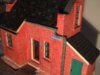
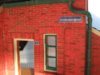
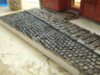
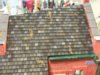
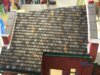
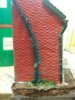
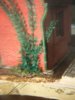
After putting on the roof (I know not really the usual roof tiles) I started with a base coat of black and then I put on some different colors, so that’s drying for now so I can blend them all together later on.
Then I put on the first wash on the drainpipes and dry brushed it 1 time I think more will follow.
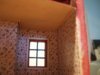
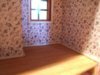
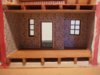
The inside walls received some carpets ( I mean Wallpapper thanks Si) and the doors and windows received some frames.
At the moment I am working on the Ivy because I want to cover the house with Ivy but I am not sure where I want to put it.
And I am still experimenting with some smd lights.
Boy they are small those thingies 2mm x 1,2mm x 0,8mm
So here are some pictures of the progress and any tips you can recommended or critics please say so it will only help me.
View attachment 72576
View attachment 72577
View attachment 72578
View attachment 72579
View attachment 72580
View attachment 72581
View attachment 72582
View attachment 72583
View attachment 72584
View attachment 72585
View attachment 72586
View attachment 72587
View attachment 72588
View attachment 72589
View attachment 72590
View attachment 72591
View attachment 72592
Cheers Richi
View attachment 185599
View attachment 185600
View attachment 185601
View attachment 185602
View attachment 185603
View attachment 185604
View attachment 185605
View attachment 185606
View attachment 185607
View attachment 185608
View attachment 185609
View attachment 185610
View attachment 185611
View attachment 185612
View attachment 185613
View attachment 185614
View attachment 185615
here is a little update on my build.
After putting on the roof (I know not really the usual roof tiles) I started with a base coat of black and then I put on some different colors, so that’s drying for now so I can blend them all together later on.
Then I put on the first wash on the drainpipes and dry brushed it 1 time I think more will follow.
The inside walls received some carpets ( I mean Wallpapper thanks Si) and the doors and windows received some frames.
At the moment I am working on the Ivy because I want to cover the house with Ivy but I am not sure where I want to put it.
And I am still experimenting with some smd lights.
Boy they are small those thingies 2mm x 1,2mm x 0,8mm
So here are some pictures of the progress and any tips you can recommended or critics please say so it will only help me.
View attachment 72576
View attachment 72577
View attachment 72578
View attachment 72579
View attachment 72580
View attachment 72581
View attachment 72582
View attachment 72583
View attachment 72584
View attachment 72585
View attachment 72586
View attachment 72587
View attachment 72588
View attachment 72589
View attachment 72590
View attachment 72591
View attachment 72592
Cheers Richi
View attachment 185599
View attachment 185600
View attachment 185601
View attachment 185602
View attachment 185603
View attachment 185604
View attachment 185605
View attachment 185606
View attachment 185607
View attachment 185608
View attachment 185609
View attachment 185610
View attachment 185611
View attachment 185612
View attachment 185613
View attachment 185614
View attachment 185615
Attachments
-
 DSCF1940.jpg2.9 KB · Views: 0
 -
 DSCF1954.jpg2.1 KB · Views: 0
 -
 DSCF1955.jpg2.9 KB · Views: 0
 -
 DSCF1956.jpg2.4 KB · Views: 0
 -
 DSCF1957.jpg2.5 KB · Views: 0
 -
 DSCF1958.jpg2.7 KB · Views: 0
 -
 DSCF1953.jpg3.2 KB · Views: 0
 -
 DSCF1950.jpg3.1 KB · Views: 0
 -
 DSCF1941.jpg2.7 KB · Views: 0
 -
 DSCF1942.jpg2.4 KB · Views: 0
 -
 DSCF1943.jpg2.8 KB · Views: 0
 -
 DSCF1944.jpg2.5 KB · Views: 0
 -
 DSCF1945.jpg2.8 KB · Views: 0
 -
 DSCF1946.jpg2.1 KB · Views: 0
 -
 DSCF1947.jpg2.7 KB · Views: 0
 -
 DSCF1948.jpg2.7 KB · Views: 0
 -
 DSCF1949.jpg2.9 KB · Views: 0
By carpets, do you mean wallpaper lol. This is looking superb mate, I am really envious of this build, the detailing is sublime. Just one thing to add to the roofs, on the main roof add some moss growth, can be achieved via painting, also also maybe some just on the guttering, inside and lip. The porch roof needs some flashing from roof line to brickwork.
I really love how this is turning out Richi, top build.
Si")
I really love how this is turning out Richi, top build.
Si
Thanks Si,
yep i will put those ideas in to reality.
but what do you mean by
"The porch roof needs some flashing from roof line to brickwork". do you mean a clear separation of those 2 there is a small paper piece between the wall and the porch roof (if you mean the roof on the right side) that represents lead that has to be painted yet. when you do, i think thats the separation we need don't you?
Thanks
Cheers Richi
G
Guest
Guest
Excellent work Richi, I keep coming back to your pics, so much to see and look at.
Keep up the good work buddy.
Tom
Keep up the good work buddy.
Tom
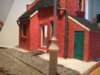
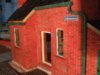
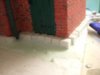
In the above two images where the tiled roof meets the red brickwork you would have had a layer of led flashing. This would be installed into the brickwork mortar and then over the top of the first row of roof tiles, this is to stop water egress. You can replicate this by smoothing off the line the bricks just above the roof and then painting in lead colour. Dose that make any sense?
Si
Si
Hi Si,\ said:In the above two images where the tiled roof meets the red brickwork you would have had a layer of led flashing. This would be installed into the brickwork mortar and then over the top of the first row of roof tiles, this is to stop water egress. You can replicate this by smoothing off the line the bricks just above the roof and then painting in lead colour. Dose that make any sense?
Si
yes i know exactly what you mean, just edited my text from the question i asked you because it was not very clear lots of misspelled words, it should have been saying
"there is a small paper piece between the wall and the porch roof (if you mean the roof on the right side) that represents led (lead) that has to be painted yet. when you do, i think thats the separation we need don't you?"
But it is good to know that we are at the same page Si
") ,
,Thanks
Cheers Richi
Hi you all,
here is a mini update
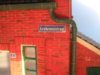
Just made some street names with Coral Draw (my favorite drawing program) and put some on the house. It needs some weathering but that can wait. Now I am working on a fence for the house a small one.
Here are the pictures.
View attachment 72850
View attachment 72851
View attachment 72852
View attachment 72853
View attachment 72854
View attachment 72855
View attachment 72856
View attachment 72857
View attachment 72858
Cheers Richi
Ps. If someone is interested in the Street names file just say so and I send them or if Ian is reading this, I got a lot of self-made printies (NOT COPIES) for 1/35 scale that I would share with u all but I couldn’t find a download section in the forum. I could make the files in CDR format or in PDF.
View attachment 185873
View attachment 185874
View attachment 185875
View attachment 185876
View attachment 185877
View attachment 185878
View attachment 185879
View attachment 185880
View attachment 185881
here is a mini update
Just made some street names with Coral Draw (my favorite drawing program) and put some on the house. It needs some weathering but that can wait. Now I am working on a fence for the house a small one.
Here are the pictures.
View attachment 72850
View attachment 72851
View attachment 72852
View attachment 72853
View attachment 72854
View attachment 72855
View attachment 72856
View attachment 72857
View attachment 72858
Cheers Richi
Ps. If someone is interested in the Street names file just say so and I send them or if Ian is reading this, I got a lot of self-made printies (NOT COPIES) for 1/35 scale that I would share with u all but I couldn’t find a download section in the forum. I could make the files in CDR format or in PDF.
View attachment 185873
View attachment 185874
View attachment 185875
View attachment 185876
View attachment 185877
View attachment 185878
View attachment 185879
View attachment 185880
View attachment 185881
Attachments

That's the one Richi, couldn't see it but if it isn't painted yet then that would have been why. Nice work on those signs.\ said:Hi Si,yes i know exactly what you mean, just edited my text from the question i asked you because it was not very clear lots of misspelled words, it should have been saying
"there is a small paper piece between the wall and the porch roof (if you mean the roof on the right side) that represents led (lead) that has to be painted yet. when you do, i think thats the separation we need don't you?"
But it is good to know that we are at the same page Si
Thanks
Cheers Richi
Si
Hello Guy’s and Girls
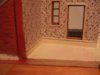
Here’s a little update on the Dutch house.
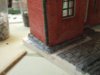
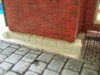
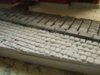
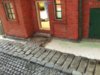
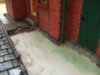
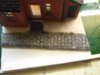
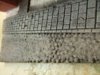
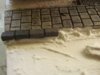
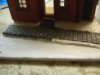
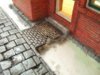
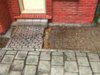
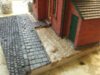
First of all I removed my cobblestone beans road wasn’t that happy about it. Have to practice on that one.
I had a positive form of a road piece I made from depron a while ago so I went with that, much happier now.
Put the new bottom stones for the house in place, and gave it a gray base tone.
So here are the pictures
View attachment 73109
View attachment 73110
View attachment 73111
View attachment 73112
View attachment 73113
View attachment 73114
View attachment 73115
View attachment 73116
View attachment 73117
View attachment 73118
View attachment 73119
View attachment 73120
View attachment 73121
View attachment 73122
View attachment 73123
View attachment 73124
View attachment 73125
View attachment 73126
View attachment 73127
View attachment 186132
View attachment 186133
View attachment 186134
View attachment 186135
View attachment 186136
View attachment 186137
View attachment 186138
View attachment 186139
View attachment 186140
View attachment 186141
View attachment 186142
View attachment 186143
View attachment 186144
View attachment 186145
View attachment 186146
View attachment 186147
View attachment 186148
View attachment 186149
View attachment 186150
Here’s a little update on the Dutch house.
First of all I removed my cobblestone beans road wasn’t that happy about it. Have to practice on that one.
I had a positive form of a road piece I made from depron a while ago so I went with that, much happier now.
Put the new bottom stones for the house in place, and gave it a gray base tone.
So here are the pictures
View attachment 73109
View attachment 73110
View attachment 73111
View attachment 73112
View attachment 73113
View attachment 73114
View attachment 73115
View attachment 73116
View attachment 73117
View attachment 73118
View attachment 73119
View attachment 73120
View attachment 73121
View attachment 73122
View attachment 73123
View attachment 73124
View attachment 73125
View attachment 73126
View attachment 73127
View attachment 186132
View attachment 186133
View attachment 186134
View attachment 186135
View attachment 186136
View attachment 186137
View attachment 186138
View attachment 186139
View attachment 186140
View attachment 186141
View attachment 186142
View attachment 186143
View attachment 186144
View attachment 186145
View attachment 186146
View attachment 186147
View attachment 186148
View attachment 186149
View attachment 186150
Attachments
-
 DSCF2021.jpg2.3 KB · Views: 0
 -
 DSCF2007.jpg3.2 KB · Views: 0
 -
 DSCF2008.jpg2 KB · Views: 0
 -
 DSCF2009.jpg2.7 KB · Views: 0
 -
 DSCF2010.jpg2.5 KB · Views: 0
 -
 DSCF2011.jpg2.6 KB · Views: 0
 -
 DSCF2012.jpg3 KB · Views: 0
 -
 DSCF2014.jpg2.9 KB · Views: 0
 -
 DSCF2015.jpg3 KB · Views: 0
 -
 DSCF2016.jpg2.3 KB · Views: 0
 -
 DSCF2004.jpg2.3 KB · Views: 0
 -
 DSCF2003.jpg2.6 KB · Views: 0
 -
 DSCF1990.jpg2.8 KB · Views: 0
 -
 DSCF1992.jpg2.6 KB · Views: 0
 -
 DSCF1994.jpg2 KB · Views: 0
 -
 DSCF1995.jpg2.7 KB · Views: 0
 -
 DSCF1996.jpg2.4 KB · Views: 0
 -
 DSCF1999.jpg2.4 KB · Views: 0
 -
 DSCF2017.jpg3.1 KB · Views: 0
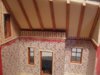
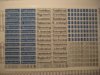
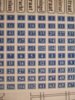
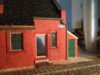
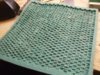
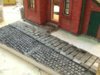
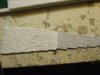
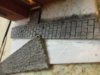
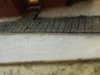
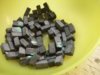
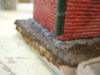
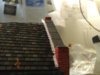
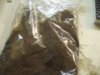
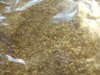
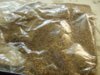
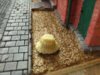
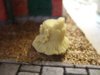
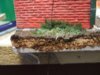
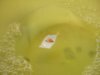
Then I went on with some ground work around the house.
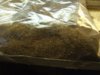
First I put on some bright brown sand diluted with white glue and let it dry overnight.
Then I put a dark earth over it also with glue and that’s drying at the moment.
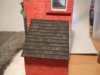
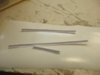
Put some of the same stuff on the roof which I will paint green later on so it would resemble moss
And I put some paper stripes on the roof there were the led (lead) would be, that’s also drying at the moment.
And here are the pictures
View attachment 73128
View attachment 73129
View attachment 73130
View attachment 73131
View attachment 73132
View attachment 73133
View attachment 73134
View attachment 73135
View attachment 73136
View attachment 73137
View attachment 73138
View attachment 73139
View attachment 73140
View attachment 73141
View attachment 73142
View attachment 73143
Cheers Richi
View attachment 186151
View attachment 186152
View attachment 186153
View attachment 186154
View attachment 186155
View attachment 186156
View attachment 186157
View attachment 186158
View attachment 186159
View attachment 186160
View attachment 186161
View attachment 186162
View attachment 186163
View attachment 186164
View attachment 186165
View attachment 186166
First I put on some bright brown sand diluted with white glue and let it dry overnight.
Then I put a dark earth over it also with glue and that’s drying at the moment.
Put some of the same stuff on the roof which I will paint green later on so it would resemble moss
And I put some paper stripes on the roof there were the led (lead) would be, that’s also drying at the moment.
And here are the pictures
View attachment 73128
View attachment 73129
View attachment 73130
View attachment 73131
View attachment 73132
View attachment 73133
View attachment 73134
View attachment 73135
View attachment 73136
View attachment 73137
View attachment 73138
View attachment 73139
View attachment 73140
View attachment 73141
View attachment 73142
View attachment 73143
Cheers Richi
View attachment 186151
View attachment 186152
View attachment 186153
View attachment 186154
View attachment 186155
View attachment 186156
View attachment 186157
View attachment 186158
View attachment 186159
View attachment 186160
View attachment 186161
View attachment 186162
View attachment 186163
View attachment 186164
View attachment 186165
View attachment 186166
Attachments
-
 DSCF2042.jpg2.5 KB · Views: 0
 -
 DSCF2043.jpg3.2 KB · Views: 0
 -
 DSCF2044.jpg1.7 KB · Views: 0
 -
 DSCF2045.jpg2.5 KB · Views: 0
 -
 DSCF2047.jpg3.4 KB · Views: 0
 -
 DSCF2041.jpg2.8 KB · Views: 0
 -
 DSCF2040.jpg3 KB · Views: 0
 -
 DSCF2022.jpg2.4 KB · Views: 0
 -
 DSCF2023.jpg2.5 KB · Views: 0
 -
 DSCF2024.jpg2.9 KB · Views: 0
 -
 DSCF2025.jpg3 KB · Views: 0
 -
 DSCF2026.jpg2.3 KB · Views: 0
 -
 DSCF2027.jpg2.8 KB · Views: 0
 -
 DSCF2029.jpg3 KB · Views: 0
 -
 DSCF2031.jpg3.1 KB · Views: 0
 -
 DSCF2038.jpg2.6 KB · Views: 0
Looking superb Richi. I am sorry but this piece for practice is a load of tosh mate, it is turning into a master class in scratch building of a building. Superb skills and superb pictures, this has to be a real help to others wanting to try something like this.
Si
Si
Hi all,
Thanks Si, and yes I will use it for a little Diorama.
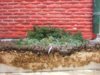
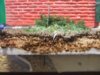
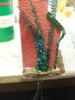
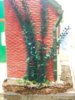
quick update while my groundwork is still wet, I started to put some of the ivy in place so it could dry together with the groundwork’s.
First I build up the back a little with the different sorts of moss, then I took an injection needle because its hollow, I put the needle true the ground work and put a ivy in it so I can pull the ivy true the bottom after that I did the same with the rest of the ivy. Now I have to wait until it is all dried up.
Here are some pictures
View attachment 73146
View attachment 73147
View attachment 73148
View attachment 73149
View attachment 73150
View attachment 73151
View attachment 73152
View attachment 73153
View attachment 73154
View attachment 73155
View attachment 73156
View attachment 73157
View attachment 73158
Cheers Richi
View attachment 186169
View attachment 186170
View attachment 186171
View attachment 186172
View attachment 186173
View attachment 186174
View attachment 186175
View attachment 186176
View attachment 186177
View attachment 186178
View attachment 186179
View attachment 186180
View attachment 186181
Thanks Si, and yes I will use it for a little Diorama.
quick update while my groundwork is still wet, I started to put some of the ivy in place so it could dry together with the groundwork’s.
First I build up the back a little with the different sorts of moss, then I took an injection needle because its hollow, I put the needle true the ground work and put a ivy in it so I can pull the ivy true the bottom after that I did the same with the rest of the ivy. Now I have to wait until it is all dried up.
Here are some pictures
View attachment 73146
View attachment 73147
View attachment 73148
View attachment 73149
View attachment 73150
View attachment 73151
View attachment 73152
View attachment 73153
View attachment 73154
View attachment 73155
View attachment 73156
View attachment 73157
View attachment 73158
Cheers Richi
View attachment 186169
View attachment 186170
View attachment 186171
View attachment 186172
View attachment 186173
View attachment 186174
View attachment 186175
View attachment 186176
View attachment 186177
View attachment 186178
View attachment 186179
View attachment 186180
View attachment 186181
Attachments
-
 DSCF2051.jpg2.8 KB · Views: 0
 -
 DSCF2052.jpg2.5 KB · Views: 0
 -
 DSCF2053.jpg2.6 KB · Views: 0
 -
 DSCF2054.jpg2.8 KB · Views: 0
 -
 DSCF2055.jpg2.9 KB · Views: 0
 -
 DSCF2056.jpg3.1 KB · Views: 0
 -
 DSCF2057.jpg3 KB · Views: 0
 -
 DSCF2058.jpg2.8 KB · Views: 0
 -
 DSCF2060.jpg3 KB · Views: 0
 -
 DSCF2061.jpg3 KB · Views: 0
 -
 DSCF2064.jpg2.8 KB · Views: 0
 -
 DSCF2065.jpg3.1 KB · Views: 0
 -
 DSCF2066.jpg2.6 KB · Views: 0
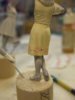
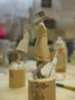
Hi everyone,
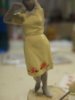
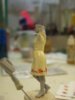
so I don’t know if its right to put my woman up for display in this thread ,
,
but I am gone do it anyway since she would find a place in this diorama.
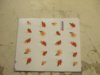
Well I started with a light sandy color then started to search for the right size of finger nail tattoos,
I used some warm water with some soap in it to break the water, and then I put on some of the micro set were I want to put the decal.
After applying all the decals I used the Micro sol to seal the decals.
Then I started to make some shadows and highlight and most of all trying to blend the decals in.
Well here is the result of the clothes flesh has to be painted yet.
View attachment 73166
View attachment 73167
View attachment 73168
View attachment 73169
View attachment 73170
View attachment 73171
View attachment 73172
View attachment 73173
View attachment 73174
View attachment 73175
View attachment 73176
View attachment 73177
Cheers Richi
View attachment 186189
View attachment 186190
View attachment 186191
View attachment 186192
View attachment 186193
View attachment 186194
View attachment 186195
View attachment 186196
View attachment 186197
View attachment 186198
View attachment 186199
View attachment 186200
so I don’t know if its right to put my woman up for display in this thread
,but I am gone do it anyway since she would find a place in this diorama.
Well I started with a light sandy color then started to search for the right size of finger nail tattoos,
I used some warm water with some soap in it to break the water, and then I put on some of the micro set were I want to put the decal.
After applying all the decals I used the Micro sol to seal the decals.
Then I started to make some shadows and highlight and most of all trying to blend the decals in.
Well here is the result of the clothes flesh has to be painted yet.
View attachment 73166
View attachment 73167
View attachment 73168
View attachment 73169
View attachment 73170
View attachment 73171
View attachment 73172
View attachment 73173
View attachment 73174
View attachment 73175
View attachment 73176
View attachment 73177
Cheers Richi
View attachment 186189
View attachment 186190
View attachment 186191
View attachment 186192
View attachment 186193
View attachment 186194
View attachment 186195
View attachment 186196
View attachment 186197
View attachment 186198
View attachment 186199
View attachment 186200
Attachments
-
 DSCF2081.jpg1.4 KB · Views: 0
 -
 DSCF2082.jpg2 KB · Views: 0
 -
 DSCF2083.jpg2.3 KB · Views: 0
 -
 DSCF2092.jpg2.1 KB · Views: 0
 -
 DSCF2093.jpg2.2 KB · Views: 0
 -
 DSCF2095.jpg2.3 KB · Views: 0
 -
 DSCF2097.jpg2.1 KB · Views: 0
 -
 DSCF2103.jpg2 KB · Views: 0
 -
 DSCF2080.jpg1.8 KB · Views: 0
 -
 DSCF2079.jpg2 KB · Views: 0
 -
 DSCF2068.jpg2.4 KB · Views: 0
 -
 DSCF2078.jpg1.9 KB · Views: 0
wow Richard that is very impressive indeed all i can say is omg fantastic build ,
i would real like to know how you got the scale right for the plans and all the floor
and roof beans and so on ,you have put in so much useful info as well, thank you
very much ,its a great help for me.
would it be possible to ask for a printable copy of the planes and dimension ?
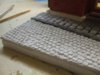
and how did you do the brick work im so impressed
how did you set the mortar in, the way i did it was to paint it in the lines and
let sit for about 3o secs or so then wipe it off ?
cheers
you should go have a pint you earn t it
fantastic build ,i would real like to know how you got the scale right for the plans and all the floor
and roof beans and so on ,you have put in so much useful info as well, thank you
very much ,its a great help for me.
would it be possible to ask for a printable copy of the planes and dimension ?
and how did you do the brick work im so impressed
how did you set the mortar in, the way i did it was to paint it in the lines and
let sit for about 3o secs or so then wipe it off ?
cheers
you should go have a pint you earn t it
Thanks Moni,
ok so I will work on your wish list,
1. The plans lots of Research ;-), no I didn’t, as I was younger I used to build real houses for a living before I became a soldier so i hat some inside knowledge.
I took some overall dimensions of some Miniart boxes like your street diorama for instance and used this for drawing the pieces of the house in Corel Draw and then printed them on normal A4 paper.
I will try to make a pdf file then you can print it on A4 paper and you can measure the sizes if you want.
ok i think it works with the pdf.
more to come, need some time to get some measurements the wooden beams.
I will make a how to, (my way) on the brick walls
View attachment 73178
View attachment 73179
View attachment 186201
View attachment 186202
Attachments
- Status
- Not open for further replies.
Legal Notice
scalemodelling.co.uk is a privately operated online discussion forum. All content posted by members reflects their own views and opinions and does not necessarily represent those of the forum owners or administrators. While reasonable efforts are made to moderate content, no responsibility is accepted for user-generated material. By using this site, you agree to comply with UK law and the forum rules.