Theme editor

Scale Model Shop

Dave Ward's 1/48 Revell/ICM Mig-25 RBT Foxbat 'B'

Status
Not open for further replies.

Dave Ward

New member
Joined
Apr 27, 2018
Messages
10,549
Reaction score
43
Points
0
1/3
Thread owner
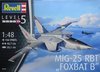
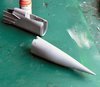
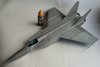
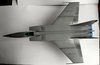
As my Zvezda MSTA-S is fast approaching a finish, I'm gearing up for this big single-seater
View attachment 313518
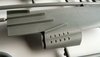
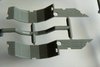
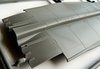
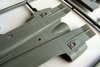
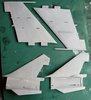
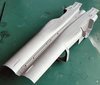
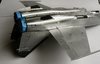
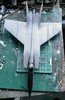
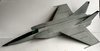
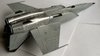
The model sprues are crisp, totally free of flash, and look well detailed. ICM models are usually well engineered, and with well fitting parts.
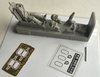
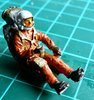
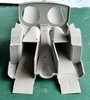
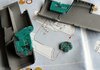
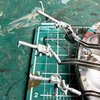
I'm not doing this quite OOB, as I have a Aerobonus pilot and seat to furnish the cockpitView attachment 313516
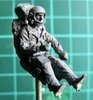
I actually assembled him, tonight & primed him...................View attachment 313517
I've left off the visor for painting, and I might just add the rudder pedals to his feet, so things line up.
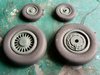
I've been wanting to get this on the bench for quite a while, I've read various reviews, and the majority are favourable ( OK, no PE, flattened tyres - but I can live with that! ). I do have some ICM Russian runway slabs, so a base might materialise......
Construction will start shortly
Dave
 

Attachments

  • mig-25 pilot 01.jpg
    mig-25 pilot 01.jpg
    2.7 KB · Views: 0
  • mig-25 pilot.jpg
    mig-25 pilot.jpg
    3.8 KB · Views: 0
  • revell foxbat b.jpg
    revell foxbat b.jpg
    3 KB · Views: 0
Looking forward to seeing this big beast Dave! Ive heard a lot of good things about this too ,cheers tony
 
Thread owner
Just a few detail shots........................
All recessed detail, top & bottom fuselage
View attachment 313674View attachment 313675
Detail in the wheel wells
View attachment 313673
Wing, with separate ailerons & flaps
View attachment 313672
The front fuselage is in multi parts - careful seam lines will be the order of the day
View attachment 313671
The underbelly fuel tank ( I wouldn't call it a drop tank ) is LARGE
View attachment 313670

For such a large model, it's comparatively simple, not that many parts really. ICM models usually are well engineered, and parts fit well, so looking forward to this
Construction will start shortly
Dave
 

Attachments

  • detail 01.jpg
    detail 01.jpg
    1.4 KB · Views: 0
  • detail 02.jpg
    detail 02.jpg
    1.9 KB · Views: 0
  • detail 03.jpg
    detail 03.jpg
    1.8 KB · Views: 0
  • detail 04.jpg
    detail 04.jpg
    2.2 KB · Views: 0
  • detail 05.jpg
    detail 05.jpg
    2.4 KB · Views: 0
  • detail 06.jpg
    detail 06.jpg
    2.6 KB · Views: 0
Thread owner
Construction started - nothing exciting, there a fair few parts that are in halves - nose, wings, tail, wheels, engine intakes, burner tubes - all very mundane, but need doing before I can proceed.
Pilot in the process of being painted - I'm not a figure painter, and a fair bit of tweaking & retouching will be needed before Ivan is ready to take his place...
View attachment 313809Oh dear, he looks bad in close up! :disappointed2:
Dave
 

Attachments

  • P1050401.JPG
    P1050401.JPG
    4.3 KB · Views: 0
Looks a very nice kit Dave, I'm sure once Ivan is sat in the tub he'll look just fine and dandy.
 
Dave .
Why oh why we worry about these photos taken at zero distance, when the completed build will be seen from at least 18 in, but we do.:smiling2:
More important is did you get it for a good price !
John.
 
Thread owner
John,
you're quite right! Anyway, the pilot sits deep in the cockpit, and the small canopy has rather heavy framing..................
I think that I bought the pilot, as an add on to another order ( flat rate postage! ), so I did get it at a good price.
Dave
 
Thread owner
Construction well under way the fuselage is essentially a 4 sided box - it's big! The u/c bays are added, and the inlet trunking for the two massive engines, and a former for the rear fuselage
View attachment 313950View attachment 313951View attachment 313952
The wings and tails - the sprue ingates are nicely spaced, and not oversized - easily cleaned upView attachment 313954
Forward fuselage and the camera nose
View attachment 313949
The huge belly tank and engine tubes
View attachment 313953
There are afterburner rings in the engines........................
View attachment 313948
Whether you will see them or not, I'll have to wait & see.
So far, the fit of the parts has been very good, and the instructions are clear. I'll have to make good a few seams ( like the belly tank ), and start priming the internals, but the way this has gone together, it may be quite a quick build!
Dave
 

Attachments

  • wings & tails.jpg
    wings & tails.jpg
    3.4 KB · Views: 0
  • tank & engines.jpg
    tank & engines.jpg
    3.4 KB · Views: 0
  • lower f 03.jpg
    lower f 03.jpg
    3.1 KB · Views: 0
  • afterburners.jpg
    afterburners.jpg
    2.6 KB · Views: 0
  • forward fuselage.jpg
    forward fuselage.jpg
    2.7 KB · Views: 0
  • lower f 01.jpg
    lower f 01.jpg
    2.8 KB · Views: 0
  • lower f 02.jpg
    lower f 02.jpg
    3.3 KB · Views: 0
Nice start Dave, looking forward to see it coming together.
Very nice panel lines and riverts, will be great looking in the weathering stage me thinks.:thumb2:
 
Thread owner
I've primed the wheelwells & sprayed them aluminium, the same for the air intakes ( though they will be invisible ) Sides of the fuselage added, it would be an advantage to have been an octopus, to hold these when drying!
View attachment 314033View attachment 314034
Cockpit painted in the turquoise favoured by Russian flyers, and instrument panel decals added
View attachment 314032
The decals will snug down overnight, and I'll seal all with varnish before assembling. The instructions give a nose weight of 25g, but there's enough room in the nose for many times that, in ball bearings
Dave
 

Attachments

  • cockpit decals.jpg
    cockpit decals.jpg
    2.9 KB · Views: 0
  • lower f 04.jpg
    lower f 04.jpg
    1.7 KB · Views: 0
  • lower f 05.jpg
    lower f 05.jpg
    1.5 KB · Views: 0
That looks great, can't wait for the next update, looking at the belly tank this could be a huge model
 
Thread owner
Fuselage boxed in, and tails added the fit was again very good, I might need a smear of filler on the on the lower cockpit/fuselage join, but that is all.....................did I mention that this is big?
Wings & camera nose dry fitted
View attachment 314125
At times like this, it makes you glad to have an airbrush. Using a hairy stick on something this big would take a long time, and getting an even finish would be a real trial. I'm going to leave the fuselage to really dry overnight, before fixing the wings, as the joint line on the 'shoulder' really needs to be secure - I might add some drops of CA to really make it tight
Dave
 

Attachments

  • dry fit bits.jpg
    dry fit bits.jpg
    1.8 KB · Views: 0
Thread owner
The instructions indicate 25g of weight as ballast. Instead of my normal load of ball bearings, I used 9 X 1p coins ( best use I have made of these! ) I rolled them in silver foil, and fastened into the nose with 5-Minute epoxyView attachment 314182

Undercarriage legs assembled, and painted, I'll leave these off until I've painted & masked the exterior.
View attachment 314183
Wheels - the 2 main wheels are the largest I've ever fitted to an aircraft!
View attachment 314184

I'm going to have a think about the masking, there are 3 main colours - grey, aluminium, and gunmetal, and the order in which I do them needs consideration................
Dave
 

Attachments

  • ballast.jpg
    ballast.jpg
    3.5 KB · Views: 0
  • u-c legs.jpg
    u-c legs.jpg
    4.8 KB · Views: 0
  • wheels.jpg
    wheels.jpg
    3.2 KB · Views: 0
Looking very nice Dave, like the office a lot.:thumb2:
Good luck with the final assembly and paint work.
 
Thread owner
Wings and nose finally added, the nose joint needs a bit of filler to blend in nicely. The elevators will be left off at the moment - they'll get in the way of the painting.View attachment 314264
The model is a little too big for taking decent pictures on the work bench! I'll have to clear stuff away to get final pictures!
I sprayed the rear underside & sides with Vallejo Metal Color AluminiumView attachment 314265

I hope that masking over the ally paint will be OK. Dielectric panels painted dark grey, ready to be masked.
That BIG fuel tank, also sprayed with Vallejo Aluminium
View attachment 314263
Now that the nose & wings have been added, you can appreciate what a big brute of an aircraft this really is
Dave
 

Attachments

  • fuel tank.jpg
    fuel tank.jpg
    1.6 KB · Views: 0
  • topside assy.jpg
    topside assy.jpg
    2 KB · Views: 0
  • underside ally.jpg
    underside ally.jpg
    2.1 KB · Views: 0
Thread owner
I spent most of the morning carefully masking the aluminium panels etc, and stuffing paper tissues into the engine inlets & exhausts & wheelbays. I primed overall, then painted the anti glare panel black. I did a partial spray of the upper surfaces, to see how the paint covers
View attachment 314445
I'm using Vallejo Model Air 339 - Russian AF grey No.3 - it's one of those paints that has a big tone change as it dries. Next will be masking the anti-glare panel & completing the grey basecoat.
Dave
 

Attachments

  • top first coats.jpg
    top first coats.jpg
    3 KB · Views: 0
Thread owner
Basecoat applied, and all the masking removed. A little bit of bleeding, and paint has lifted in a few places, so touch up will be needed, otherwise, not bad.
View attachment 314487View attachment 314488
Next up will be the gunmetal section at the rear of the fuselage. Note: The grey on the tail fins IS asymmetrical! Getting towards a finish, not many bits left in the box..............
Dave
 

Attachments

  • basecoat 01.jpg
    basecoat 01.jpg
    1.8 KB · Views: 0
  • basecoat 02.jpg
    basecoat 02.jpg
    1.9 KB · Views: 0
Status
Not open for further replies.
Back
Top