Theme editor

Scale Model Shop

Dave Ward's 1/48 Trumpeter JF-17 Thunder

Status
Not open for further replies.

Dave Ward

New member
Joined
Apr 27, 2018
Messages
10,549
Reaction score
43
Points
0
1/3
Thread owner
This has caught my eye, don't know why - but it somehow appeals to me
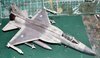
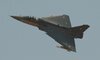
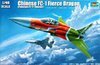
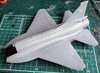
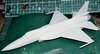
It's a cross between a Mig-21 and a F-16, developed as a joint venture between China & Pakistan. The Chinese don't use it, but Pakistan has over 100 already in service, and Myanmar & Nigeria are buying.View attachment 319910
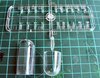
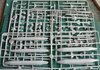
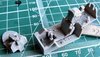
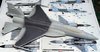
The usual Trumpeter box, and full of bits - but wait - 3 of those sprues are fuel tanks, pylons and weapons!View attachment 319904
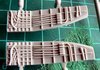
12 air to air missiles to fit on four stations,and 3 fuel tanks Sidewinder clones, and Sparrow lookalikes and some odd configuration ones.
The tub is basic - an advantage of 'glass' cockpits is that decals work well
View attachment 319906
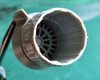
The wheelwells are nicely detailed - how much will be seen is moot.
View attachment 319908View attachment 319909

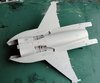
The fuselage is split top & bottom, nice engraved details
View attachment 319907
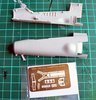
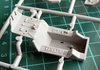
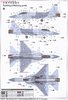
The nose is split side to side. A small PE fret give harness, HUD & mirrorsView attachment 319903
Good clear canopy & lights, seeker heads etcView attachment 319901
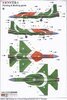
Decal sheet for 3 versions - A Chinese demonstrator, A garish red/white/green Pakistani version, and a Pakistani two-tone grey ( the version I'm going to do ). Another smaller decal sheet provides stencil data for the missilesView attachment 319902

I certainly can't remember having made a Pakistani marked airplane before, so this is a first for me
Construction will start shortly.........
Dave
 

Attachments

  • clear bits.jpg
    clear bits.jpg
    3.7 KB · Views: 0
  • decals.jpg
    decals.jpg
    3.8 KB · Views: 0
  • nose & PE.jpg
    nose & PE.jpg
    4.1 KB · Views: 0
  • tanks & weapons.jpg
    tanks & weapons.jpg
    4 KB · Views: 0
  • tub.jpg
    tub.jpg
    3.4 KB · Views: 0
  • upper.jpg
    upper.jpg
    3.4 KB · Views: 0
  • wheelwell 01.jpg
    wheelwell 01.jpg
    2.8 KB · Views: 0
  • wheelwell 02.jpg
    wheelwell 02.jpg
    3.6 KB · Views: 0
  • trumpy jf-17 thunder.jpg
    trumpy jf-17 thunder.jpg
    3.4 KB · Views: 0
A nice kit and unusual subject. Hope the fit is OK.

Pete
 
Thread owner
Finally managed some benchtime - joining all the fuel tanks halves, putting fins on missiles, weighted wheel bits. The\multi-part wheelwells added to the lower fuselage, and the top added..................
View attachment 320137
Nearly forgot to open up the pylon mount holes - when in doubt, read the instructions. Really good fit - there are one piece separate slats, flaps & ailerons, minimal clean up after assembly.
The engine nozzle - looks rather crude & clunky compared to the F-16 & later US jets. There is an afterburner ring, just visible....View attachment 320138
I can see that the major join will be the front cockpit sides to the fuselage, - all the other seams/joints are minimal or covered by later bits - looks like it will be a pretty quick build. Next up will be the cockpit tub & the ejector seat ( Martin Baker PK16 )
Dave
 

Attachments

  • P1050551.JPG
    P1050551.JPG
    2.9 KB · Views: 0
  • P1050554.JPG
    P1050554.JPG
    2.6 KB · Views: 0
An interesting looking aircraft, if the Pakistani red and green scheme is the one on the box art I see what you mean by “garish”
 
Thread owner
Cockpit tub & ejector seat assembled - now awaits the PE harness.......View attachment 320216

As I thought, the rest of the fuselage went together easily & quickly, a minimum of clean up - fit very good!View attachment 320217
Dave
 

Attachments

  • main fuselage.jpg
    main fuselage.jpg
    3.2 KB · Views: 0
  • cockpit.jpg
    cockpit.jpg
    3.3 KB · Views: 0
Interesting one Dave, great looking progress and nice to see that the parts fit very good.:thumb2:
 
Thread owner
Further progress, the forward fuselage joined - with the cockpit tub & nose wheelwell sandwiched between them. I must admit I was sceptical about the joint between this and the main fuselage - I didn't see how it could line up. With a little wiggling and twisting for a dry fit, it clicked into place so well that I didn't dare take it apart. A little TET wicked into the joints, job doneView attachment 320409View attachment 320410
The joint is spot on! I'll have to clean up the joint between the nose halves ( not much at all ), and that is the major construction finished, and I can think of paint. I'll leave the nosecone off for the moment, just in case I need to add some weights.
The fit of this model has been outstanding, and has needed little edge preparation, or tweaking - very impressive!
Dave
 

Attachments

  • topside.jpg
    topside.jpg
    3 KB · Views: 0
  • underside.jpg
    underside.jpg
    3.4 KB · Views: 0
Thread owner
I decided I'd better add weights to the nosecone, so I epoxied in some ball bearings, before adding it to the rest of the fuselage. Masked up the canopy, then stuck it on using white PVA, so I can remove it later. Out with the airbrush, and a basecoat appliedView attachment 320549
I pawed through my assortment of light grey paints, to find something that looked right - and used Mission Models Light Gull Grey. It'll darken down a bit when I gloss coat it - pre wash. No weathering on this, all photographs I've seen, have been immaculate. I have a dark grey patch to apply over the light grey - time to look at my dark(er) grey selection.........
Dave
 

Attachments

  • basecoated.jpg
    basecoated.jpg
    2.5 KB · Views: 0
Thread owner
Grey patch added, top and bottom.................View attachment 320636
I used MiG Ammo Medium Gunship Grey. Despite all my care, I managed some overspray, and to knock off one of the underside aerials - I'll have to touch up the Gull Grey in a few places.
Dave
 

Attachments

  • patch.jpg
    patch.jpg
    2.7 KB · Views: 0
That looks very dark grey to me, compared to the instructions (which, of course, can be highly misleading). However, if I look for photos of the real thing, I find this:

Pakistan_JF-17_%28modified%29.jpg


It’s your model, of course, but I think I’d consider overspraying it with the basic grey you used to see if that brings it closer to the contrast between the colours in that photo :)
 
Thread owner
Yup,
that Medium Grey was a bit over the top! I'll have another go tomorrow morning! :sad:
Dave
 
Thread owner
This has turned out to be a bit of a struggle - I decided to overspray the Ammo Gunship Grey with the Mission Models Light Gull Grey, darkened with a few drops of the Gunship Grey.
The paints didn't mix well - then when I sprayed, the airbrush began to choke. That wasn't the worst of it - when the paint dried, it had separated to light grey, with dark grey patches. Much cursing!!!. I left it for a day, then oversprayed again, with the Mission Models Gull Grey, this time darkened with Vallejo Neutral grey. It sprayed a little better, but the airbrush was still struggling. This time, the paint dried fairly evenly, so I decided to leave well alone!View attachment 320867
I only have the one bottle of Mission Models paint, so I'm not sure about the compatibility of different colours with other makers acrylics. Since I have loads of bottles of Vallejo, AK, Hataka & Mig paint, and never had any problems mixing them, then I'm afraid that I won't be buying any more Mission Models paint. It maybe just me, but there are loads of other alternatives.
I spent ages cleaning my airbrushes, as rather stupidly, I thought it might just be a problem with one. I ended up with both choked * sigh *
Dave
 

Attachments

  • topside mk 6.jpg
    topside mk 6.jpg
    2.6 KB · Views: 0
Thread owner
After a few days away from the bench, on with the decals - I'm not going to apply the stencil data - the contrast between the paint and the decals is very little - I've applied one or two, and they have disappeared!
View attachment 321150
When I put the ejector seat in the cockpit, the canopy would not fit, the seat was too high. I trimmed about 2mm off the bottom, and the canopy now fits snugly. I can't see where I fit, or assembled anything wrongly, just one of those things!
Gloss coat next, then panel wash. I'm doing this before I add the weapons & pylons, for easy access.
Dave
 

Attachments

  • decals.jpg
    decals.jpg
    1.9 KB · Views: 0
Thread owner
I'm afraid to say that's it, as far as the Thunder is concernedView attachment 321738View attachment 321739
I've been struggling to finish this, but I've given up. I've had a few health issues, and at the moment I can't keep my hands from shaking ( no, it's not the DT's! ). I've got some new medication, but it might take a while before the doseage is correct. So, no more benchtime for the moment!
I'm still going to keep my 'spots on the internet' moving, and will keep abreast of what's going on.
Dave :sad-face:
 

Attachments

  • fin 01.jpg
    fin 01.jpg
    2.4 KB · Views: 0
  • fin 02.jpg
    fin 02.jpg
    2.8 KB · Views: 0
at the moment I can't keep my hands from shaking
I can say from experience that that’s not helpful for building models, no, but it should pass I suppose :) In my case, I was told to stop using medication I had been taking, and one of the results of that was hands that shook just a little, but too much to do any modelling. After a couple of days the withdrawal symptoms went away and I could build models again — but never did finish the one I was working on at the time :)
 
Sorry to hear about the hands issue Dave, hope that the dosage with the meds is quickly found and all works out...
Oh nice result on the Thunder.:thumb2:
 
Thread owner
Thanks, fellers!
It looks OK from a distance, but there are a load of bits missing, the ( tiny ) torque links on the undercarriage legs, HUD lenses, sensor probes, the IR heads on the missiles, all little bits I can't cope with at the moment.
It's a nice model, very good fit. Pretty obscure in the West!
The tensions between Pakistan and India are driving some pretty advanced aircraft
i.e. the Indian HAL Tejas
View attachment 321785View attachment 321786
Pictures from Indian Press.
As can be seen from the bottom picture - designed to be operated from carriers, as well as land based.
Little known in the West - I've only found one model of the Tejas - a 3D printed 1/144 version!
Dave
 

Attachments

  • HAL Tejas 02.jpg
    HAL Tejas 02.jpg
    1.1 KB · Views: 0
  • HAL Tejas 03.jpg
    HAL Tejas 03.jpg
    1.6 KB · Views: 0
Status
Not open for further replies.
Back
Top