Theme editor

Scale Model Shop

Dave Ward's Meng 1/35 FT-17 & extras

Status
Not open for further replies.

Dave Ward

New member
Joined
Apr 27, 2018
Messages
10,549
Reaction score
43
Points
0
1/3
Thread owner
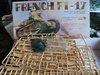
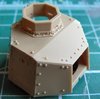
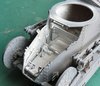
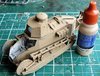
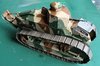
Mr Benson has already blogged a FT-17, but mine is the cheaper boxing, without engine etc, and a riveted turret.....View attachment 316437
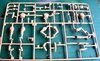
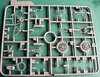
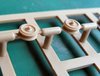
Nice mouldings - including a Hotchkiss m.g
View attachment 316435
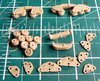
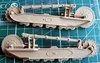
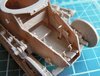
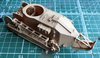
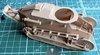
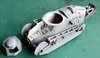
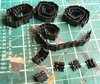
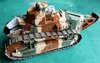
Meng went to a lot of trouble, moulding the roadwheels in one piece
View attachment 316438
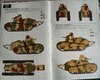
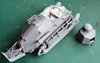
Two schemes, one American, one Chinese, neither of which I will be using
View attachment 316439
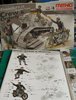
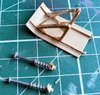
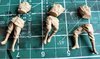
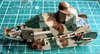
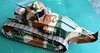
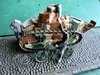
As add-ons for a small diorama....
View attachment 316433
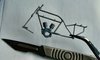
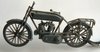
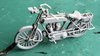
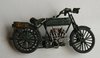
The crew figures look OK
View attachment 316434Not sure about the motorbike wheels, thoughView attachment 316436

All of this will be mounted, somehow on this cobbled street section
View attachment 316432
Construction will be starting shortly.....................
Dave
 

Attachments

  • cobbles.jpg
    cobbles.jpg
    2 KB · Views: 0
  • crew box instr.jpg
    crew box instr.jpg
    3.5 KB · Views: 0
  • crew.jpg
    crew.jpg
    3.9 KB · Views: 0
  • hotchkiss.jpg
    hotchkiss.jpg
    1.9 KB · Views: 0
  • mbike.jpg
    mbike.jpg
    4.4 KB · Views: 0
  • meng ft-17 contents.jpg
    meng ft-17 contents.jpg
    3.9 KB · Views: 0
  • roadwheels.jpg
    roadwheels.jpg
    3.3 KB · Views: 0
  • schemes.jpg
    schemes.jpg
    3.5 KB · Views: 0
Hope you enjoy the build as much as I did Dave, without the interior it goes together quite quickly:thumb2:
 
Thread owner
Finally got back to the bench - I've had a few health problems that have laid me low, but I've made a start on the FT-17. I've gone out of sequence of the instructions, and started with the suspension, as wanted it all to dry before going any further
View attachment 316781
Return rollers - each consisting of 9 plastic bits & 1 metal pin!
View attachment 316779
Road wheel bogies - all the bits at the bottom make up the two assemblies at the top ( same bits either side ).
Some of the parts had ejector pin marks that needed cleaning up, so the wheels would fit neatly View attachment 316780
Meng would have you assemble the bogies so that the roadwheels can rotate, but I cannot see any reason you would want to, it makes assembly very difficult ( & fragile ). Anyway, the wheels are fixed, but the bogie mount beams are moveable.
So far, fit has been good, but rather fiddly, due to the small pieces. I'm surprised at the clean up on parts so far, I don't associate this with Meng, at all
Dave
 

Attachments

  • bogies.jpg
    bogies.jpg
    4.7 KB · Views: 0
  • clean-up.jpg
    clean-up.jpg
    3.6 KB · Views: 0
  • return rollers.jpg
    return rollers.jpg
    3.4 KB · Views: 0
Hi Dave
Looks well detailed but more clean up needed than there should be. Sprue attachment points look a bit heavy on some pieces. If you get the motor cycle frame off in one piece you'll have done very well. You look to have made a good start.
Hope you're feeling better.
Jim
 
Thread owner
A little more holding my breath, and the left hand suspension is assembled, just a few bits of PE to be added - the right hand will have to wait until tomorrowView attachment 316795View attachment 316796
The roadwheels & bogies are hardly visible, and will become even less, when the tracks are added.
I took up my extra sharp sprue cutters, and very carefully extracted the motorbike frame
View attachment 316794
in one piece! phew - that's enough for one day - back to bed :sleeping:
Dave
 

Attachments

  • bike frame.jpg
    bike frame.jpg
    2.3 KB · Views: 0
  • lh suspension 01.jpg
    lh suspension 01.jpg
    1.9 KB · Views: 0
  • lh suspension 02.jpg
    lh suspension 02.jpg
    2 KB · Views: 0
Thread owner
Both suspension assemblies completed - not sure why the PE bits couldn't have been made of plastic.................View attachment 316856
The internals and floor pan assembled - in the top range model, there are an engine + other bits added, but detail stops at the drivers seat in mine.View attachment 316857
Other minor details prepared, the tail skid, and the main suspension springs - not sure about these 'working' springs - probably I'll make it all solidView attachment 316858
That's it for the day
Dave
 

Attachments

  • both suspensions.jpg
    both suspensions.jpg
    3.5 KB · Views: 0
  • floor pan .jpg
    floor pan .jpg
    3.1 KB · Views: 0
  • skid & springs.jpg
    skid & springs.jpg
    4.5 KB · Views: 0
Thread owner
Very good session today, the bits seemed to fly together - excellent fit & a minimum of clean up. The hull is more or less complete, the front hatches are left off, so I can paint the drivers area..................
View attachment 316906View attachment 316904View attachment 316905

The riveted turret is 8 separate flat sides - tricky little assembly to get all pieces to join the top and bottom platesView attachment 316907
The front gun mount plate is left off at the moment - I can't decide whether to use the 37mm cannon, or the Hotchkiss m.g.
I've just about reached the stage of priming - I've got a set of AK French WWI AFV colours for the final camo finish
Dave
 

Attachments

  • turet assy .jpg
    turet assy .jpg
    3.5 KB · Views: 0
  • drivers cab.jpg
    drivers cab.jpg
    3.7 KB · Views: 0
  • assembly 02.jpg
    assembly 02.jpg
    3.2 KB · Views: 0
  • assembly 01.jpg
    assembly 01.jpg
    3 KB · Views: 0
Thread owner
Last few details added, and the outside & inside primed. The interior of the turret, and the crew compartment have the white basecoat addedView attachment 317454View attachment 317455View attachment 317453
I'll have to decide which colour to use as basecoat - 'Milky Coffee' looks to be the lightest ( yes, that's what it's called ). I'm going to use the Hotchkiss m.g. in the turret - as Mr Benson used the 37mm cannon!
Dave
 

Attachments

  • inside primed.jpg
    inside primed.jpg
    3.5 KB · Views: 0
  • primed 01.jpg
    primed 01.jpg
    2.5 KB · Views: 0
  • primed 02.jpg
    primed 02.jpg
    2.4 KB · Views: 0
Thread owner
Hull and turret basecoated with 'Milky Coffee'. I'm sure that should be 'Café au lait' but that's what AK call itView attachment 317537
I'll leave this overnight to really dry, then green, and red/brown camo will be applied, by brush, as it's only a small model & masking would take more time than doing it by hand.
The tracks clip together ( some better than others ), 32 links a side, but you seem to get quite a few sparesView attachment 317539
Legs and torsos..............View attachment 317536

And, that motorbike, a real b****r to assemble - the parts are small and thin - not sure about the wheel spokes - maybe they'll look better under paint
View attachment 317538
No real problems so far, only fat fingers & tiny parts!
Dave
 

Attachments

  • bodoes.jpg
    bodoes.jpg
    3.3 KB · Views: 0
  • hull basecoated.jpg
    hull basecoated.jpg
    4 KB · Views: 0
  • mbike assy 01.jpg
    mbike assy 01.jpg
    2.3 KB · Views: 0
  • TRACKS ASSY.JPG
    TRACKS ASSY.JPG
    4.5 KB · Views: 0
Thread owner
Camouflage applied, using the hairy stick..........................View attachment 317614View attachment 317615
This version doesn't have the black lines between the colours. It all looks far too bright and clean at the moment, but that won't last!
Dave
 

Attachments

  • camo 01.jpg
    camo 01.jpg
    3.1 KB · Views: 0
  • camo 02.jpg
    camo 02.jpg
    3.2 KB · Views: 0
Thread owner
The tank is essentially finished, just the tools to add, before I start to throw dirt at it. The tracks were a good fit, 32 links a side, as per instructions - I ran liquid poly into the joints after I'd fitted them, to keep them snug.View attachment 317692View attachment 317693

The crew have been assembled - without heads, and I've started a hunt for my nearest to 'horizon bleu'. I'll probably mix up a bit - I'm not buying another paint pot, just for their trousers - anyway, I bet they were pretty dirty after bouncing around in the tank, or riding a motorbike!View attachment 317694
Isn't it amazing how primer shows up the mould lines?
Dave
 

Attachments

  • prewet 01.jpg
    prewet 01.jpg
    3 KB · Views: 0
  • prewet 02.jpg
    prewet 02.jpg
    2.7 KB · Views: 0
  • primed crew.jpg
    primed crew.jpg
    2.4 KB · Views: 0
Thread owner
I've decalled the tank - such as they are & started a bit of a wash...............
View attachment 318115
A long way to go on that!
Now, that motorbike - View attachment 318114
This is one of the fiddliest assemblies I have ever completed! 27 tiny parts - not very clear instructions, and fat fingers! I managed to get the parts off the sprue without breakage ( a miracle on it's own ). Assembling them & getting them straight ( that saddle looks wonky, now! ) was a real struggle, and it nearly ended up in the bin several times - anyway, assembled & primed
Dave
 

Attachments

  • assy mbike.jpg
    assy mbike.jpg
    2.5 KB · Views: 0
  • decalled & wash begin.jpg
    decalled & wash begin.jpg
    3.1 KB · Views: 0
Thread owner
I've managed to find the resin cobbled street section I intend to use as base ( I'd tidied it away! ). This will be the layout...........View attachment 318278
At the moment, I'm finding it difficult to sit down & paint the figures - especially the heads ( still on the sprue ). I'll have to find a way to fasten the bits down, probably stubs of wire into drilled holes. Conscious of the 11th fast approaching..........
Dave
 

Attachments

  • layout.jpg
    layout.jpg
    3.9 KB · Views: 0
Thread owner
Health issues have interfered with benchtime, but at least I have managed to finish the tank,
washes don't need concentration, or steady hands!
View attachment 318975View attachment 318976
With the nights getting longer, I'm going to have to try and move my benchtime to late morning, as opposed to afternoon. At the moment I'm not sure about finishing the figures, it'll depend on how things go in the next few days...........
Dave
 

Attachments

  • tank fin 01.jpg
    tank fin 01.jpg
    2.8 KB · Views: 0
  • tank fin 02.jpg
    tank fin 02.jpg
    2.9 KB · Views: 0
Thread owner
Sadly the figures have defeated me - my hands are just not up to face painting. It's frustrating, I know what I want to do, but, I can't get the fingers do the tiny movements I need! The tank is finished, and in the completed GB folder.
The Meng model is superb - no problems at all. The motorbike is a real pig to assemble, and the spokes are well overscale - PE would solve this.................View attachment 319198

All in all, a disappointing end to what I thought was going to be a nice diorama. It's brought home to me yet another thing I can't do now, that I could a few years ago.
Dave
 

Attachments

  • bike fin.jpg
    bike fin.jpg
    2.1 KB · Views: 0
The only good thing about getting old is that it's better than the alternative.

Pete
 
Status
Not open for further replies.
Back
Top