DH.89A Dragon Rapide in cardboard to 1/24th scale,lots of extra structure to make this a viable build,card is a challenging material and your best friend is adomestic teaspoon to manipulate the card,by using a piece of carpet underlay the card can be carefully dished out and curved,here was the build in detail.
.JPG")
The completed Rapide with lots of modifications to get it together,work slowly and tackle every problem area as you go along and believe me there are plenty !
.JPG")
.JPG")
The three best adhesives for card modelling Aliphatic resin for quick grab,UHU Por for slower drying areas,Anitas tacky PVA glue which has a really fine dispenser.
.JPG")
Make up batches of repetitive items.
.JPG")
Seat bases.
.JPG")

Flimsy parts are best glued to thin balsa sheet otherwise they are virtually impossible to assemble as the card is constantly moving,for this purpose use Solvite wallpaper overlap paste.
.JPG")
The backrests to the seats are made from balsa.
.JPG")
Square up the sides carefully.
.JPG")
These are magnetic clamps ideal for this type of model building.
.JPG")
Painting the window surrounds.
.JPG")
Touch up the seats.
.JPG")
Make up clear plastic sheet window panels.
.JPG")
Excellent adhesive for any clear cockpits or clear plastc sheet,dries crystal clear.
.JPG")
Windows and seats in place.
.JPG")
Add the upper cabin decking.
.JPG")
Cockpit parts being prepared.

.JPG")
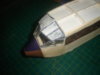
First start of the cockpit structure.
The completed Rapide with lots of modifications to get it together,work slowly and tackle every problem area as you go along and believe me there are plenty !
The three best adhesives for card modelling Aliphatic resin for quick grab,UHU Por for slower drying areas,Anitas tacky PVA glue which has a really fine dispenser.
Make up batches of repetitive items.
Seat bases.
Flimsy parts are best glued to thin balsa sheet otherwise they are virtually impossible to assemble as the card is constantly moving,for this purpose use Solvite wallpaper overlap paste.
The backrests to the seats are made from balsa.
Square up the sides carefully.
These are magnetic clamps ideal for this type of model building.
Painting the window surrounds.
Touch up the seats.
Make up clear plastic sheet window panels.
Excellent adhesive for any clear cockpits or clear plastc sheet,dries crystal clear.
Windows and seats in place.
Add the upper cabin decking.
Cockpit parts being prepared.
First start of the cockpit structure.

.JPG")
.JPG")
.JPG")
.JPG")
.JPG")
.JPG")
.JPG")
.JPG")
.JPG")
.JPG")
.JPG")
.JPG")