
You are using an out of date browser. It may not display this or other websites correctly.
You should upgrade or use an alternative browser.
You should upgrade or use an alternative browser.
Did you see them coming?
- Thread starter scottie3158
- Start date
- Status
- Not open for further replies.
- Joined
- Apr 27, 2018
- Messages
- 15,043
1/3
Steve,Keep pushing those boundaries Scottie. Your doing a great job. Very impressive.
Thanks mate with people like your good self I have to push to keep up.
- Joined
- Apr 27, 2018
- Messages
- 15,043
1/3
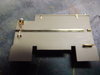
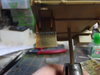
Had fun at the bench this morning removed all the detail from the front bulkhead as I decided to add a bit of detail. After it had been filed smooth I replaced the solid moulded strengthening spar with some etch sprue. The aerial tensioner was made from copper wire and evergreen sprue as the etch offering was just flat, although the brackets were used. The locker clasps were replaced and finally not sure if you can see it in the pictures a solid tube was replaced with some ally tube.
View attachment 326777
View attachment 326780
cheers
Scottie
View attachment 326777
View attachment 326780
cheers
Scottie
Attachments
- Joined
- Apr 27, 2018
- Messages
- 15,043
1/3
Paul,
Thanks mate I enjoyed it probably not 100% correct but I think it looks better than the kit or etch offerings.
Thanks mate I enjoyed it probably not 100% correct but I think it looks better than the kit or etch offerings.
- Joined
- Apr 27, 2018
- Messages
- 15,043
1/3
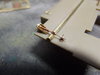
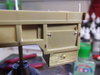
The rear of the vehicle was detailed today. The moulded on canopy supports were replaced with drilled out evergreen rod.. The tie downs were added using 0.3 copper wire. Eyelets were added to the tail gate chains from the same wire. The rest was binged up with a bit of etch, wire and foil.
I have to replace the poles this I will do tomorrow. When this is done It will be time to sort out the stowage.
View attachment 327034
View attachment 327035
View attachment 327036
View attachment 327037
View attachment 327038
all comments welcome
Scottie
I have to replace the poles this I will do tomorrow. When this is done It will be time to sort out the stowage.
View attachment 327034
View attachment 327035
View attachment 327036
View attachment 327037
View attachment 327038
all comments welcome
Scottie
Attachments
G
Guest
Guest
Paul quite stunning.love those tensioners, did you bend that pewter ?
John.
John.
- Joined
- Apr 27, 2018
- Messages
- 15,043
1/3
Thanks John, I must admit I do like how the tensioner worked out. Do you mean the pewter on the bumper?Paul quite stunning.love those tensioners, did you bend that pewter ?
John.
- Joined
- Apr 27, 2018
- Messages
- 15,043
1/3
Bob,Not sure how I missed thread before Paul, awesome work. :thumb2:
No worries it is easy to miss posts on here, but glad you found it and it meets with your approval.
G
Guest
Guest
Yes Paul.
John.
John.
- Joined
- Apr 27, 2018
- Messages
- 15,043
1/3
John,Yes Paul.
John.
The pewter was bent in the same way as normal etch using a folding tool. I normally use smooth pliers but that was a bit long for the jaws.
- Joined
- Apr 27, 2018
- Messages
- 15,043
1/3
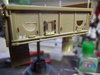
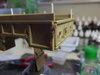
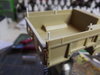
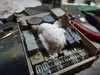
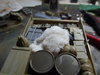
I came up with a cunning plan, cut out a template of the load area then stick the stowage to that so I could remove it to paint it. Somewhere along the process I think I have got some glue somewhere as I can't seem to get it out now:rolling:. The cam net was added using gauze soaked in diluted PVA. This has been left to dry over night. Next will be to form a tarp which wont cover all the load but probably be mostly rolled up and draped over the 45 gallon oil drums.
View attachment 327140
View attachment 327141
Scottie
View attachment 327140
View attachment 327141
Scottie
Attachments
- Joined
- Apr 27, 2018
- Messages
- 15,043
1/3
Oooohhhh, the details, the details! PaulE
Hi Paul, Thanks for looking in. The good thing about this type of vehicle is you can add pretty much what you like here you like.
You betcha. Bummer on the stuck load. Looks like barrels are upside down unless you've yet to add the bungs. Your latches, catches & hooks are just outstanding. PaulE
- Joined
- Apr 27, 2018
- Messages
- 15,043
1/3
John,You betcha. Bummer on the stuck load. Looks like barrels are upside down unless you've yet to add the bungs. Your latches, catches & hooks are just outstanding. PaulE
I haven't added to any details to the drums or filled the gaps as these will be covered with a tarp so they are there just to form the shape underneath. Glad you like the rest of the details.
G
Guest
Guest
Excellent work Paul.
Looks like it is all ready for the boys jolly to Margate now!! Just make a small space in the back to hide JR. We don't want to upset the locals:smiling5::smiling6:
Cracking build mate. Are you using Milliputt or foil for the tarp and will there be any of your famous eyelets??
Cracking build mate. Are you using Milliputt or foil for the tarp and will there be any of your famous eyelets??
- Joined
- Apr 27, 2018
- Messages
- 15,043
1/3
Thanks Ralph appreciate the kind comment.Excellent work Paul.
- Status
- Not open for further replies.
Legal Notice
scalemodelling.co.uk is a privately operated online discussion forum. All content posted by members reflects their own views and opinions and does not necessarily represent those of the forum owners or administrators. While reasonable efforts are made to moderate content, no responsibility is accepted for user-generated material. By using this site, you agree to comply with UK law and the forum rules.