Theme editor

Scale Model Shop

Dragon Smart Kit , Panzer IV ''Tauchpanzer'' , 1/35th Scale

Status
Not open for further replies.

Gary MacKenzie

SMF Supporter
Joined
Apr 28, 2018
Messages
1,059
Reaction score
1
Points
38
Location
Forres , Moray , Scotland
1/3
Thread owner
View attachment 301101

View attachment 301102
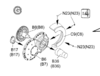
A work in progress.
Small gap between rear plate and body , used milliput to fill it.
Dragon instructions are not the clearest for some things and downright wrong on part numbers in a number of sections.
So far carpet monster has stolen 2 pieces , which i will spend tomorrow morning hunting for.
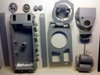
 

Attachments

  • CameraZOOM-20180511192355432.jpg
    CameraZOOM-20180511192355432.jpg
    3.4 KB · Views: 0
  • CameraZOOM-20180511192322121.jpg
    CameraZOOM-20180511192322121.jpg
    3.1 KB · Views: 0
Hi Gary,
I've got this kit amongst many more Dragon Panzer IV 's so I'm interested in seeing this one develope
regards Jim
 
Thread owner
I'll try and tell you the snags i find , there have been a couple.
 
Hi Gary,
That would be most helpful thank you, I've got the voyager etch set as well so jumping between instructions will be fun or frustrating
regards Jim
 
Hi Gary,
that's one reason I don't like dragon kits the instructions, I hope the carpet monster gives up the pieces without to much of a fight.
Scottie
 
Thread owner
First one : Use A27 not A16 ( optional ends for suspension units ) according to at least one site the A16 wasn't used on any Ausf 'E'
Second : section 14/15 : Part marked F9 is actually G2
 
Gary
Have you ever come across a Dragon kit that has no mistakes in its destructions!? How they have got away with it for so long is beyond me. Looks like you are beating it into submission. Good luck with the rest.
Steve
 
Thread owner
I grew up on airfix , monogram , esci etc.
I then moved to Tamiya.
I have only made a few Dragon models , and agree , the instructions are usually a little ''mistaken''
Will try and get a few more of my ''not finished'' , finished.
 
looking good gary, use a hoover tubey bit with some of the missus's tights over the end bit for missing bits on the carpet ;)
 
Thread owner
looking good gary, use a hoover tubey bit with some of the missus's tights over the end bit for missing bits on the carpet ;)

Yeah , thats next option.
Wouldn't mind , but the bit is about 2 cm by 1cm 'L' shaped.

UPDATE : Its hiding from the hoover too , will retry again later
 
Thread owner
A bit not shown on Tauchpanzer instructions , but shown on Ausf A smartkit instructions , B36 , without which it is very hard to attach the drive sprocket to the drive train.
View attachment 301588
 

Attachments

  • b36.png
    b36.png
    3.3 KB · Views: 0
Thread owner
am obviously getting worse at reading instructions , nowhere on the kits instructions can i determine which port cover gets used on left and on right side of turret , only two parts in kit are d49 and d50 , but one has no vision slot in it , yet both ports should have kit perspex parts installed behind them .... why for a port with no vision slit ?

UPDATE : Found instructions for kit Dragon 6264 , has far better instructions.
 
Gary.
Not you , its Dragon ! Cunning people just like to confuse .:smiling3:
John.
John.
 
Status
Not open for further replies.
Back
Top