Theme editor

Scale Model Shop

first diorama

Status
Not open for further replies.

saguy

New member
Joined
Feb 27, 2011
Messages
570
Reaction score
0
Points
0
1/3
Thread owner
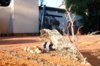
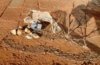
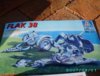
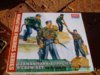
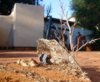
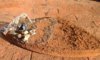
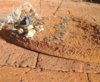
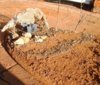
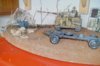
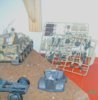
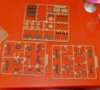
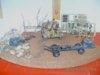
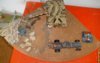
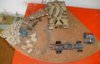
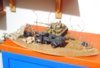
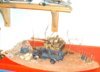
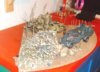
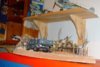
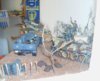
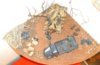
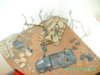
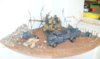
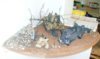
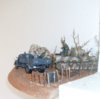
hi there ... thought i would give a diorama a go ... so the master plan is a tank refuelling crew, an anti aircraft battery and a opel blitz truck getting themselves organised to re-fuel and re-arm a tiger (the tiger will not be there just yet!!). Had a good look through the internet looking for some advice / hints on just where on earth to start. Lots of stuff there but i took the more practical and wise road and asked Ron (spanner570) who gave me some very simple but very effective advice on how to get the whole project on the go. Get some diluted pva, lots of dirt and stuff and get going .....made a start on it and here is some pics of where i am at present ....lots of stuff still to be done but this is good fun .................. rgds lindsey

View attachment 47932

View attachment 47933

View attachment 47934

View attachment 47935

View attachment 47936

View attachment 47937

View attachment 47938

View attachment 47939

View attachment 47940

View attachment 160958

View attachment 160959

View attachment 160960

View attachment 160961

View attachment 160962

View attachment 160963

View attachment 160964

View attachment 160965

View attachment 160966
 

Attachments

  • 9.jpg
    9.jpg
    3 KB · Views: 0
  • 1.jpg
    1.jpg
    2.9 KB · Views: 0
  • 2.jpg
    2.jpg
    3.4 KB · Views: 0
  • 3.jpg
    3.jpg
    3.3 KB · Views: 0
  • 4.jpg
    4.jpg
    3.5 KB · Views: 0
  • 5.JPG
    5.JPG
    3.5 KB · Views: 0
  • 6.jpg
    6.jpg
    2.5 KB · Views: 0
  • 7.jpg
    7.jpg
    3.4 KB · Views: 0
  • 8.jpg
    8.jpg
    3.7 KB · Views: 0
Wow Lindsey, that didn't take long, the pva must still be wet!

Your basework is looking very good and I'm glad I could offer some advise. I notice you have used scale tree trunks from the garden....twigs to me! Nice one.

Your last line pleases me.....Having fun!

Always keep this attitude no matter what. Let your ideas flow and come to you as you build, as they surely will.

Don't be rigid with the dio. If you don't like a bit, sling it. Be a free spirit, slap it on and don't fiddle.

Gain experience from this first go, your next will be better. And as you learn new tricks, possibly easier......

Keep us posted on your progress and good luck with it.

Ron
 
Lindsey nice start mate, I have the opel blitz kit too so id be interested in hearing how it builds. Tamiya are pretty much "pour glue n shake the box" but ya never know.

What did you use for a base bro?
 
Thread owner
and on we go (ty to the kind and encouraging comments) ... have started the blitz truck ... typical tamiya build .. very straightforward. completed the re-fuelling crew with all their bits and bobs and just have to stick them together. have decided to place the tiger that i did a little while ago on the diorama .. think it looks good so it shall stay.

aaron ... the base is a corner shelf that i bought at pick and pay (will get the model up out of the way once completed but will still be visible to whoever wants to have a look at it) .... dolloped a a whole lot of pva on it (spanner570's advice) and then loaded stones, dust, sand, leaves etc on it. I then added the camo netting (an old onion bag soaked in light brown paint), the flak gun which is italeri and a little fire. still looking to work extra on the dio itself ... maybe some barbwire fencing, some shell craters and will try some tracks for the blitz and the tank ....all in all i am very pleased with how it is looking at the minute.

me more pics are incl .. scratching my head over the weathering for the truck as the base will be german grey ....so any ideas / suggestions here is most welcome.

tx

lindsey

View attachment 48028

View attachment 48029

View attachment 48030

View attachment 48031

View attachment 48032

View attachment 48033

View attachment 161054

View attachment 161055

View attachment 161056

View attachment 161057

View attachment 161058

View attachment 161059
 

Attachments

  • e.JPG
    e.JPG
    2.4 KB · Views: 0
  • d.JPG
    d.JPG
    3 KB · Views: 0
  • c.JPG
    c.JPG
    3.2 KB · Views: 0
  • f.jpg
    f.jpg
    2.3 KB · Views: 0
  • a.jpg
    a.jpg
    2.3 KB · Views: 0
  • b.jpg
    b.jpg
    2.3 KB · Views: 0
It's coming together nicely Lindsey. As for weathering the Blitz, I used oils & pastels to do my Panzer II, just adding a few streaks & dusty patches. You don't need much more than that.

Cheers

Patrick
 
Patricks modulation thread is a perfect way to weather the opel blitz.

Once again that base is looking well fit and i agree that the tiger looks proper.

edit: Ive never seen figures painted in entirety on the sprue like that.
 
Here's the link to my build Lindsey which might give you some ideas

http://www.scale-models.co.uk/armoured/15652-tamiya-1-35-panzer-ii-colour-modulation-technique.html#post126668

Cheers

Patrick
 
Thread owner
hi there ... am now putting the figures together and then will place them on the diorama to complete it ....... the blitz is complete along with various bits and bobs ...jerry cans, fuel drums, ammunition boxes and so on (a few more very dead looking trees and barbed wire) .....been good fun putting this together ....rgds lindsey

View attachment 48230

View attachment 48231

View attachment 48232

View attachment 48233

View attachment 48234

View attachment 48235

View attachment 161256

View attachment 161257

View attachment 161258

View attachment 161259

View attachment 161260

View attachment 161261
 

Attachments

  • dio.6.JPG
    dio.6.JPG
    2.6 KB · Views: 0
  • dio.1.JPG
    dio.1.JPG
    2.4 KB · Views: 0
  • dio.2.JPG
    dio.2.JPG
    2.3 KB · Views: 0
  • dio.3.JPG
    dio.3.JPG
    3 KB · Views: 0
  • dio.4.JPG
    dio.4.JPG
    2.6 KB · Views: 0
  • dio.5.JPG
    dio.5.JPG
    1.7 KB · Views: 0
Man i like that blitz a lot.

the dio lookd Fantastic, Are you sure this is your first? lol Compared to my first yours is Epic.

Nice job Lindsey.
 
Thread owner
Tx ole and aaron ....... i must say i am very pleased with the way that this is turning out ... i think what helps me (being very artistically challenged) is that with a dio u can chop and change as u go along. all u need is an interest in the subject matter and an imagination ...... i must say if spanner had not guided me wth how to start the dio (pva and dirt) i may very well still be staring at a blank shelf.

tx for the kind comment on my weathering Ole .. since i joined this site this is an aspect of my modelling which i have tried very hard to get better at .....was working on the figures late last nite so the project should be a wrap sometimes this weekend ...rgds Lindsey

note .. also a big tx to Shannon my little 7 year old daughter who took the pictures ......
 
this is looking very nice indeed, the weathering is well done. what did you use for the camouflage net it is very good .

Scott
 
This is looking great Lindsey and thanks for the compliment, glad to be of help......but remember, you can get all the advise you could shake a stick at, but it's still all down to the modeller to produce the goods, and are you doing just that!

Excellent composition. A lot of thought is going into this and isn't it great when you get new ideas and visions as you progress?...And having the balls to alter things! That's what I find makes dioramas such great fun to do....Free as a bird!

Congrats to your little girl, excellent photos. A talent to be groomed.

Cheers,

Ron
 
Thread owner

Attachments

  • 14.JPG
    14.JPG
    2.8 KB · Views: 0
  • 8.jpg
    8.jpg
    2.5 KB · Views: 0
  • 9.jpg
    9.jpg
    2.5 KB · Views: 0
  • 10.JPG
    10.JPG
    2.1 KB · Views: 0
  • 11.jpg
    11.jpg
    2.2 KB · Views: 0
  • 13.JPG
    13.JPG
    2.4 KB · Views: 0
That's turned out very nicely! Good one Lindsey.

I'm not knocking what you've done, but I might have coloured the 'solid' areas of the camo mesh in green to look like leaves. Mind you, with desert camo, perhaps your single colour works best.

Gern
 
Status
Not open for further replies.
Back
Top