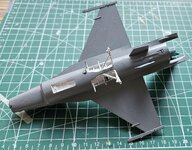
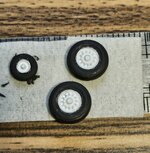
Theme editor

Scale Model Shop

Gary's 1/72 Tamiya F-16 CJ Block 50

Thread owner
Thanks Geoff. It is starting to come together a bit now - will post some more pictures later. I've finished priming and will now be moving on to painting the top coats, all hand painted of course. The Eduard resin/brass replacement exhaust pipe has also arrived, which is much nicer than the rather basic original, so am working on that as well.
 
Thread owner
I finished painting the undersides, so the next step is to mask off these parts and paint the top of the wings and fuz. Not so happy with the joint on the underside forward and aft of the nose wheel bay. Under my desk lamp it was not visible, but on the photos and in daylight it shows up a bit. Not sure what to do about it - probably will leave it as it is and rubbing it down and then repainting runs the risk that it will still be visible.

1000024078 (1).jpg
 

Attachments

  • 1000024078 (1).jpg
    1000024078 (1).jpg
    426.1 KB · Views: 0
Thread owner
Wheels ready to roll! Why do things always look worse in the photos than in real life??😉
1000024086.jpg
 

Attachments

  • 1000024086.jpg
    1000024086.jpg
    1.4 MB · Views: 0
Coming along nicely Gary. I agree about the photos, I always seem to notice something new when I post photos. I wouldn't worry about the wheel well join. It wont be visible when the model is displayed.
 
Thread owner
Masking tape is off, but I've been left with a few places which will need cleaning up and retouching unfortunately! I guess that is pretty much to be expected when hand painting.
1000024389.jpg
 
Doesn't look as if much touch up is needed. Photos do indeed show up issues which were unnoticed before.
 
Thread owner
There was some leakage under the masking tape around the nose and rear of the wings, plus I managed to somehow get a dark gray thumb print in the light gray underside! Upside of that was it gave me an excuse to run down the annoying seam at the front of the nose wheel bay prior to touching it up.

Anyway now touched up and good to go. Going to let it dry for a day or so then give it a coat of gloss varnish to protect the paint before picking out of a few details and doing the decals. Not sure how much I am going to weather it - the photos I have of the real thing show it looking pretty spick and span.
1000024413 (1).jpg 1000024416.jpg 1000024419.jpg
 
Thread owner
The build is a bit on hold while the gloss varnish drys, and while I wait for some titanium gold paint to arrive that I need to pick out a couple of panels on the underside before doing the decals. In the meanwhile I've started on a FineMolds F14a, the build of which I can also post if anyone is interested??
 
Thread owner
Painting and a gloss now completed, nose cone and exhaust added, and I managed to cut/pry the canopy off without any serious damage - just a bit of touching up was needed around the cockpit edge. It was always the intention to display the model with the canopy open so I left the seat and instrument panels to add afterwards. In retrospective this was probably no such a good idea as it committed me to having to remove the canopy no matter what! 1000024817 (2).jpg 1000024826.jpg
 
Thread owner
I hate gloss varnish it seems to show every brush mark. Hope it tones down a bit with the last matt coat.
 
Thread owner
Getting there..... although I've managed to misplace one decal that should have been gone on the nose (not visible in this photo) and had to replace with something approximating it taken from the spare box. Hopefully it won't be too obvious on the completed model.

1000024939 (1).jpg
 
Back
Top