Theme editor

Scale Model Shop

Gern's Academy 1/35 STuG IV

Status
Not open for further replies.

Gern

Well-known member
Joined
May 17, 2009
Messages
9,320
Reaction score
235
Points
63
1/3
Thread owner
Hi guys.


I've not heard from anyone saying I couldn't use this kit in the GB despite the fact it has been started (only a bit of painting though) so I'm assuming it's OK. If not, I'll still be making it but it will have to be moved from the GB threads.


I've checked out the warp in the main hull (see here: http://www.scale-models.co.uk/topic/26358-july-oct-2016-gb-panzers-wwii-chat-thread/?page=2) and found the rear plate fits inside so that's fixed.


Patrick has very kindly offered to send some decals for it (PM on it's way Patrick) so I'm good to go.
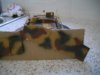
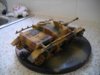
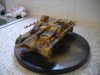
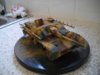
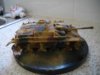
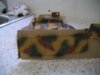
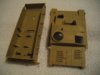
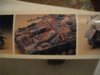
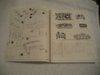
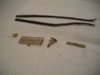
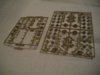
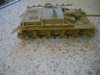
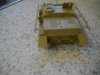
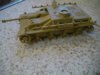
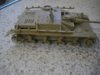

Usual pics:


View attachment 258884View attachment 258885View attachment 258886View attachment 258887View attachment 258888


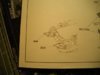
The box has this picture on the side:


View attachment 258889


That's the one I'm hopefully going for.
 

Attachments

  • IMGP1966.JPG
    IMGP1966.JPG
    2.2 KB · Views: 0
  • IMGP1971.JPG
    IMGP1971.JPG
    2.4 KB · Views: 0
  • IMGP1970.JPG
    IMGP1970.JPG
    1.8 KB · Views: 0
  • IMGP1969.JPG
    IMGP1969.JPG
    1.6 KB · Views: 0
  • IMGP1968.JPG
    IMGP1968.JPG
    2 KB · Views: 0
  • IMGP1967.JPG
    IMGP1967.JPG
    1.9 KB · Views: 0
Hi Dave


Good to have you aboard! looking forward top seeing your Stug progress.


Cheers


Paul
 
Thread owner
Hi guys. Some progress pics:


View attachment 258965View attachment 258966View attachment 258967View attachment 258968


Don't know about you, but I reckon it looks something like a STuG so I'm happy so far. Construction is straightforward, but you need to take care. This was originally offered as a motorised kit so there are some parts you don't need, and some alternative parts which I guess would be down to different variants. There is nothing mentioned about either in the instructions, but it's not difficult to see what's happening. I'm not ecstatic about how the rear of the hull fit into the warped main hull part and I suspect this is where it comes back to bite me!


I have two bits I don't know how to fit as the diagram is not the most useful:


View attachment 258980


Has anyone built this before or have pictures showing what it should look like? I think I know where they should go, but the warping on the hull won't allow me to fit them without a lot of fiddling about. I don't want to start that if it turns out they go somewhere else.


I was going to start painting, but I've just noticed I haven't added the rest of the brackets for the Schurtzen. Back out with the glue .....


While I think about it. Would the Schurtzen be removed and painted with the camo scheme separately? That's what I plan to do, even though I'll be using the three tone sand/green/brown as shown in the box picture for both the main body and the Schurtzen.
 

Attachments

  • IMGP1977.JPG
    IMGP1977.JPG
    2 KB · Views: 0
  • IMGP1976.JPG
    IMGP1976.JPG
    2.5 KB · Views: 0
  • IMGP1975.JPG
    IMGP1975.JPG
    2.3 KB · Views: 0
  • IMGP1974.JPG
    IMGP1974.JPG
    2.5 KB · Views: 0
  • IMGP1972.JPG
    IMGP1972.JPG
    2.5 KB · Views: 0
very nice progress with this ,looking good, :D


don,t you just lov it when it dose not show or say were and how, >:( if I,m right,the back go,s around the axle,and the angle bit,follows the rear inside of the mud guard,


and the tow hooks should slot in beside the inner side of the angle holder of the guard, 9_9


hope that helps, :D
 
Thread owner
I think you're right Moni. I've just checked and there's a guide strip on the underside of the mudguard, and the angles of the part fit exactly with the mudguard itself and the rear of the hull - although they don't actually go anywhere near the axle.. Anyway, as there are no other parts to finish the mudguard, I'm going to use these.


Thanks.
 
Thread owner
Just the job Patrick! That's where I've fitted them so all's well.


Thanks.
 
Hi Dave


Excellent and rapid progress on the Stug! Nice build!


And it's great to have support from the guys when the instructions are a bit vague.


looking forward to the next instalment


Cheers


P
 
While I think about it. Would the Schurtzen be removed and painted with the camo scheme separately? That's what I plan to do, even though I'll be using the three tone sand/green/brown as shown in the box picture for both the main body and the Schurtzen.

Although documented evidence is lacking Dave, I would expect that schürzen were painted off the vehicle. 


By the time that 'ambush camouflage' became the standard (Sept 44), most vehicles were painted in the factory. The scheme on the box that you're going for would represent this.


However, it's entirely possible that on the battlefield, damaged schürzen was replaced by taking panels from knocked out vehicles, leading to mismatched camo.


But in general, the Germans were keenly aware of the usefulness of good camouflage. Obviously by 1944 air superiority was lost, so factories took great pains to ensure that the tanks etc were as correct as possible - Alles in ordnung, so to speak ;)
 
Thread owner
Thanks Patrick, that saves me a job! I'll be using the same scheme on both but now I don't have to worry about matching the location of the colours on the Schurtzen to those on the main body! Am I also right in thinking that the back of the skirts (I can't be a***d to keep typing 'Schurtzen'!) would not have the camo scheme but just left overall sand coloured?
 
Thanks Patrick, that saves me a job! I'll be using the same scheme on both but now I don't have to worry about matching the location of the colours on the Schurtzen to those on the main body! Am I also right in thinking that the back of the skirts (I can't be a***d to keep typing 'Schurtzen'!) would not have the camo scheme but just left overall sand coloured?

No worries mate & that's what I'd go for. I very much doubt they'd bother adding any camo colour to the back of the schürzen ( yay for phone predictive text ) :)
 
Am I also right in thinking that the back of the skirts (I can't be a***d to keep typing 'Schurtzen'!) would not have the camo scheme but just left overall sand coloured?

Absolutely spot on Dave. You can also expect the schurzen to be pretty scraped up on the inside too as they were put on or removed from the hangers.


Here's a Stug III I did (many moons ago) that shows my interpretation


Cheers


P
 
so glad that you did get it sorted, :D ,and always very good to see people,do help,out, :D
 
Thread owner
First camo colours done.


View attachment 259032View attachment 259033View attachment 259034View attachment 259035View attachment 259036View attachment 259037View attachment 259038


Not being a colour fanatic, I picked Tamiya XF 59 Desert Yellow, XF 74 JGSDF Olive Drab and XF 64 Red Brown. I'm thinking it would benefit from a well-thinned mist coat of a lighter colour to tone them down a bit. Should I use the XF 59 or perhaps a very light grey? As for the 'dot' markings, it looks like each main colour gets dots of the other two colours at random, so that's what I'll be doing later.


The skirts were painted together - maybe they were removed and leant against a wall somewhere to get a continuous pattern? I've test fit them and overall the fit is b****y awful! Just like the real thing, so that's OK! xD


Been working on the wheels as well, but more on them later.
 

Attachments

  • IMGP1985.JPG
    IMGP1985.JPG
    2.3 KB · Views: 0
  • IMGP1984.JPG
    IMGP1984.JPG
    2.6 KB · Views: 0
  • IMGP1983.JPG
    IMGP1983.JPG
    2.4 KB · Views: 0
  • IMGP1981.JPG
    IMGP1981.JPG
    2.6 KB · Views: 0
  • IMGP1980.JPG
    IMGP1980.JPG
    2.5 KB · Views: 0
  • IMGP1979.JPG
    IMGP1979.JPG
    2.5 KB · Views: 0
  • IMGP1986.JPG
    IMGP1986.JPG
    2.3 KB · Views: 0
Status
Not open for further replies.
Back
Top