I thought I'd better start a new thread for this as it might get quite long .....
I started the Bug figures last night and I've made some changes to the figures as supplied. This is for two main reasons. Firstly I'm not that impressed with the 'ball and socket' joints the manufacturer used. The design is such that you can't position the legs so they face forwards and backwards - they will only fit sideways. Secondly, I wanted to try and get a closer match to my Kay Tee.
One good thing is that the legs are completely interchangeable. They all have three sections and the lengths of the top, middle and lower sections respectively are the same on all of them. There are four different legs so you can get a variety of different poses. If you wanted to go overboard, it would not be difficult to cut the legs apart at the joints and create new ones. I'll not be making a huge number so I don't need to go that far.
The corrections were not difficult and clean up of the pieces was straightforward as the plastic is hard - not that b****y awful polyethylene stuff! Lots of filler needed, but obviously some of that is down to the changes I made. Anyway, some pictures:
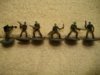
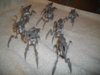
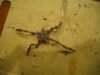
The original design
View attachment 91428
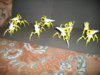
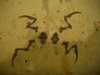
How they would look
View attachment 91429
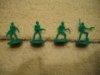
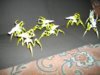
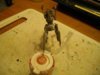
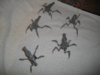
How I changed them
View attachment 91427
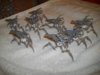
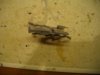
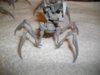
The finished Bug
View attachment 91424
View attachment 91425
View attachment 91426
Apart from the issues with the leg joints, overall I'm well impressed with these kits. They have much more detail than the resin kit I used for Kay Tee - despite the fact that Kay Tee is about 6 times larger!
As for painting, I'll be trying to recreate Kay Tee's colours. More later ....
View attachment 204447
View attachment 204448
View attachment 204449
View attachment 204450
View attachment 204451
View attachment 204452
I started the Bug figures last night and I've made some changes to the figures as supplied. This is for two main reasons. Firstly I'm not that impressed with the 'ball and socket' joints the manufacturer used. The design is such that you can't position the legs so they face forwards and backwards - they will only fit sideways. Secondly, I wanted to try and get a closer match to my Kay Tee.
One good thing is that the legs are completely interchangeable. They all have three sections and the lengths of the top, middle and lower sections respectively are the same on all of them. There are four different legs so you can get a variety of different poses. If you wanted to go overboard, it would not be difficult to cut the legs apart at the joints and create new ones. I'll not be making a huge number so I don't need to go that far.
The corrections were not difficult and clean up of the pieces was straightforward as the plastic is hard - not that b****y awful polyethylene stuff! Lots of filler needed, but obviously some of that is down to the changes I made. Anyway, some pictures:
The original design
View attachment 91428
How they would look
View attachment 91429
How I changed them
View attachment 91427
The finished Bug
View attachment 91424
View attachment 91425
View attachment 91426
Apart from the issues with the leg joints, overall I'm well impressed with these kits. They have much more detail than the resin kit I used for Kay Tee - despite the fact that Kay Tee is about 6 times larger!
As for painting, I'll be trying to recreate Kay Tee's colours. More later ....
View attachment 204447
View attachment 204448
View attachment 204449
View attachment 204450
View attachment 204451
View attachment 204452


")
")