Theme editor

Scale Model Shop

Gern's Laserart Locomotive

Gern

Well-known member
Joined
May 17, 2009
Messages
9,320
Reaction score
235
Points
63
1/3
Thread owner
This is my second entry for this GB.

As the title suggests, it's a wooden laser cut kit from Laserart.

Normally, this is where I'd post pictures of the boxart and sprues. Unfortunately, Laserart don't sell their kits in boxes or leave the parts on some sort of sprue - and according to their advert on ebay, they don't supply printed instructions either. They're sent via email.

However, I've taken pictures of what I got and the original advert image. Despite their advert, I also received a printed copy of the instructions.

So here we go:

IMGP4532.jpg
IMGP4533.jpg
IMGP4539.jpg
s-l960.jpg

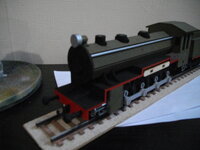
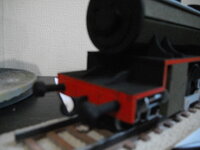
As you can see, it's pretty basic, but the build was a doddle. All the parts fit together nicely (Tab A went into Slot A with no problems - for those old farts like me who remember those kid's books where you cut out a figure and fitted clothes using tabs and slots).

I've mentioned elsewhere that I wanted to tart this up a little with some paint and unusually for me I've got some pictures of my build progress. See next post.
 
These are really interesting kits and the addition of the paint is a good move Gern. Looking forward to seeing what you make out of this.
 
Thread owner
Almost finished. I have to create some sort of coupling for the tender as I didn't get one in the kit. According to their instructions, the axles and coupling were originally supplied as round dowel. They've changed this to flat strips and I don't know if they forgot the coupling or if it was just missing from my kit. No worries though - it's a dead easy fix.

IMGP4549.jpg
IMGP4550.jpg
IMGP4551.jpg
IMGP4552.jpg

I think it looks much better with paint. It needs a coat or two of varnish and hopefully some simple decals and then that leaves just the tracks to do unless .....

I've been thinking of 'pimping' it up with some bits and bobs from my spares boxes. Some are wooden, but some are injection plastic. Would that be OK or should I start a new thread outside of the GB?
 
Almost finished. I have to create some sort of coupling for the tender as I didn't get one in the kit. According to their instructions, the axles and coupling were originally supplied as round dowel. They've changed this to flat strips and I don't know if they forgot the coupling or if it was just missing from my kit. No worries though - it's a dead easy fix.


I think it looks much better with paint. It needs a coat or two of varnish and hopefully some simple decals and then that leaves just the tracks to do unless .....

I've been thinking of 'pimping' it up with some bits and bobs from my spares boxes. Some are wooden, but some are injection plastic. Would that be OK or should I start a new thread outside of the GB?

no issues on that one as the main focus of the kit is wood so fire away
 
Thread owner
Finito.

Here are the pics of my completed train. A lot of fun, and though I say it myself, I reckon it looks pretty good if you don't get too close (well I'm 'chuffed' with it and that's what really counts)!

Here's the tracks. You can see what they look like in the 'sprue' shots in my first post - plain white wood with burnt edges.

I gave them a lick of paint then clamped them to a piece of hardboard with a liberal coating of PVA all over it. I then sprinkled ballast all over and brushed off the excess once the glue had dried. Much better.

IMGP4553.jpg

Unfortunately, the glue caused the hardboard to warp (caused by the water content of the glue soaking into the top surface and expanding it while the lower surface stayed its original size maybe?), but as the train still fit OK, I've left it.

IMGP4562.jpg

The tender

IMGP4556.jpg
IMGP4558.jpg

The loco

IMGP4554.jpg

IMGP4555.jpg

IMGP4563.jpg

The extra bits

In wood: 'Steam pipes' along the boiler, ladders front and rear on the tender, couplings (from kit) all round.
In plaster: Storage box in front of loco cab.
In plastic: 'Piston' assemblies at front of loco, steps at sides of cab, access hatch at front of boiler, buffers front and back.

Despite the fun, I've done as much as I want to this wonderful little kit. I've decided not to bother with varnish and decals.

That's it folks. All comments welcome as usual, now back to my Bloodhound build.

Just tried to post this and I've gone over my picture limit. Pics of complete thing in next post.
 

Attachments

  • IMGP4562.jpg
    IMGP4562.jpg
    284.2 KB · Views: 0
  • IMGP4557.jpg
    IMGP4557.jpg
    271.9 KB · Views: 0
That's very nice indeed. Painting was a good idea. The extras are definitely worth while. Far better than I imagined a wooden kit of a steam engine would be.
 
Thread owner
Thanks guys.

Like I said, a very enjoyable build and I had a lot of fun. I absolutely agree that a coat of paint has improved the looks - provided you don't get too close!
 
Evening Dave,
What a transition some paint and your ingenuity have achieved. Hard to believe it is the same kit as that first photograph. Excellent job, tracks look fantastic, hope the warping settles down in time. Great job 👍.
 
Back
Top