Theme editor

Scale Model Shop

Halftrack to Halftrack

  • Thread starter Thread starter Guest
  • Start date Start date
Status
Not open for further replies.
Mike,
an excellent choice I have been tempted to try and build one of these my self, so I will be following along very closely. If memory serves they had one of these parked on a plinth outside the guardroom at the TTA SEME in Bordon
 
Thread owner
Scottie,
It is really an easy build, but if you have the Dragon kit then there is a bit of alteration with measurements but it is in mm's if that. And of course depending on how you want to outfit the vehicle. I can let you have all of my material/plans when you decide, just let me know.
Cheers
Mike.
Thanks Mike I might take you up on that offer but I will watch yours first so I can learn.
 
Hi Mike
Great project. Brilliant work to date. Engine and cab detail is really nice. Scratched roof and gantry up to your usual highly skilled standard.
Jim
 
Thread owner
Cheers JR. Nice pics mate. Look forward to seeing Mike's update on how he is tackling the jib
Just found some more , there is, it appears very little on this version.

View attachment 319249
If you do to this link, there is a very old film of R.E.M.E. in the field, at approx 4 minutes in is one of these in use, interesting piece of film.
Hope you didn't mind Mike
John .
 

Attachments

  • 1541858537712.png
    1541858537712.png
    6.3 KB · Views: 0
Thread owner
John R,
Many thanks for the pic and the video, both interesting to watch and use. I could have used the pic a few days ago but it will still come in usefull.
Steven, Jim and Ian,
Many thaks for the comments, very welcome.
Steve Jones,
Main jib frame is on the way, I will post some pics a bit later on my progress.
Cheers
Mike.
 
Thread owner
Your welcome mate, just didn't want to appear I was pushing in . I love anything to do with recovery/ REME . Those old training films are so funny at times, esp those BBC type voice overs .
John .
 
Thread owner
Update.
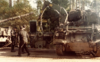
OK, lost part replacement. For some insane reason I lost part of the bogie suspension, and it is the part that couples both sets of wheels making a pair. So it was out with the card and knife.....

View attachment 319385
......One end done, and as it will be hidden away just the basic shape will do.

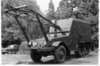
The jib has come togerther and now it is a case of fitting the details such as brackets, hinge pins and rollers.

View attachment 319386

And thanks to the latest pic from John, I can add a bit more detail as the photo's I have are a bit cluttered.

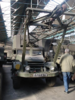
The radiator and engine are also now in situ, had some fun with the fit, radiator went first - engine would not fit - engine first - ditto. so it was slow dry c/a and then with both hands, one holding the engine and the other the radiator with the fragile fan inside the shroud it was a fit. It was a bit like trying to break and egg and hit the frying pan with your eyes closed....

View attachment 319387

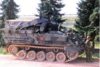
So, filled with success, I fitted both sides to the cab floor, and they went in with just a slight cut away of material where the bottom of the mudguard/fender touches the foot step.

View attachment 319388
And that is where we are today, the cab is still loose on the chassis as there is a bit more to do, more when I get there, please enjoy.
Cheers
Mike.
 
Thread owner
Enjoy....... Mike.
I am, love the replacements scratchery.
How do you get on with using the foamboard for a backing and not stick the frame to it when gluing up ?
John.
 
Thread owner
Hi John,
Pleased you are enjoying the build.
I copy the item and print it out, then a rough cut outline and stick it to the foamboard with masking tape. For some reason the plastic seems not to want to stick to the printer ink. When I have finished the part I want to build, I then release it by first undoing the masking tape and then gently peel back the paper and where it sticks some gentle movement will normally release it. If not the just a little liquid cement at the join usually does the trick. After that a light sand cleans up the job.
Mike.
 
Thread owner
Update,
Well the bogie replacement part came out ok and is in place just the centre shaft to add, not pretty but as it will not be seen it will do the job.

View attachment 319464

So flushed with success, I moved onto the front radiator cover and put the flaps in place, and this is now ready for the light fittings to have the light mounting holes drilled as there is new replacement headlights at the front.

View attachment 319465

And that is it for today..... but more work done on the other build.
 
Great idea and progress Mike, the engine is very nicely done.:thumb2:
Following on with interest...
 
Thread owner
Hi John,
Pleased you are enjoying the build.
I copy the item and print it out, then a rough cut outline and stick it to the foamboard with masking tape. For some reason the plastic seems not to want to stick to the printer ink. When I have finished the part I want to build, I then release it by first undoing the masking tape and then gently peel back the paper and where it sticks some gentle movement will normally release it. If not the just a little liquid cement at the join usually does the trick. After that a light sand cleans up the job.
Mike.
Mike.
Thank you.
Think this is a great way to rebuild or build a thin section. My roof spans would have been much easier, windows too. At the moment I use a steel plate with heavy bars /magnets to keep things in place, applying a small amount of grease on the steel to stop the glue from sticking. Will be using that next time :thumb2:
John .
 
Thread owner
Mike .
Having read today's update, there's nothing like success to push you on . Nice detail with those pe engine covers and the bogies
John
 
Thread owner
Welcome back Mike, great work .:thumb2::thumb2:
John, That 434 with the Leyland dangling from it brings back memories..:thumb2:
 
Status
Not open for further replies.
Back
Top