Theme editor

Scale Model Shop

Harley Davidson WLA 1/9 Scale from Italeri build

Status
Not open for further replies.

Richi72

Active member
Joined
Sep 29, 2013
Messages
1,100
Reaction score
0
Points
36
1/3
Thread owner
Hi all,

well its been almost 3 years since i touched a kit, haven't been on the forum allot either, sorry for that.

I changed my job because i definitely got too old for it, and i got more time for the family and too get back at the bench again.

Last week i build a figurine 1/35 and began painting it ''bummer'', my hands are not as steady as i thought they would be, so no Erbsentarn camouflage soon:sad:.

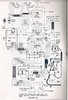
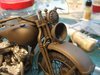
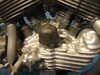
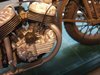
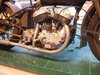
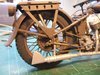
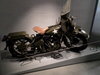
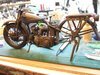
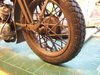
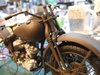
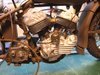
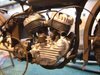
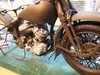
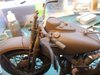
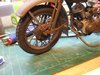
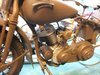
So i looked at my stash and saw my 1/9 HD WLA which i started 6, 7 years ago but never finished. I Painted the bike a Vallejo us olive drab and started too detail it a bit, all with keeping in mind that my hands would remember what modeling is. But here are some W.I.P pictures.

As always comment's and tip's are always welcome.

View attachment 295546View attachment 295547View attachment 295548View attachment 295549View attachment 295550View attachment 295551View attachment 295552View attachment 295553View attachment 295554View attachment 295555View attachment 295556

Thanks

Cheers
Richi
 

Attachments

  • DSCF1861.jpg
    DSCF1861.jpg
    4.1 KB · Views: 0
  • DSCF1876.jpg
    DSCF1876.jpg
    3 KB · Views: 0
  • DSCF1874.jpg
    DSCF1874.jpg
    3.8 KB · Views: 0
  • DSCF1872.jpg
    DSCF1872.jpg
    3.9 KB · Views: 0
  • DSCF1870.jpg
    DSCF1870.jpg
    3.9 KB · Views: 0
  • DSCF1869.jpg
    DSCF1869.jpg
    4 KB · Views: 0
  • DSCF1868.jpg
    DSCF1868.jpg
    3.9 KB · Views: 0
  • DSCF1867.jpg
    DSCF1867.jpg
    3.5 KB · Views: 0
  • DSCF1865.jpg
    DSCF1865.jpg
    3.5 KB · Views: 0
  • DSCF1864.jpg
    DSCF1864.jpg
    3.7 KB · Views: 0
  • DSCF1862.jpg
    DSCF1862.jpg
    4 KB · Views: 0
Welcome back to modelling Richi. I have built a couple of these old Italeri bikes and I have the HD in the stash so, with experience, I can say you are making a great job of this:thumb2:
 
First of all welcome back Richi, as Graham points out its a great start.
 
welcome back Richi,:smiling:
I for one have missed seeing your work,always a very big fan,:hungry:
thats a very nice start ,and I,m one who dose lov a harley
 
Thread owner
Thanks for the warm welcome back.

I missed the modelling allot, its for me like yoga is for others. But i didn't think that it would be so difficult to get the feeling back.
I hope it would be quick so i can finish my 2015 GB Market Garden Diorama, well better late then never i think:rolling:

Yep Harley is my favorite bike too Moni.
 
Good show.
2 things regarding accuracy of this kit:
1) . There is a box on the left side of the seat post , that is the ignition coil , the spark plug wires emanate from the pins on top of it. The small cylindrical item on top of the generator is where they would have you start them, that thing is entirely spurious , I have never seen one on any of the numerous 1-1 bikes I've examined, it isn't in any parts book either.

2) The dome shaped part on the mid-right of the engine case is the point housing. The pin sticking out of the side of it should be located in the 'c' shaped hook directly in front, basically rotate the point housing 90 degrees counterclockwise. The 'c' shaped hook is the manual spark advance , operated by the left twist grip.

The chain can be sorted with LOW heat from a soldering iron , but I have yet to find a glue that will attach to that material! Cutting it and pinning the two ends under the front sprocket cover may be a way to do it. I replaced the chain with a p/e one from HiroBoy. Otherwise we are stuck with the 'chain sandwich' supplied.

Some good pics of what can be done with the kit here:
https://www.facebook.com/Custom-Motorcycle-Modeler-Page-766321873448007/
 
Thread owner
Good show.
2 things regarding accuracy of this kit:
1) . There is a box on the left side of the seat post , that is the ignition coil , the spark plug wires emanate from the pins on top of it. The small cylindrical item on top of the generator is where they would have you start them, that thing is entirely spurious , I have never seen one on any of the numerous 1-1 bikes I've examined, it isn't in any parts book either.

2) The dome shaped part on the mid-right of the engine case is the point housing. The pin sticking out of the side of it should be located in the 'c' shaped hook directly in front, basically rotate the point housing 90 degrees counterclockwise. The 'c' shaped hook is the manual spark advance , operated by the left twist grip.

The chain can be sorted with LOW heat from a soldering iron , but I have yet to find a glue that will attach to that material! Cutting it and pinning the two ends under the front sprocket cover may be a way to do it. I replaced the chain with a p/e one from HiroBoy. Otherwise we are stuck with the 'chain sandwich' supplied.

Some good pics of what can be done with the kit here:
https://www.facebook.com/Custom-Motorcycle-Modeler-Page-766321873448007/
Thanks for the pointers,

1 i figured, no way that engine would start like this, i found a wiring diagram on the www that i will use to do the wiring at least too make it more realistic.

that thingi on the generator i will remove first thought it was something like a magneto switch or so.
2 i will correct.

Thanks for the pointers
Cheers
Richi
 
Thread owner
I did some searching and i found this diagram
View attachment 295672
in this one there is a part on the generator which is a Radio Interference suppression, if I read it correctly.

Here is some aditional info on it,

During WWII it became necessary to reduce or eliminate radio static caused by engine interference. In the case of the WLA model motorcycle, early 42 WLA types, such as the early 42 WLA Type III, previous WLA models, and models produced up to about 1944 did not come equipped with radio suppression. 1944 produced WLA models did come equipped with the suppression systems. It became necessary to equip the vast majority of WLA models with the radio suppression systems. The suppression systems consisted of numerous part changes.

I got the information from this site http://forum.sscycle.com/viewtopic.php?f=6&t=12410&hilit=transmission

Maybe Italeri used a 1944 or later model as there master?

Cheers Richi
 

Attachments

  • 865edf7f-b06f-4a52-aae6-577d7bf0a4e8_zps6142c236.jpg
    865edf7f-b06f-4a52-aae6-577d7bf0a4e8_zps6142c236.jpg
    2.9 KB · Views: 0
Thread owner

Attachments

  • DSCF1883.jpg
    DSCF1883.jpg
    3.7 KB · Views: 0
  • DSCF1882.jpg
    DSCF1882.jpg
    3.4 KB · Views: 0
  • DSCF1880.jpg
    DSCF1880.jpg
    3.5 KB · Views: 0
  • DSCF1878.jpg
    DSCF1878.jpg
    3.8 KB · Views: 0
  • DSCF1877.jpg
    DSCF1877.jpg
    4 KB · Views: 0
Not great photos I know but it is the real thing in a museum a few years ago - might help !
 

Attachments

  • SAM_3814.JPG
    SAM_3814.JPG
    2.6 KB · Views: 0
  • SAM_3815.JPG
    SAM_3815.JPG
    2.8 KB · Views: 0
Richard.
Hi , just come across this by chance as I find my way around. Have to say a top class job, paintwork is excellent. Interesting to see a wiring diagram being used as well .
Jo .hnhn
 
Hi Richard
A few of these large scale bikes come up on eBay fairly regularly. Older kits but I have often been tempted. You are making a great job of this and I look forward to the end result.
Jim
 
Status
Not open for further replies.
Back
Top