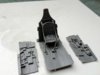
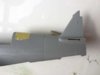
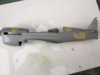
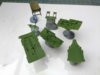
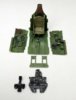
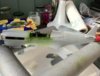
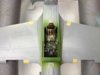
Theme editor

Scale Model Shop

Hasegawa 1/32 Curtis Warhalk P40E Aleutain Tiger

Status
Not open for further replies.
Thread owner
Well I've made a start with the cockpit. Side walls and floor pan with green zinc chromate and the seat and supports in interior green. Dry fit with the fuselage looks good although I'm not quite sure why Hasegawa have opted to split the tail section from the rest of the fuselage. There is no natural panel line at that point (see line drawing this is actually a Kittyhalk but the fuselage is the same and I managed to find this image of a warhalk tail section as well), so filling it so it's not seen is going to be a real pain as there is rivet detail along the spine and underneath.

Vaughan

View attachment 49143

View attachment 49144

View attachment 49145

View attachment 49146

View attachment 49147

View attachment 162169

View attachment 162170

View attachment 162171

View attachment 162172

View attachment 162173
 

Attachments

  • Screen shot 2012-06-06 at 17.30.48.jpg
    Screen shot 2012-06-06 at 17.30.48.jpg
    5.4 KB · Views: 0
  • IMG_1008.jpg
    IMG_1008.jpg
    5.9 KB · Views: 0
  • IMG_1007.jpg
    IMG_1007.jpg
    4.7 KB · Views: 0
  • IMG_1005.jpg
    IMG_1005.jpg
    5 KB · Views: 0
  • IMG_1002.jpg
    IMG_1002.jpg
    5.4 KB · Views: 0
Good spot. Many WW2 aircraft were constructed with an entire tail section that bolted on but the P-40 series was an exception.

There is a panel line running vertically for most of the depth of the suselage but it is not a joint between two elements of the airframe and hence could be filled,taped,sanded or whatever during construction.

Cheers

Steve
 
Thread owner
Steve thanks for the info and images. The panel line your referring to is "A" which is already there. But the join that is a result of the tail section fitting into the rest of the fuselage is further along at "B" where there is no natural panel line, so will need to be completely filled. And that's the problem all the rivets that are right next to the join will make it near impossible to fill without loosing them. Any suggestion on how to do this will be greatly appreciated as I have no real experience at re-scribing and don't want to going down that road if I can avoid it.

Vaughan

p.s Sorry Steve I've realise you are just talking about that particular panel line (A) on the real aircraft and not the join on the kit (B).

View attachment 49272

View attachment 162298
 

Attachments

  • arrows.jpg
    arrows.jpg
    1.6 KB · Views: 0
Thread owner
Some progress with that fuselage. Whilst scouring the internet I found another build of a Warhalk which had a work around regarding the fuselage and tail sections. The guy got round it by attaching the tail sections to their corresponding fuselage halves first thus minimising the seam line and getting a better fit. Once glued you can then join the halves when required. They still required some work to get them flush but it was definitely a better option. The only draw back is that you get a tapered gap on the underside, this makes you appreciate what a step would have been created had you followed the instructions. This can easily be filled once the fuselage halves are together.

Vaughan

View attachment 49347

View attachment 49348

View attachment 49349

View attachment 162373

View attachment 162374

View attachment 162375
 

Attachments

  • IMG_1039.jpg
    IMG_1039.jpg
    4.9 KB · Views: 0
  • IMG_1047.jpg
    IMG_1047.jpg
    4.7 KB · Views: 0
  • IMG_1043.jpg
    IMG_1043.jpg
    5 KB · Views: 0
Im surprised this kit has that join and the associated problems.Not what you expect from an expensive Hasegawa kit.Having seen your other excellent builds i am sure you will sort it Vaughan.
 
That's a good fix. There's often a way of shifting a problem to somewhere it is more easily fixed.

Hasegawa do a similar thing with their Bf109s but then they did have different tails and a nice convenient join. Not sure why they do it with the P-40.

Cheers

Steve
 
Thread owner
Now that fuselage and tail sections are sorted I've moved onto the air intake scoop. The radiator grills were first painted silver followed by some masking fluid and once dry a coat of zinc chromate green. I think it worked well. Finally a dry fit in the a fuselage half. The next step will be to start making the seat belts and then button up the office as it's still a dry fit.

Vaughan

View attachment 49433

View attachment 49434

View attachment 49435

View attachment 49436

View attachment 49437

View attachment 49438

View attachment 49439

View attachment 49440

View attachment 162459

View attachment 162460

View attachment 162461

View attachment 162462

View attachment 162463

View attachment 162464

View attachment 162465

View attachment 162466
 

Attachments

  • IMG_1061.jpg
    IMG_1061.jpg
    1.8 KB · Views: 0
  • IMG_1062.jpg
    IMG_1062.jpg
    5.5 KB · Views: 0
  • IMG_1059.jpg
    IMG_1059.jpg
    4.9 KB · Views: 0
  • IMG_1058.jpg
    IMG_1058.jpg
    4.7 KB · Views: 0
  • IMG_1057.jpg
    IMG_1057.jpg
    5.4 KB · Views: 0
  • IMG_1053.jpg
    IMG_1053.jpg
    1.7 KB · Views: 0
  • IMG_1052.jpg
    IMG_1052.jpg
    1.6 KB · Views: 0
  • IMG_1051.jpg
    IMG_1051.jpg
    5 KB · Views: 0
Thread owner

Attachments

  • IMG_1076.jpg
    IMG_1076.jpg
    2 KB · Views: 0
  • IMG_1074.jpg
    IMG_1074.jpg
    1.9 KB · Views: 0
  • IMG_1073.jpg
    IMG_1073.jpg
    5.2 KB · Views: 0
  • IMG_1072.jpg
    IMG_1072.jpg
    5.2 KB · Views: 0
absolutely fantastic detail work in there,its jaw droppinly good

mobeae
 
Thread owner
Thanks for that Ole building the office and getting the camo on( once the model is together) are I think my most enjoyable parts of model making. Glueing wings and fuselages with out seeing those dreaded seams is still a real bugbear for me.

Vaughan
 
The cockpit's looking excellent, especially the control panel and addition of the harnesses.
 
i`m beginning to find that also vaughan,seems like you have to almost melt the plastic with the glue to get rid lol

mobear
 
Thread owner
The fuselage halves are together, I used Mr Cement S for the first time and as people have said the capillary action is outstanding. I've only used Plastic Weld before but Mr Cement S is far superior you just have to be careful how far it does travel otherwise you can get into a sticky mess if your fingers are in the way. A small amount of sanding has been required on the seams but all looks good. The office is not yet glued in situ as I have read build reviews that say you have to put a plastic rod or a length of sprue to spread the wing roots otherwise there's an issue with the wing and large gaps. Will wait till I get to that stage before I make a decision. The section directly behind the pilot is a dry fit and as yet to be glued and sanded.

I've also made a start on the propeller and nose cone. The propeller was interesting in the fact that Hasegawa had moulded raised lines to show you where to paint the yellow tips these of course had to be sanded down. Anyway a light coat of white followed by some pre-shading before a final coat of yellow. The pre-shading is not very obvious in the photos but its there.

Vaughan

View attachment 49486

View attachment 49487

View attachment 49488

View attachment 49489

View attachment 49490

View attachment 49491

View attachment 49492

View attachment 162512

View attachment 162513

View attachment 162514

View attachment 162515

View attachment 162516

View attachment 162517

View attachment 162518
 

Attachments

  • IMG_1087.jpg
    IMG_1087.jpg
    5.9 KB · Views: 0
  • IMG_1086.jpg
    IMG_1086.jpg
    2.9 KB · Views: 0
  • IMG_1082.jpg
    IMG_1082.jpg
    5.2 KB · Views: 0
  • IMG_1080.jpg
    IMG_1080.jpg
    5.5 KB · Views: 0
  • IMG_1078.jpg
    IMG_1078.jpg
    4.4 KB · Views: 0
  • IMG_1089.jpg
    IMG_1089.jpg
    2.9 KB · Views: 0
  • IMG_1093.jpg
    IMG_1093.jpg
    4.8 KB · Views: 0
Thread owner
Some progress today. A dry fit with the wings and the fuselage as far as I can see there will be no gaps once the wings are at the correct dihedral. The wheel bays are complete having a had a coat of zinc chromate green and are now clamped in situ in the lower section of the wing. Once dry the wing halves will be joined.

Vaughan

View attachment 49676

View attachment 49677

View attachment 49678

View attachment 49679

View attachment 49680

View attachment 49681

View attachment 49682

View attachment 49683

View attachment 49684

View attachment 162702

View attachment 162703

View attachment 162704

View attachment 162705

View attachment 162706

View attachment 162707

View attachment 162708

View attachment 162709

View attachment 162710
 

Attachments

  • IMG_1116.jpg
    IMG_1116.jpg
    5.6 KB · Views: 0
  • IMG_1112.jpg
    IMG_1112.jpg
    5.6 KB · Views: 0
  • IMG_1109.jpg
    IMG_1109.jpg
    2.1 KB · Views: 0
  • IMG_1108.jpg
    IMG_1108.jpg
    5.4 KB · Views: 0
  • IMG_1107.jpg
    IMG_1107.jpg
    2.7 KB · Views: 0
  • IMG_1105.jpg
    IMG_1105.jpg
    5.1 KB · Views: 0
  • IMG_1104.jpg
    IMG_1104.jpg
    4.7 KB · Views: 0
  • IMG_1103.jpg
    IMG_1103.jpg
    5.1 KB · Views: 0
  • IMG_1101.jpg
    IMG_1101.jpg
    4.6 KB · Views: 0
Status
Not open for further replies.
Back
Top