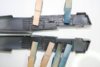
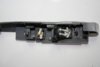
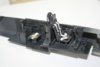
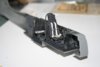
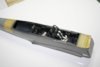
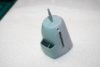
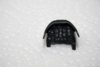
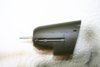
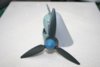
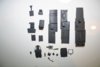
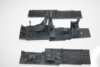
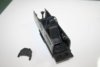
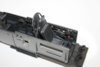
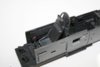
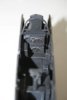
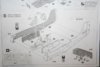
Theme editor

Scale Model Shop

Hasegawa 1/32 Junkers JU87D STUKA

Status
Not open for further replies.

Vaughan

Well-known member
Joined
Apr 1, 2011
Messages
3,246
Reaction score
51
Points
48
1/3
Thread owner

Attachments

  • _MG_0075.jpg
    _MG_0075.jpg
    5.5 KB · Views: 0
  • IMG_0071.jpg
    IMG_0071.jpg
    5.2 KB · Views: 0
Good choice! I've built a couple of these and it's a good kit. Having seen your Ar196 I can safely say this will be a walk in the park for you.

Cheers

Steve
 
Ah! I'll be watching this as well.

You got that at a bargain price!

Ian M
 
Thread owner
Hi would someone be able to move my thread to the planes and helicopter section.

Thanks Vaughan
 
Another big scale ,awesome! Looking forward to this build Vaughan.cheers Trey
 
Thread owner
The office is weathered with just the rear gunners seat and belts to add (I have just realised that I don't have any seat belts). The decals for the rear dials went down well, lots of decal soft was need but worked well. The office is a dry fit at the moment not sure wether to fit the side panels directly to the fuselage halves and then add the floor. Anyone have some ideas on this one?

Vaughan

View attachment 43592

View attachment 43593

View attachment 43594

View attachment 43595

View attachment 43596

View attachment 43597

View attachment 156618

View attachment 156619

View attachment 156620

View attachment 156621

View attachment 156622

View attachment 156623
 

Attachments

  • IMG_0005.jpg
    IMG_0005.jpg
    1.9 KB · Views: 0
  • IMG_0012.jpg
    IMG_0012.jpg
    1.6 KB · Views: 0
  • IMG_0014.jpg
    IMG_0014.jpg
    1.9 KB · Views: 0
  • IMG_0015.jpg
    IMG_0015.jpg
    1.9 KB · Views: 0
  • IMG_0020.jpg
    IMG_0020.jpg
    1.8 KB · Views: 0
  • IMG_0022.jpg
    IMG_0022.jpg
    1.9 KB · Views: 0
:tongueout2:

niceeeee choice and work so far my frined... VERY NICE INDEAD :)

Like scheme says it goes directly to the fuselage and afterwards floor...

I will do like this... I'm not shure, but seems to be a good way to do it because floor going underside sides panels into the pins of fuselage... and I think will fit ok...

If I understand right your question?

Roman
 
I love the Stuka's! Fantastic work so far Vaughan, if your last build is anything to go by this will be a stunner!
 
looking forward to this ... have a soft spot for the ju87 ... very ugly looking bird but tons of character ........ nice looking cockpit ...rgds lindsey
 
Thread owner
Thanks for that Roman. It's not always obvious what to attach first but will give your idea a go.

Vaughan
 
Thread owner
Hi All

The side walls are on. I've taken the advice of Roman and Steve on this one. A small area of the upper fuselage has to be trimmed to allow the canopy to fit properly. I had a look at the canopy at the same time all the framework is embossed on the inside, I've never come across this before, so the outside is completely smooth this wont make masking very easy as there's no frame to cut to. Does anybody have any ideas on this one?. It might be a case of ordering some canopy masks from Eduard although not cheap and I still need some seat belts.

Vaughan

View attachment 43601

View attachment 43602

View attachment 43603

View attachment 43604

View attachment 156627

View attachment 156628

View attachment 156629

View attachment 156630
 

Attachments

  • IMG_0031.jpg
    IMG_0031.jpg
    5.5 KB · Views: 0
  • IMG_0030.jpg
    IMG_0030.jpg
    4.5 KB · Views: 0
  • IMG_0029.jpg
    IMG_0029.jpg
    4.4 KB · Views: 0
  • IMG_0027.jpg
    IMG_0027.jpg
    4.4 KB · Views: 0
Dont spend your money for that masking tapes... tamiya masking tape will do far enough... Of course if we are talking about canopy...

My way: Put masking tape a cross the canopy, from begining to ned to cover all (let me say) right side of canopy. Put canopy on source of light and cut on the edges of "panel lines" of canopy.

Just must be carefull when you do it... imageine that you are some brain suregery doctor LOOL

And of course these procedure is always done with me when I have magnifier glass on my head.

And must say... looks great so far :)

Roman
 
I take it this kit doesn't come with the decals for inside and out then.

I masked mine in the usual way which was a fiddle as you've noticed. I also didn't paint the inside,just put the interior colour on the outside first in my normal way. That inner canopy framing is quite obvious on the real thing and there is a case for masking and painting the inside. If you did that I think masks would be a justifiable investment

An alternative,for the exterior anyway,is to use appropriately coloured decal film to represent the frames. Unless I'm mistaken some of the frames have the splinter demarcation on them making this option tricky too!

Cheers

Steve

Cheers

Steve
 
we are talking about interior of canopy... sorry, missunderstand

What I'm doing and is quiet well...

Put masked canopy on the plane, before priming... or whatever you do in your style...

Spray all over same color of cockpit... it's german gray if I'm right...

and you will see there is not need for painting of interrior of canopy because is transparent and you can see german gray color from inside of cocpit...

after that I put all over primer and thats it :)

Roman
 
Thread owner
You were right in what you said the first time Roman but the thing was that the usual embossed framework on the outside of the canopy is missing it only appears on the inside and that's what's going to make masking difficult. I've just checked the decal sheet Steve and your right there are decals for inside and out but it looks like it would be a total nightmare to apply them. The Hasegawa decals are very thin and I think they would split and fall apart very easily. I know the canopy can wait till later but it still needs some thought.

Vaughan
 
I always have a problems with decals who are apllying on the canopy... they are NEVER made like meassure of canopy.

Yes, best you give a little more thought... tomorow is new day :)
 
Thread owner

Attachments

  • IMG_0174.jpg
    IMG_0174.jpg
    4.7 KB · Views: 0
  • IMG_0177.jpg
    IMG_0177.jpg
    5.1 KB · Views: 0
  • IMG_0180.jpg
    IMG_0180.jpg
    5.2 KB · Views: 0
  • IMG_0183.jpg
    IMG_0183.jpg
    4.9 KB · Views: 0
Thread owner
Hi All

I have made a start on the engine cowlings RLM 65 on the underside and then masked and a base coat of RLM 71 for the camo. The prop and nose cone have a coat of RLM 70. The tip of the nose cone is finished in bright blue . I used deep sea blue with two drops of white to achieve this colour. I've also finished off the instrument panel with some decals, gun sight is yet to be added. The fuselage has still to be joined, I'm putting it off at the moment as seams are not my strong point and I haven't decided on wether to use plastic weld or Revell contacta poly cement.

Vaughan

View attachment 43954

View attachment 43955

View attachment 43956

View attachment 43957

View attachment 156980

View attachment 156981

View attachment 156982

View attachment 156983
 

Attachments

  • _MG_0003.jpg
    _MG_0003.jpg
    4.6 KB · Views: 0
  • _MG_0004.jpg
    _MG_0004.jpg
    4.6 KB · Views: 0
  • _MG_0019.jpg
    _MG_0019.jpg
    4.8 KB · Views: 0
  • IMG_0010.jpg
    IMG_0010.jpg
    4.9 KB · Views: 0
Status
Not open for further replies.
Back
Top