Theme editor

Scale Model Shop

HobbyBoss 1/48 KV-1 “Small Turret”

Status
Not open for further replies.

Steve Brodie

New member
Joined
Sep 17, 2014
Messages
4,652
Reaction score
0
Points
0
1/3
Thread owner
Morning,


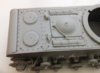
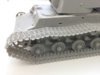
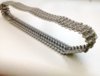
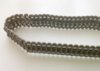
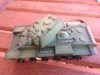
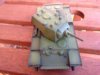
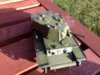
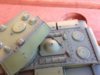
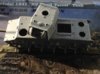
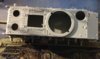
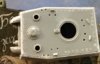
Whilst waiting for some primer to dry on resin bits and bobs for my coyote build, I cracked this bad boy out; HobbyBoss’s 1/48 KV-1 “Small Turret”. This is my first HobbyBoss kit and so far impressions are good, couple of fit issues/gaps with the turret, made from 6 pieces, which need filling and very gently smoothing out as some nice casting details I don’t want o loose, so have intentionally left the putty less than mirror smooth. Going to be a nice little tank when finished.


View attachment 250223

View attachment 250224

View attachment 250225

View attachment 250226

View attachment 250227
 

Attachments

  • IMG_1401.JPG
    IMG_1401.JPG
    2.6 KB · Views: 0
  • IMG_1409.JPG
    IMG_1409.JPG
    2.7 KB · Views: 0
  • IMG_1406.JPG
    IMG_1406.JPG
    2.4 KB · Views: 0
  • IMG_1405.JPG
    IMG_1405.JPG
    2.4 KB · Views: 0
  • IMG_1402.JPG
    IMG_1402.JPG
    2.4 KB · Views: 0
Will be following this with interest Steve.


I've thought about buying one of these Hobbyboss afv's.
 
I love these HobbyBoss 1/48, the T34 with a full interior is a great kit. Tracks re a tad tricky but the kits are fine.
 
Nice work Steve.


A little tip for you. Next time you do any filling near some detail you need to keep, put a strip of masking tape up to the edge of the gap that needs filling, then when you put the filler on take the tape off then all you need to sand is the very edge so saving the detail.


A little edit.


When the filler as dried put some more tape on when sanding then if you do sand too close to the detail it will sand the tape first and save the detail.
 
Thread owner
\ said:
Nice work Steve.
A little tip for you. Next time you do any filling near some detail you need to keep, put a strip of masking tape up to the edge of the gap that needs filling, then when you put the filler on take the tape off then all you need to sand is the very edge so saving the detail.


A little edit.


When the filler as dried put some more tape on when sanding then if you do sand too close to the detail it will sand the tape first and save the detail.
What a great Tip! will remember for the future
 
very nice Steve,Im,close to the end of my 1.35 KV 1 small turret build,


what a shame so meany bits for the turret,you think it would be on four bits should clean up


fine,and what a good tip from,Ian,as well remember and use as well, ;)
 
Thread owner
Whilst watching my local hockey team playing in P’boro – marvel of the internet !, I cracked on with the KayVee, added the inner part of the wheels and drive sprocket, couple of covers on the engine deck and the exhausts – instructions are wrong, as I found out to my cost. Exhausts are labelled wrong, noticed this when the glue had but almost set. Luckily I have managed to slice them and refit. I started on the track links using the jig provided, which is quite good, I tried standard glue, but the links kept slipping/breaking. So using super glue and working quite quick, managed to get the seven links together and then wrapped them round the jig and left to set over night. Checked this morning and it would seem, comparing what I had to the box art, they are the wrong way round !!!!!!!!. To be fair the instructions are pants at this point with no clear definition as to which way round they should have been set, so this tank will have one set on wrong. Bit of mud and weathering on the front and rear and the issue will be gone though.


View attachment 250524

View attachment 250525

View attachment 250526

View attachment 250527
 

Attachments

  • IMG_1425.JPG
    IMG_1425.JPG
    2.3 KB · Views: 0
  • IMG_1421.JPG
    IMG_1421.JPG
    2 KB · Views: 0
  • IMG_1418.JPG
    IMG_1418.JPG
    2.6 KB · Views: 0
  • IMG_1416.JPG
    IMG_1416.JPG
    1.6 KB · Views: 0
nice progress so far on this one,Steve,glad you court the misplacement of the exhausts in time,


what a great jig that is give a very neat and nice curve to the tracks,if you have not done to muck of the tracks,


maybe you still have time to fix the mistake your done,as in altering the curve to suit ,by placing in hot water,


and reshaping, ;)
 
Thread owner

Attachments

  • IMG_1431.JPG
    IMG_1431.JPG
    2.1 KB · Views: 0
  • t2.jpg
    t2.jpg
    2.2 KB · Views: 0
  • t1.jpg
    t1.jpg
    2.1 KB · Views: 0
looking good Steve,and I do like the way you put them on all in one bit,


and then the other wheels,and so on,will remember that way, ;)
 
\ said:
First track run complete after a hours work :) - dont know how it took that long, considering upper and lower runs come as one piece but it did;
View attachment 151070 View attachment 151071 View attachment 151072


Another lesson learned - don't glue the drive sprocket on till the tracks have been added !!!!! :mad::mad:
I have done this so many times I have to keep telling myself not to glue sprockets until everything is done. If you do need to for some reason then stick them on with a drop of PVA. That way when you need to, a quick twist and it will come off again.
 
Status
Not open for further replies.
Back
Top