Theme editor

Scale Model Shop

Hobbyboss 1:48 Ta152 C-11

Status
Not open for further replies.

matto21

New member
Joined
Apr 27, 2014
Messages
182
Reaction score
0
Points
0
1/3
Thread owner
Hello everyone,


I've got several models in varying stages of assembly at the moment [1:48 Eduard Mirage IIICJ, 1:32 Revell Bf109 G-10, 1:48 Eduard Tempest, 1:72 Revell Phantom] and I don't have the motivation to finish any of them at the moment.


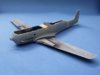
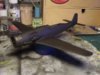
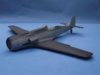
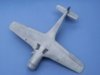
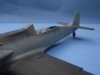
I picked up a Hobbyboss Ta152 C-11 for a bargain price and also bought the new tool Airfix Hurricane Mk.1 [if I get bored!].


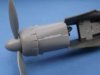
I'm aiming to build it OOTB as much as possible and I'm not worried about any errors [mainly mine] when it comes to painting - I just want to build something [famous last words....]


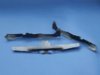
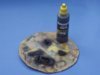
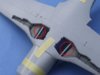
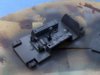
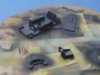
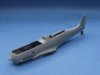
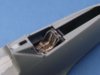
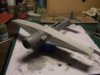
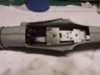
I've not made as much progress as I'd have liked this week despite being off work but I have managed to prep some of the parts and get them sprayed with primer prior to getting some colour on them tomorrow. I've been struggling to find a primer that I liked for ages - tried Vallejo's but found it really difficult to clean out of the airbrush. This Ammo stuff is really good, sprays well and cleans easily.


View attachment 117120


View attachment 117121


View attachment 230143

View attachment 230144
 

Attachments

  • 1.jpg
    1.jpg
    1.6 KB · Views: 0
  • 2.jpg
    2.jpg
    1.8 KB · Views: 0
I like the subject- nice choice! Looking forward to more porgress
 
Thread owner
A bit of progress - cockpit and wheelwells have been basecoated. Mid Gray for the cockpit and RLM Gray for the wheelwells [both Tamiya colours].


View attachment 117745


View attachment 117744


The instructions don't make it clear that part of the fuselage also need painting to match the wheel bays - I only noticed when dry fitting the parts.


View attachment 117746


And finally a mock up of things so far.


View attachment 117743


Thanks

View attachment 230766

View attachment 230767

View attachment 230768

View attachment 230769
 

Attachments

  • 6.jpg
    6.jpg
    2.2 KB · Views: 0
  • 4.jpg
    4.jpg
    2.3 KB · Views: 0
  • 5.jpg
    5.jpg
    2.4 KB · Views: 0
  • 3.jpg
    3.jpg
    1.9 KB · Views: 0
Yes, it's liking good to start with. Your pictures are also nice and clear and the exposure/white balance is good so I look forward to more pics haha.


I don't put much effort in until it's finished. Nice one
 
Thread owner
Thanks for the comments. From first impressions it does look like good kit, after dry fitting some of the parts, fit seems pretty good too - let's hope they're not famous last words!


Dougie - the fact the pics are clear is more luck than skill!
 
Thread owner
So much for a double build, so much for a quick build!


2 months on and I've finally got the fuselage halves together! I used some spare Eduard belts in the cockpit because the kit ones just look huge! I'm really going off these PE belts, they look great but I find them such a faff to use and attach to the seat. I didn't end up doing much to the cockpit apart from some washes, a quick drybrush and some minor chipping on the seat [barely visible!].


View attachment 121981


The fuselage goes together pretty well although the seams need quite a bit of filling. I've started this process off using Mr Surfacer 500 but it'll need a few more applications to get things right.


View attachment 121982


View attachment 121983


View attachment 121984


View attachment 121985


Thanks for looking


Matt

View attachment 234872

View attachment 234873

View attachment 234874

View attachment 234875

View attachment 234876
 

Attachments

  • 14.jpg
    14.jpg
    1.9 KB · Views: 0
  • 12.jpg
    12.jpg
    1.5 KB · Views: 0
  • 11.jpg
    11.jpg
    1.5 KB · Views: 0
  • 7.jpg
    7.jpg
    1.6 KB · Views: 0
  • 9.jpg
    9.jpg
    2 KB · Views: 0
Thread owner
Almost ready for paint!


Unless I'm mising something, there's no floor below the cockpit so anyone looking up into the undercarriage bay can see right through the model. It's not pretty or clever but I painted everything black so at least it hide the fact that it's so empty!


View attachment 122596


I've also attached the wings - pretty good fit to be fair.


View attachment 122597


It's starting to look like a 190 now...

View attachment 235487

View attachment 235488
 

Attachments

  • 16.jpg
    16.jpg
    2.7 KB · Views: 0
  • 15.jpg
    15.jpg
    2.4 KB · Views: 0
Looks good Matt! If it's of any help, there's no wheel well bays on the 190D or Ta 152 as far as I'm aware.


My 190 D-11 definitely is the same as yours!
 
Looks great so far.


I built the Hobby Boss R14 version and have to say that kit is what convinced me that aircraft kits could be pleasant to build. up to that point I had despised aircraft kits due to past experiences and intended never to build them again. Then this one came along... total redemption!


Looking forward to seeing this one completed.
 
Thread owner
Thanks for your positive comments!


Managed to get the first layer of colour on. I normally paint all my models with Tamiya acrylics but for the first time I've used Mr Hobby acrylics and I have to say that I'm impressed! I've used their RLM76 Light Blue and managed to get a nicely [in my opinion] shaded finish which is the beauty of using a black base coat. I've also highlighted this a little bit with the RLM76 mixed with white.


Incidentally, I've always used Klear as a gloss coat but I've often struggled to get a decent finish on a consistent basis. This time I tried mixing Klear with Ultimate Airbrush Thinner and found it gave a much better finish - sprayed better and dried slightly glossier. Win win!


View attachment 123501


View attachment 123502


View attachment 123503


Thanks for looking


Matt

View attachment 236392

View attachment 236393

View attachment 236394
 

Attachments

  • 20.jpg
    20.jpg
    1.7 KB · Views: 0
  • 19.jpg
    19.jpg
    1.6 KB · Views: 0
  • 21.jpg
    21.jpg
    1.8 KB · Views: 0
Status
Not open for further replies.
Back
Top