G
Guest
Guest
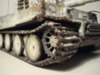
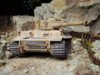
Looking at the photos of your "works of art" the one thing I would like to know is how do you get your tank tracks on your kits to look like real tracks, I have looked at the paint range and seen nothing similar, can anyone please advise
Once again
Thanks in advance
Kelvgood
Once again
Thanks in advance
Kelvgood