Theme editor

Scale Model Shop

Italeri Crusader III 1/35

Status
Not open for further replies.

Ian M

Administrator
Staff member
Joined
Dec 14, 2008
Messages
18,331
Reaction score
563
Points
113
1/3
Thread owner
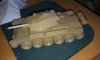
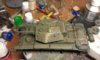
As I had the camera in hand I thought I would post a couple of pictures of my current project.
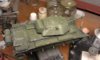
A Crusader III.

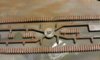
Although a re release, it is the original tool and I have to say up to now I am quite impressed with the detail and the fineness of some of the parts. OK you can see that the tool is a little tired and the register on some of the parts is a fraction off. No problem on the larger parts. Some of the finer parts, pipes tubes and bars, are getting replaces with brass wire. I would of done that any way so what the hey!

Not sure which version the paint will be. There are three options on the plans A green one, a yellow one and a yellow/black one (probably the most seen of the three).

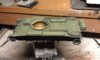
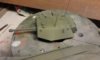
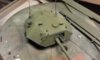
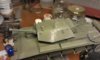
This is where I am at.

View attachment 37554View attachment 37555

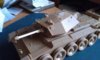
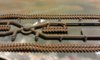
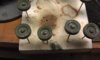
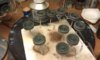
Drilling the rims out was a labour of love.....Dude thats a lot a holes!

Ian M

View attachment 41701

View attachment 41702

View attachment 154727

View attachment 154728
 

Attachments

  • IMAG0103.jpg
    IMAG0103.jpg
    2.1 KB · Views: 0
  • IMAG0104.jpg
    IMAG0104.jpg
    2.6 KB · Views: 0
That's looking really good Ian, though I'd never have the patience to drill all those holes! I'm looking forward to seeing you paint it.

Patrick
 
Thread owner
Thanks Patrick. Wasn't that many holes actually. Only 36 per rim (36X2X20, oh that is a lot of holes!) I must confess that I did them in four sessions.

Right now I have just primed it after having spent the day putting all the fidly bits on. I Think I will go for the Green option which is a tank from the 26th armoured brigade, though the all over sand version for the 9th Royal lancers is running a close second.....

Ian M
 
The green sounds a good choice, but in which theater would that one have served in?I've only seen Crusaders in North Africa. I quite fancy a crack at something from the Afrika Korps, never done a desert vehicle before.
 
Thread owner
Funnily enough it was from a tank that was in Tunisia! 26th Armoured Brigade, 6th Armoured div. Tunisia, Feb 1943. Well thats what it says on the instructions....!

Well I just painted the first colour.....Bronze Green. I also painted the tracks Earth. So at some point in time the tank will get a few highlights and the like and the tracks will get a dry brush with silver.

Here is the first coat down.

View attachment 37580 View attachment 37581 View attachment 37582

I was just a bout to paint the tires when I suddenly thought that I had better wait until the wheels had gotten a few highlights on them as well.

Ian M

View attachment 41718

View attachment 41719

View attachment 41720

View attachment 154744

View attachment 154745

View attachment 154746
 

Attachments

  • wheels.jpg
    wheels.jpg
    2.7 KB · Views: 0
  • turret.jpg
    turret.jpg
    2.5 KB · Views: 0
  • Bronze green.jpg
    Bronze green.jpg
    2.5 KB · Views: 0
Looking very good Ian makes me want to do a tank Iwill be watching this one grow
 
Thread owner
Well found a bit of time today to do a bit more and post a few photos.

View attachment 37617 View attachment 37616

I got the tracks painted. A coat of flat earth then dry brushed to brighten the contact areas.

View attachment 37618 View attachment 37609 View attachment 37615

Then the road wheels got a light going over with Olive Green, Dry brushed to ware the paint down and a bit of rust in the nooks and krannies.

View attachment 37611 View attachment 37612 View attachment 37610

Here the Turret and hull has been faded a little again with Olive green.

View attachment 37608 View attachment 37607

These were then attacked with the dry brush

View attachment 37614View attachment 37613

Then give a bit of rust with the oils.

Too Much? Not enough?

The next run is painting all those rubber wheel bands!

Ian M

View attachment 41745

View attachment 41746

View attachment 41747

View attachment 41748

View attachment 41749

View attachment 41750

View attachment 41751

View attachment 41752

View attachment 41753

View attachment 41754

View attachment 41755

View attachment 41756

View attachment 154771

View attachment 154772

View attachment 154773

View attachment 154774

View attachment 154775

View attachment 154776

View attachment 154777

View attachment 154778

View attachment 154779

View attachment 154780

View attachment 154781

View attachment 154782
 

Attachments

  • Tracks Paioted outer.jpg
    Tracks Paioted outer.jpg
    2.2 KB · Views: 0
  • Tracks painted inner.jpg
    Tracks painted inner.jpg
    2.5 KB · Views: 0
  • Rust Road Wheels.jpg
    Rust Road Wheels.jpg
    2.1 KB · Views: 0
  • Rust II.jpg
    Rust II.jpg
    2.7 KB · Views: 0
  • Rust I.jpg
    Rust I.jpg
    2.8 KB · Views: 0
  • Olive green highlights.jpg
    Olive green highlights.jpg
    2.4 KB · Views: 0
  • Olive Green Highlights Turret II.jpg
    Olive Green Highlights Turret II.jpg
    2 KB · Views: 0
  • Olive Green Highlights Turret I.jpg
    Olive Green Highlights Turret I.jpg
    2.3 KB · Views: 0
  • Metal Road Wheels.jpg
    Metal Road Wheels.jpg
    2.2 KB · Views: 0
  • Drybrushed ware II.jpg
    Drybrushed ware II.jpg
    2.5 KB · Views: 0
  • Drybrushed ware I.jpg
    Drybrushed ware I.jpg
    2.4 KB · Views: 0
  • wheels with holes.jpg
    wheels with holes.jpg
    2.7 KB · Views: 0
It's come together really well Ian. I like your work with the AB to fade out the paintwork. I'm using oils as filters on my Pershing.

With regard to the rust, I'd have to say too much. I just can't see the crew allowing or being allowed to get it that bad. Just my opinion though!

Patrick
 
Thread owner
Hmm I thought so my self so no worries. I'll see If I can back it up a bit.

If not I'll just give it loads more and have the thing abandoned at the road side.

Ian M
 
Shouldn't be a problem to tone it down a bit as you've used oils. I've done the same thing with careful application of thinners.
 
Thread owner
After another day of non-stop eating at the father in law's I came back and gave the rust a swabbing down with a Q-tip and some white spirit. That seams to have done the trick. I will see what it dries like.

Ian M
 
Thread owner
Well I think it will do. For now.

Pictures in the finished section.

Ian M
 
Status
Not open for further replies.
Back
Top