Theme editor

Scale Model Shop

Italeri P51a mustang cross kit

yak face

Moderator
Staff member
Joined
Jun 13, 2009
Messages
14,406
Reaction score
956
Points
113
Age
60
1/3
Thread owner
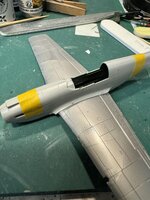
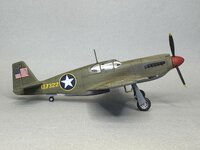
Heres one Ive been working on in the background , the Italeri P51a mustang . I love the look of the early razorback mustangs even the often forgotten Allison engined A version . I especially like the clean lines of the cannon armed versions . The reason this is a kit bash / cross kit is that Italeri lazily only tooled a different fuselage sprue and used the wing sprue from their P51D , which is wrong . The A version ( and B and C )doesnt have the fillet on the inner leading edge of the wing that was introduced on the D .
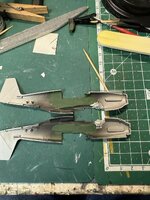
So I obtained a Revell P51 B on ebay that had two kits in the box but only 1 set of decals -perfect for this build.
The wing from the revell kit will be mated with the Italeri fuselage and with a little fettling will produce an accurate A model. IMG_4683.jpg IMG_4684.jpg IMG_4686.jpg IMG_4688.jpg IMG_4689.jpg
 
Sounds like a well thought out plan. You'll end up with a much more accurate model. I hope the fit of the Revell wings onto the Italeri fuselage goes ok.
 
Thread owner
I’m not going to go mad on the cockpit of this as its a closed canopy so its just going to get a paint job and some masking tape belts. One thing ive done before the fuselage halves go together is to fill the front of the wing fillet area with a superglue and baking powder mix , so that when im sanding this area theres something solid if I go through the plastic . I put the Revell B wing over the top of the Italeri one so you can see the difference . It needed a bit of fettling under the intake and a piece adding at the front but went on ok. The area where Italeri have tooled the fuselage to meet the D wing fillet now needs to be sanded / filed back to blend in with the correct wing and then under the nose just needs bulking up a bit , hence the massive splodge of green stuff .
3E543311-97F3-4F52-9A24-C0E917816304.jpg F6EF8FDF-F79F-4520-9640-2E5F861102F4.jpg BC64DF9F-62C6-444A-B24E-C5838121C8F5.jpg FC1E99B6-5E2D-482B-9F7E-75B25BB74636.jpg 7F09C181-4BAB-4799-944A-9248518EC6C9.jpg
 

Attachments

  • BC64DF9F-62C6-444A-B24E-C5838121C8F5.jpg
    BC64DF9F-62C6-444A-B24E-C5838121C8F5.jpg
    331.9 KB · Views: 0
  • 3E543311-97F3-4F52-9A24-C0E917816304.jpg
    3E543311-97F3-4F52-9A24-C0E917816304.jpg
    377.1 KB · Views: 0
A fair bit of work then. Looks as if you have it in hand, just lots of filling and sanding. Just got to ensure a smooth transition wing to body.
 
Thread owner
Next instalment - the excess fillet at the wing fuselage joint has been sanded and shaped ( in the pic the left side has been done , the right side was still to do ), so too
has the underside of the nose . The canopy has been masked and fitted and its now time to look at the cannons . The Italeri kit supplies these with a section of the wing leading edge , which should fit into a cut out on the D wing ( obviously they modified the moulds slightly to account for the cannons ) but naturally the Revell wing is different . Its not a problem as I’m going to scratch the cannons anyway cause the kit ones are rubbish .
IMG_4730.jpg IMG_4731.jpg IMG_4743.jpg IMG_4742.jpg IMG_4732.png
 
Thread owner
Airframe all together now and canopy is on . As mentioned the kit cannons are pants , plus they are meant to fit the unused italeri wing - so its time to scratch some . I first had to find something for the tapered shrouds , nothing came up in the spares box then I thought how about cocktail sticks?
After cutting off the ends and carefully drilling for the brass tube barrels they were cut to size and four holes drilled in the wing leading edge. A bit of acrylic putty to blend them in and they were fine.
The whole thing was then primed Halfords grey , which is a great match for US Neutral grey , so the underside was left as is and masked off ready for the olive drab upper.
IMG_4745.jpg IMG_4747.jpg IMG_4746.jpg IMG_4744.jpg IMG_4748.jpg
 
Thread owner
Top colour has gone on and after a coat of Klear the decals were applied. The whole airframe has had a wash to accent the panel lines and give it a worn appearance . I found a good reference pic of the cannons so I started by cutting some brass tubing . The recoil springs will be made from coiled wire .
IMG_4798.jpg IMG_4799.jpg IMG_4800.jpg IMG_3941.jpg IMG_4802.jpg
 

Attachments

  • IMG_4798.jpg
    IMG_4798.jpg
    406.8 KB · Views: 0
Thread owner
Right , onto the cannons . The four barrels have been cut to length from brass tubing , and some suitable wire has been sourced . I wrapped the wire round a long length of the tubing and then removed it . The reference pic shows about 7 or 8 coils visible so I cut four pieces of about that many . The brass barrels were glued into the ends of the shrouds and the coiled wire slid over them. It was just a case of pushing the coil up tight and applying a drop of superglue, they were then painted black with a silver tip and will be getting a dusting of metallic grey later .
IMG_4803.jpg IMG_4804.jpg IMG_4805.jpg IMG_4806.jpg IMG_4807.jpg
 

Attachments

  • IMG_4803.jpg
    IMG_4803.jpg
    314.1 KB · Views: 0
Thread owner
Well its finished , the days off work have allowed this to progress a lot quicker than usual .After the guns were finished I added a little exhaust staining and it got a final coat of matt to seal everything in . I didnt add an aerial wire as photos of this aircraft show it didn't have one .
heres a few pics to finish off this thread and I’ll put a completed set up in a bit , thanks to all who’ve been watching .
Click image for larger version  Name:	IMG_4824.jpg Views:	0 Size:	285.6 KB ID:	1244443 Click image for larger version  Name:	IMG_4825.jpg Views:	0 Size:	274.9 KB ID:	1244444 Click image for larger version  Name:	IMG_4826.jpg Views:	0 Size:	177.6 KB ID:	1244445 Click image for larger version  Name:	IMG_4829.jpg Views:	0 Size:	343.6 KB ID:	1244447
 

Attachments

  • IMG_4827.jpg
    IMG_4827.jpg
    321.2 KB · Views: 0
Last edited:
Back
Top