Theme editor

Scale Model Shop

Joe's 1/72 Fujimi Sea Harrier FRS.1

Status
Not open for further replies.

flyjoe180

SMF Supporters
Joined
Jan 18, 2012
Messages
13,296
Reaction score
1,096
Points
113
Location
Earth
1/3
Thread owner

Attachments

  • IMG_2255.JPG
    IMG_2255.JPG
    2 KB · Views: 0
  • IMG_2263.JPG
    IMG_2263.JPG
    2.3 KB · Views: 0
  • IMG_2259.JPG
    IMG_2259.JPG
    2.4 KB · Views: 0
Thread owner
I quite like the look of the 801 scheme so I think I will go with that version. All pre-Falklands of course as you can see.
 
Thread owner
Cockpit started. No decals on this old kit, so painted the side console details and used the old-style instruction manual instrument panel cut out for the main panel. Ejection seat straps and handle scratch built from tape and fuse wire respectively.

View attachment 82264


View attachment 82265


This is no modern kit despite the fine engraved surfaces. So far the fit has been average and have had to deal with a bit of flash. All fun stuff though. As an aside, I read that the kit designer moved from Fujimi to ESCI and that is why there are similarities in the construction processes of the two kits.

View attachment 82263

View attachment 195286

View attachment 195287

View attachment 195288
 

Attachments

  • IMG_2371.JPG
    IMG_2371.JPG
    1.7 KB · Views: 0
  • IMG_2370.JPG
    IMG_2370.JPG
    2.8 KB · Views: 0
  • IMG_2369.JPG
    IMG_2369.JPG
    3.1 KB · Views: 0
Thread owner
This kit may have a resemblance to the ESCI kit in format, but that is where the similarities end. Nearly everything has required filling and sanding, parts have been aligned only to find that one section is larger than the other, and there are asymmetry issues with the intakes and canopy areas. I am battling through the issues, but can only manage an hour or two at the most each time before I get frustrated. The instructions are rubbish really, and the model has parts missing (as in not even included in the kit) which are presented on the paint guides and box. I've been referring to the Italeri GR.3 instructions for guidance as luckily they are similar in construction; I have scratch built some aerials and the top beacon and re-scribed some lost panel lines. I think it's nearly at the stage where if I sand more I will end up with holes in it, so it's off to the priming stage soon. I'll add some photos later, there really hasn't been much of interest to post so far unless you want to see the issues. First Fujimi kit I've built, and probably the last to be honest. Hasegawa's Sea Harrier cops a lot of flak but this one has to be close for it's problems.
 
Thread owner
It's been a while since I updated this Sea Harrier build, but I have not been idle with it, despite it fighting me every step of the way. I have to do a little at a time or it has a habit of beating my motivation down.

I had filled and sanded the airframe within a millimetre of its life, any more and I would have seen daylight through it. Managed to save some of the lost lines and re-scribed the ones I lost. As I mentioned earlier I have had to scratch build some aerials and a top beacon.

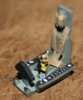
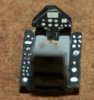
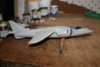
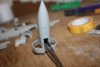
The nose section did not mate properly and the nose landing gear had no walls or detail. I scratch built some walls with plastic card and forced them against the sides with CA glue:

View attachment 83874


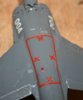
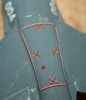
You can see some of the fit issues with the airframe here. Also I opened up the top engine vents:

View attachment 83875


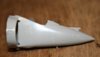
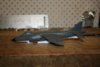
A lot of filler and sanding and time and we have a much better result, with canopy fitted. More sanding followed this:

View attachment 83876


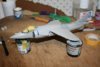
At last it was primed and ready for the next steps:

View attachment 83877


Humbrol gloss white sprayed nicely and evenly on the underside. The new batches of Humbrol are a great improvement:

View attachment 83878


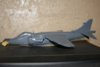
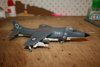
Next was the upper surface colour of Extra Dark Sea Grey, again Humbrol sprayed nice and evenly:

View attachment 83879


Seepage from the EDSG was cleaned up and the nose cone, various aerials and sensors painted. Wing stores and pylons and the landing gear are done as well and ready for later:

View attachment 83880


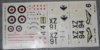
Decals have been applied but there were various issues with the roundels and top decals. They were after all around 31 years old having been produced in 1983. A little out of register on the top but cleaned up with some careful masking and a steady hand:

View attachment 83881


View attachment 83882


More to come soon, but should be completed in the next day or two if things go my way with the final varnishes. I will be using Humbrol Matt Cote (in the 28ml bottle) via the airbrush to tone the gloss down.

View attachment 196897

View attachment 196898

View attachment 196899

View attachment 196900

View attachment 196901

View attachment 196902

View attachment 196903

View attachment 196904

View attachment 196905
 

Attachments

  • IMG_2483.JPG
    IMG_2483.JPG
    2.3 KB · Views: 0
  • IMG_2482.JPG
    IMG_2482.JPG
    2.2 KB · Views: 0
  • IMG_2458.JPG
    IMG_2458.JPG
    2.1 KB · Views: 0
  • IMG_2444.JPG
    IMG_2444.JPG
    1.9 KB · Views: 0
  • IMG_2432.JPG
    IMG_2432.JPG
    1.9 KB · Views: 0
  • IMG_2426.JPG
    IMG_2426.JPG
    2.7 KB · Views: 0
  • IMG_2417.JPG
    IMG_2417.JPG
    2.7 KB · Views: 0
  • IMG_2412.JPG
    IMG_2412.JPG
    2.4 KB · Views: 0
  • IMG_2403.JPG
    IMG_2403.JPG
    2.4 KB · Views: 0
Thread owner
Today I managed to complete the Sea Harrier. I used Humbrol Matt Cote for the first time through the airbrush and it was flawless, using a 50/50 mix of the product with enamel thinners. One coat reduced the gloss to a nice sheen resembling a slightly dull satin coat. Exhaust blast plates, vectoring nozzles, wing stores and landing gear attached. Considering the trials and tribulations with this build the result is okay. Will post in the completed section shortly. Thanks for following this build.

View attachment 83949


View attachment 196972
 

Attachments

  • IMG_2493.JPG
    IMG_2493.JPG
    2.4 KB · Views: 0
Thread owner
Completed build thread here http://www.scale-models.co.uk/community/threads/joes-fujimi-1-72-sea-harrier-fleet-air-arm-sig.27608/
 
Status
Not open for further replies.
Back
Top