Theme editor

Scale Model Shop

Just Started Monogram Rebox of the Golden Knight of Nice

  • Thread starter Thread starter Guest
  • Start date Start date
Status
Not open for further replies.
G

Guest

Guest
Thread owner
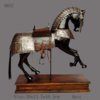
I fancied building this because I bought some gold leafy stuff from Hobbycraft to mend a plate. I thought it might be interesting to gild something. So this is the 'something'.


The plastic kit is big and very basic, and the horse in my opinion not such a good example for a knightly steed. After a couple of weeks of pondering I decided to have a go at beefing up the horse to a more manly beast.


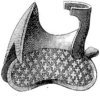
How to make cart horse type hairy legs was the problem. I settled on Isopon car filler. As it can be sanded back to nothing if all goes wrong and is quick to work with. Too quick if too much harder is used.


Have look at the progress so far and if anyone has attempted this kind of modification before I would be interested to hear from them. The photos are self explanatory and all of the tube gluing, sanding and isoponning was done in the last 2 hours.


If the legs work out Ok, I will have to try not to paint it to look like one those pot chestnut dray horses you seen in antique shops....


View attachment 119195


View attachment 119196


View attachment 119197

View attachment 119198


View attachment 232217

View attachment 232218

View attachment 232219

View attachment 232220
 
do like the looks so far the legs have turned out well,maybe add more into his main,as a


haflinger or one of the heaver type horse have a main to match there feathers, ;)
 
Thread owner
\ said:
do like the looks so far the legs have turned out well,maybe add more into his main,as a
haflinger or one of the heaver type horse have a main to match there feathers, ;)
Not sure what to do with the main. The kit has full armour which covers it up, but it look a bit toy like. I am considering not using the armour in which case I will have to sort the main and the saddle blanket. I'll see how the legs turn out before I decide. Interesting build though, last kit I made like this was an Airfix Joan of Arc a million years ago. Doing the Revell Wrecking truck sent me down a 'not in my comfort zone' kind of trip it seems.
 

Attachments

  • Buddha-Statue-Hot-Sale-Promotion-Wedding-Russia-2014-European-Supply-font-b-Medieval-b-font-font.jpg
    Buddha-Statue-Hot-Sale-Promotion-Wedding-Russia-2014-European-Supply-font-b-Medieval-b-font-font.jpg
    2.6 KB · Views: 0
  • index.jpg
    index.jpg
    3.8 KB · Views: 0
Thread owner
Cart horse ??? Knights didnt ride cart horses they rode Destriers or a palfry if you were skint. Looks good like the hairy legs you could have used milliput.
 
Thread owner
Spent an hour or so last night and part this morning carving the feet with a Dremel to remove most of the filler and try to represent hair. The problem is seeing what your are doing with all the dust. The images below show the result so far. The water colour black wash was put on to highlight the work so I can see the what it looks like. Not sure if I have done enough. It is the sort of thing where too much could ruin it, and not enough would leave it looking a bit like "My little pony" type toys.


I took the point about 'Cart Horse and looked up the 'Destrier'. So I removed a lot of the 'hair' to look more like the web images.


View attachment 119625

View attachment 119626

View attachment 119627

View attachment 119628


View attachment 232647

View attachment 232648

View attachment 232649

View attachment 232650
 
Thread owner
I love what you have done do far not that I know much bout horses and I gotta say your braver than me ;)
 
Thread owner
I managed some more work on the model over the last week. Thinned the armour and assembled the figure, more or less. The sword is a bit crude and if used it will make the model very tall since the knight is supposed to be waving it around in the air. I have decided to try to drop the arm and make a flail and have the chap waggling it around. I realise it is unlikely that a Gothic Knight would use such a weapon but it will look a bit more interesting and it means I do not have to use the crude sword. You can see the spiked ball being made from lead fishing weight with nail ends in the picture. The brass rod is just a holder.


I made up a scabbard for the sword and will I will dangle it from a belt, yet to be made. The right arm will need dropping but because the arm parts have a big chunk of the body it will mean gluing it on, then cutting the actual arm off and repositioning it. I will worry about making the chain mail match up when its fixed. The pictures below show the parts taped or banded just to get an idea of the finished model and its size.


View attachment 121535

View attachment 121536


View attachment 234426

View attachment 234427
 
Thread owner
Hi mate, looking very good and I like the idea of changing the weapon, its quite likely that this type of weapon was used, it was called a morning star, most mounted, and indeed foot, knights would carry more than one weapon. You could cut the lump off the arm that fixes to the body, re arrange the arm as to how you want it and use some milliput putty to re shape the joint, if you have to match up the chainmail, just get a syringe needle from your local vet, file the point down so the end is a C section and then indent the putty with the end so that the C faces one way on the row of chainmail and face the other way on the next row so that you get the S shape of chainmail, it will blend in well
 
Thread owner
Well after a pause for real work I did a bit more to the knight. After a bit of thought and looking about the internet I decided to give him a steel plate finish rather than gold. The overall idea was black horse, silver armour with red trim the gold embellish a few highlights to represent gilt work.


The horse was primed in various red and browns with an air brush to set the undertone. Final finish has been black(ish) colours air brushedon and then highlighted with brushed oils. Problem is the size of the horse. It needs less highlighting than smaller models. As it stands right now it is sort of on its way to being finished, but now I think I preferred the brown primer. I might go back to that later. Not a lot of the horse is actually visible if all the armour is used.


All the armour was first primed in Alclad black. The intention was to use Alclad steel but the two bottles I had were dried out. I therefore used Humbrol polishing steel with a good extra dollop of graphite stirred in to give me something to polish.


The result was airbrushed on to the metal work. This worked out OK on the horse armour but the on the knight itself the paint crazed very badly, possibly due to a combination of the high shine and curved surves.


The horse armour polished up quite nicely although I think the black primer has darkened the overall finish. I intend using some inks on the chain mail to darken it somewhat. The masking is coming off the red trim in a couple of places so you can see where the trim will be.


I tried polishing the crazing out on the knight but it didn't work, I just ended up rubbing through the paint. It was a total mess.


I have therefore sanded and re-primed the knight with Tamiya Chrome Silver which how it appears in the photo. This is a gloss paint but it is only barely applied so it has a semi gloss finish. I will re spray with the Humbrol/Graphite mix and re-polish. Hopefully this will lighten the finished steel effect.


The pictures are not too good. My Nikon is away with my wife, I have been left with a smartphone.


Any comments or advice regarding the horse colour or the steel finish would be appreciated.


The final picture shows all the bits propped together to give me some idea of what the final assembly will look like.


One final work of caution to anyone else using the Humbrol/Graphite powder mix with an air brush. The powder goes everywhere, especially into your nose if you don't wear a mask (as I did not!)


View attachment 123831


View attachment 236722
 
Status
Not open for further replies.
Back
Top