Theme editor

Scale Model Shop

Langy's Stolly..... Airfix 1/35 Alvis Stalwart

langy71

Active member
SMF Supporters
Joined
Apr 27, 2018
Messages
2,178
Reaction score
299
Points
83
Age
54
First Name
Chris
Location
Nottingham
1/3
Thread owner
Finally managed to grab a couple of hours to make a start...

so here's the sprue shots..with the addition of a few pieces that have broken off the sprues.
 

Attachments

  • IMG_0660.jpg
    IMG_0660.jpg
    454.3 KB · Views: 0
  • IMG_0661.jpg
    IMG_0661.jpg
    468 KB · Views: 1
  • IMG_0662.jpg
    IMG_0662.jpg
    478.2 KB · Views: 1
  • IMG_0663.jpg
    IMG_0663.jpg
    363.4 KB · Views: 1
  • IMG_0664.jpg
    IMG_0664.jpg
    472.2 KB · Views: 0
  • IMG_0665.jpg
    IMG_0665.jpg
    355.1 KB · Views: 0
  • IMG_0666.jpg
    IMG_0666.jpg
    301.1 KB · Views: 0
  • IMG_0667.jpg
    IMG_0667.jpg
    828.5 KB · Views: 0
Thread owner
So a quick dabble with the Tamiya Extra thin has given me this so far..

IMG_0673.jpgIMG_0674.jpg
IMG_0675.jpgIMG_0676.jpg

It falls together really well, you just need to pay attention to the instructions, However unfortunately this moulding does seem to suffer from it being rushed through the process of prototyping to actual kit and as such it does have rather large injection marks on various bits..(I'll highlight these as I go along), and the odd damaged or short shot part..
This being the prime example,

IMG_0677.jpg
 
Looking good although Airfix should have better quality control. Poor moulding and bad ejector marks are not what is expected from a new Airfix kit.
 
Thread owner
And the fun continues...
In between sanding down the stair bannisters...(don't ask me why, you know what women are like, they see you having a minute to yourself and booom suddenly there's a really urgent job that needs sorting...lol)... I've popped the running gear together and most of the driving compartment..

(note the two rather large injection holes right in plain view.)

The running gear although a bit fiddly, builds up into a rather convincing representation, and besides most of it will probably end up covered in weathering / mud.

IMG_0680.jpg

IMG_0679.jpg
IMG_0678.jpg

IMG_0681.jpg

IMG_0682.jpg

IMG_0683.jpg

IMG_0684.jpg
 
I have one in the stash, looking forward to your progress and observations! Good start!
Steve
 
Great start Chris 👍

The Stalwart got a bit of a panning in several reviews when it came out so I’m interested to see how you find it 🤔

Geoff.
 
Regarding the reviews, from what I remember it wasn’t the accuracy they were disappointed with but the general production quality.
Ejector pin marks in inappropriate places, some poorly executed moulding. I think the tarp has tie down eyes on one side but they are missed on the other.
Nothing that can’t be fixed but it was a general consensus of disappointment in view of the quality of recent Airfix releases.

Looking at your build though Chris it looks like it is going together with no real issues 👍

Geoff.
 
I think there were some issues with a box of some sort inside the cab too, but can't remember exactly. I have a friend from another hobby who built this and had some minor issues from memory.
 
Thread owner
If memory serves, (It sometimes does, other times I can't remember what my name is..lol)

The comments about the 'box' refer to what could be perceived as a 'battery ?' type box that's fitted to the right hand side of the cab..(in the place of the third seat), and complaints about the radios that are supplied,

The kit comes with two 'radios' for you to select one from depending on the 'version' of the Stolly you are doing...

I'm sure one is a 'Clansman' set up and the other Is the Larkspur, however some folks are claiming that the Stalwart was never fitted with radio gear unless it was a 'Key Unit Personnel Vehicle'..(typically officer types) and nothing below a 'Troop Commander' would have a radio fitted to his vehicle.

So this area becomes as clear as the debate about the true colour of Dunkelgelb..(Which is a muddy yellowy mash up..lol)

Other folks say the most common radio for the Stolly was a manpack PRC 351 or 352 sat on the floor, ...personally I don't really give a chuff, my own personal radio was the PRC 349..and that was garbage 60% of the time...along with the extra battery for the 351..why carry extra batteries for the 'scallies radio', when you can carry extra bombs and bullets instead ?...it's his kit, he can carry the crap.

I have looked around the net to verify this but can't seem to get a definitive answer, there seems to be various radio sets fitted so I'm probably going with the clansman in mine. or I may just blank the roof aerial hole out with a plate....(I'll worry about this when I'm closer to finishing the cab build up)

To be honest you really have to ask yourself 'just how much of the interior will you really see when it's all buttoned up and fitted in place ?', personally I'm more concerned with finding a couple of 1/35 scale drivers / crew that I can drop into the build to give it a splash of 'realism'

So any suggestions for figures would be most helpful.
 
Thread owner
https://youtu.be/qmNYWSgrjMM?si=CHk7egeqmvvdw-0v

You might want to watch this guy...... Been following him on and off for last couple of years...... Military vehicle restorer..... They are currently doing a very very rare tank for the tank museum...... This is episode one of five of a stolly project


Just sat and watched a few of these, this guy is brilliant, he certainly knows his stuff.
 
Thread owner
This hasn't been forgotten guys, it's Mrs L's fault, she won't stop coming up with various decorating ideas for me to deal with....grrrrrrrrrr !!!
 
Thread owner
Right then, decorating done.....(until she spots me enjoying myself...lol),
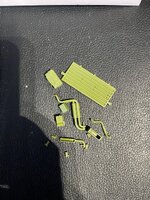
So I managed to do a bit more work on this..
mainly just the cab area,

I've gotta admit Airfix's colours are pretty vague,
well when I say vague I really mean 'paint everything bronze green other than the seat cushions and slap the decals on'. So I had a bit of a mess around with various tones to break up the green blob appearance.

Oh and I've ditched the ideal of bronze green cause I read somewhere that the MK2's were mostly painted in the new 'NATO Green', which was already being used.

1955–1970/71: Vehicles were primarily painted in gloss or matte Deep Bronze Green.
Late 1960s/1971: Introduction of NATO Green and black camouflage, often applied at unit level.
Post-1971: New, rebuilt, or repainted vehicles adopted the matte Infrared Reflective (IRR) NATO Green and Black scheme.
  • Exceptions: Some units continued using older green shades for several years, with some vehicles still appearing in Bronze Green as late as 1977.
Mine is going to represent a stalwart from around the early eighties, so NATO green would fit.

IMG_0700.webp

IMG_0701.webp

IMG_0699.webp
In the background you can see the rest of the cab which has had a bit of messing around with a cam pattern style.

IMG_0703.webp

Anybody spot the glaringly obvious mistake by Airfix on the 'back wall' ?
IMG_0702.webp

I'm not 100% sure that the passenger seat will be staying like that, the real seats were sprung loaded to lie flat which allowed the checkerplate backing to face upwards to protect the seat from muddy boots, so it may get removed and some surgery carried out.

Anybody think of anything I can add to the cab to give it a bit more lived in feel ?
 
Back
Top