Theme editor

Scale Model Shop

lDave Ward's 1/72 Revell Leopard 1A5

Status
Not open for further replies.

Dave Ward

New member
Joined
Apr 27, 2018
Messages
10,549
Reaction score
43
Points
0
1/3
Thread owner
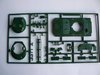
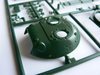
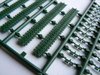
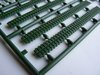
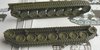
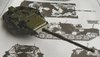
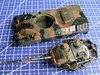
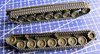
I'll be starting on this, in between finishing my C-45 Expeditor ( getting to the painting stage )................View attachment 324662View attachment 324664View attachment 324665View attachment 324666View attachment 324668View attachment 324669View attachment 324667View attachment 324671View attachment 324663
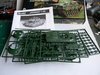
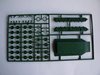
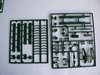
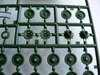
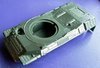
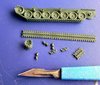
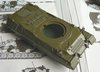
Not fond of Revell's green plastic, parts look OK, detail a bit soft in places ( moulded on tools not good ), but I hope the fit will be good. 2 finish versions, std NATO colours - the only difference being the reg. no. and unit badge
Dave
 

Attachments

  • P1050653.JPG
    P1050653.JPG
    3.6 KB · Views: 0
  • P1050654.JPG
    P1050654.JPG
    1.9 KB · Views: 0
  • P1050655.JPG
    P1050655.JPG
    2.8 KB · Views: 0
  • P1050656.JPG
    P1050656.JPG
    3.2 KB · Views: 0
  • P1050657.JPG
    P1050657.JPG
    3.2 KB · Views: 0
  • P1050658.JPG
    P1050658.JPG
    3.5 KB · Views: 0
  • P1050659.JPG
    P1050659.JPG
    4.4 KB · Views: 0
  • P1050660.JPG
    P1050660.JPG
    3.7 KB · Views: 0
  • P1050662.JPG
    P1050662.JPG
    4.2 KB · Views: 0
Hi Dave
I have one of these so I'll follow closely and pick up tips for when I build mine. I don't like the dark plastic either. I find it hard to see flaws.
Jim
 
A’noon Dave,
I quite enjoy the Revell 72nd armour kits but not seen this one before. Hope it’s not too fiddly for you!
I tend to use my razor saw to get the parts off the sprue at this scale.
Look forward to seeing how it goes together :thumb2:
 
Thread owner
Si,
according to Scalemates, it dates from 1999, It seems to have aged well, there's little, or no flash.
Hopefully. I'll get a start on this tomorrow.................
Dave
 
Watching, so I can see if there are any snags before I start mine!

Pete
 
Thread owner
Off we go.
The wheels are added to the side plates, 42 parts in total.View attachment 324809
The separate side plates mean that I can add & finish the suspension and track before anything else - I'll see how that goes.
Dave
 

Attachments

  • wheels.jpg
    wheels.jpg
    2.6 KB · Views: 0
Thread owner
Tracks assembled. BE WARNED, the sprockets are a real pig to cut from the sprue, and assembly is not positive. I would use a track link to ensure the teeth line up. View attachment 324916View attachment 324914
Now, it's possible I've lost one track link to the carpet monster ( I didn't see it go ), but I am one link short. No problem, though, as the side skirts will cover up the gap.
View attachment 324915
Basic hull assembled. You can see the vague moulded-on tools on the side - I doubt careful painting will lift them....
Dave
 

Attachments

  • hull.jpg
    hull.jpg
    2.6 KB · Views: 0
  • track assy.jpg
    track assy.jpg
    3.1 KB · Views: 0
  • complete track 01.jpg
    complete track 01.jpg
    1.8 KB · Views: 0
Thread owner
Been a few days since I touched this..........................
Completed the hull, apart from the tow cables - I''ll add them at the end.View attachment 325540
The small bits ( especially the towing hooks ) are very fiddly, and the Revell olive plastic is prone to fraying & doesn't cut cleanly.
Turret under assemblyView attachment 325541
Tricky bit will be the turret basket - especially removing it from the sprue!
Dave
 

Attachments

  • hull ready for priming.jpg
    hull ready for priming.jpg
    2.9 KB · Views: 0
  • P1050682.JPG
    P1050682.JPG
    2.6 KB · Views: 0
Nice progress on this Leopard Dave, tempted to try one myself these 1/72 armor models get better and better detailed nowadays. Are you going to brush paint it?

DIRK
 
Thread owner
Dirk,
I'll prime, and basecoat by airbrush, but the camo will be brush painted
Dave
 
Thread owner
Tracks painted, and ready for adding to the hull - I haven't painted the top track runs, or return rollers - they'll be hidden by the skirtsView attachment 326077

The hull & turret camo painted - Mig NATO Brown & Black. Oddly the brown seems to be satin, and the black, gloss - It's all going to be flattened with overall matt varnish, so no problemsView attachment 326076
There are a few decals to add, but that's nearly it! The next picture will appear in the 'completed' section.
Dave
 

Attachments

  • camo fin.jpg
    camo fin.jpg
    4.3 KB · Views: 0
  • tracks fin.jpg
    tracks fin.jpg
    3.3 KB · Views: 0
Any problems with the MIG green Dave? Mine wouldn't dry. The brown and black were OK though.

Pete
 
Hi Dave
Looks good. Nice camo. As you mentioned those tools will be fun
Jim
 
Status
Not open for further replies.
Back
Top