Theme editor

Scale Model Shop

LUT 1/96

Status
Not open for further replies.

Bigfoot57

Well-known member
Joined
Jun 24, 2015
Messages
1,179
Reaction score
301
Points
83
Age
68
1/3
Thread owner
Greetings


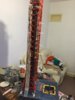
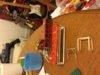
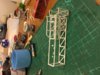
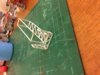
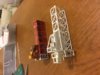
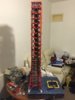
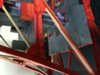
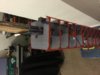
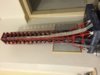
No idea if anyone will find this of interest or not but here's how far I've got with the LUT or Launch Umbilical Tower in 1/96 scale I also have the Saturn V to go with it when it's finished


This is the result of 3 months work numerous rebuilds and mods bodged etc its not perfect but the overall effect is pretty good anyway here's a picture of it so far


Regards


Colin
 
Thread owner
\ said:
Very nice Colin, so come on is this the kit or totally scratch made...tell us man :D
50 50 the kit or should I say card comes from NASA and you have to build the main base out of either thick card or a wooden frame then cover it with the supplied card the rest is flat printed card that is cut out and then folded and glued into place


Except on my model every single strut has a Chinese wooden skewer sized and cut and then embedded into the rolled card tube for strength and rigitidty and the decks have bracing struts on their undersides again for bracing and strengthening and the central core has a 4ft length of multi compressed and glued corrugated card plank for want of a better word which is why I said at the beginning 50 50 I enclose a couple of the 161 pictures taken so far of its construction

View attachment 112937

View attachment 225960
 

Attachments

  • image.jpg
    image.jpg
    2.3 KB · Views: 0
\ said:
50 50 the kit or should I say card comes from NASA and you have to build the main base out of either thick card or a wooden frame then cover it with the supplied card the rest is flat printed card that is cut out and then folded and glued into place
Except on my model every single strut has a Chinese wooden skewer sized and cut and then embedded into the rolled card tube for strength and rigitidty and the decks have bracing struts on their undersides again for bracing and strengthening and the central core has a 4ft length of multi compressed and glued corrugated card plank for want of a better word which is why I said at the beginning 50 50 I enclose a couple of the 161 pictures taken so far of its construction
Interesting, well it certainly fits the bill should look awesome when it is all finished with the mighty Saturn V in place.
 
That well look Cool with the rocket in place, look forward to the combined result
 
Thread owner
Latest update after 2 weeks of scratch building entire propellants delivery piping on side 1 to replace flat card version supplied. Pipes are made from drinking straws and the framework their attached to resembling a pair for want of a better word budgie ladders made from 1/4" balsa currently attaching those red support rings 55 out of about 97 you can see then the pipes ends need further extensions added to attach them to the various deck branch offs after that need to go over that section tidying up and finally with paint to finish it off then onto the 9 swing arm assemblies etc

View attachment 113326

View attachment 226349
 

Attachments

  • image.jpg
    image.jpg
    2.3 KB · Views: 0
Nice scratch building, Colin some very good work,will look great once the Saturn is with it, ;)
 
Nice work there mate should look the dogs with the rocket attached.


scott
 
Thread owner
Hello to all thought I would give you an update on this build not much progress at the moment due to my wanting to add extra detail


I have now put in the feed off piping from each of the pipes running up the tower as per picture I've also decided I wanted to model the railings on each deck and after failed attempts with card wire & balsa all which looked awful and were out of scale I came up with the following which I'm sure the model shipbuilders will know about


I built a jig out of scrap wood and used thread glued then painted and finally varnished see the attached pictures they can show you better than I can explain anyway the end result is perfect and because it's on a jig every other one should be the same carefully cut out and mounted on 1mm square balsa as a base to attach them to the tower decks 1 down 71 more to go they are the right scale and will make a huge difference to the model and my satisfaction


Regards


Colin

View attachment 114418

View attachment 114419

View attachment 114420

View attachment 227441

View attachment 227442

View attachment 227443
 

Attachments

  • image.jpg
    image.jpg
    2.3 KB · Views: 0
  • image.jpg
    image.jpg
    2 KB · Views: 0
  • image.jpg
    image.jpg
    2.5 KB · Views: 0
Thread owner
Another update still constructing and installing railings up to deck 9 now so half way in between waiting for the glue / varnish to dry on the threads for the railings on the jig I decided to roughly build the swing arms stage 1 was to basically put each one together minus it's pipework as I'm not impressed with the flat cardboard renditions and will be scratch building using various diameter sized tubes to represent the various hoses etc that go with each arm these will then connect with the previously installed pipework on the side of the tower

View attachment 115232

View attachment 228255
 

Attachments

  • image.jpg
    image.jpg
    2.9 KB · Views: 0
Thread owner
Update on LUT build well I'm not impressed by my completed cardboard swing arms so much so that I have scrapped them and will scratch build some new ones no idea how long this will take could be weeks will post some new pics after I've constructed the 1st one I've attached one pic showing initial construction and death by plastruct

View attachment 116074

View attachment 229097
 

Attachments

  • image.jpg
    image.jpg
    3.1 KB · Views: 0
That`s some seriously good scratch building Colin...... I am going to have to watch the rest of this. Looking really good.
 
Thread owner
Greetings Peeps


Here's my latest update on this build not much in the way progress but at least I've finalised how to do the swing arms after scrapping 4 different ways of trying I enclose a few pics showing progress so far bear in mind this is just the rough stage so things like the floor the lighting support beams and other details still need to be added and there are 9 arms to do each with different layouts and fittings but now I have a plan in my head on how to do them and how to scratch build sort of


Regards


Colin

View attachment 117993

View attachment 117994

View attachment 117995

View attachment 231016

View attachment 231017

View attachment 231018
 

Attachments

  • image.jpg
    image.jpg
    3 KB · Views: 0
  • image.jpg
    image.jpg
    2.9 KB · Views: 0
  • image.jpg
    image.jpg
    2.7 KB · Views: 0
Thread owner
Latest update to swing arm 1 nearly there few more bits to do like the floor the wire mesh on the lower sections the lights which won't be lit as there going to be too small in scale the actual arm attachment and swing joints and the remaining pipe work then to finally paint it and add a few little details


As always comments criticisms etc always welcome


Regards


Colin

View attachment 119011

View attachment 232033
 

Attachments

  • image.jpg
    image.jpg
    2.5 KB · Views: 0
Status
Not open for further replies.
Back
Top