Theme editor

Scale Model Shop

M2A1

Status
Not open for further replies.
Paul.
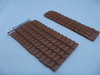
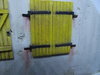
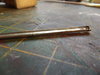
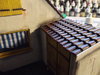
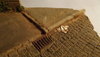
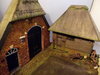
Looking good on the "timber "front. Nice move to the coffee stirrers better scale. That's the only problem with the balsa. Think Marty's idea of the stone sets is a good one, you don't have to have the whole base done either.
Great work, ........... As usual.
Sorry I wrote this yesterday and didn't post reply !
John
 
Thread owner
John,

Thanks mate your right about the stirrers they have a better grain. On this occasion I think I'm going to leave this as a dirt road.
 
Thread owner
A little bit more done. The shutters have had pewter hinges added to the building and the shutters attached. I have noticed in the pictures I need to touch up the paint on the hinges. They are a bit garish but the whole thing will be matted when the build is finished. Next work started on the roofing tiles with the addition of the lead flashing I am presuming this is used on the building in the same way it is in the UK.
Thanks for staying with it.View attachment 317558View attachment 317560View attachment 317561View attachment 317562
 

Attachments

  • DSCF1531.JPG
    DSCF1531.JPG
    3 KB · Views: 0
  • DSCF1535.JPG
    DSCF1535.JPG
    2.3 KB · Views: 0
  • DSCF1533.JPG
    DSCF1533.JPG
    3.2 KB · Views: 0
  • DSCF1532.JPG
    DSCF1532.JPG
    2.6 KB · Views: 0
Paul,

It just gets better and better. I especially like the mesh curtains and window latches on the inside. The shutters are realistic and the rust streaks add to the authenticity of it all. What are you using for the roof tiles? AM or your own mix....

Prost
Allen
 
Thread owner
Hi Allen,
Good to see you. Glad you like the window details. The roof tiles are from a company called Juweeler in Germany. You get about 500 tiles in the pack and they are reasonably priced.
 
Thanks Paul,

I kind of had a feeling about them being from Juweeler as they make cool stuff. I am going outside now to make sure you didn't nick them from the roof of my apartment……………..
 
Hi Scottie.
Late to parade for me so fizzer for me.The building for the M2a1 is outstanding.So much detail to catch the eye.
Really well done Paul.
Richard
 
Thread owner
Thanks Paul,

I kind of had a feeling about them being from Juweeler as they make cool stuff. I am going outside now to make sure you didn't nick them from the roof of my apartment……………..

Yours are safe mate I don't like heights lol
 
Thread owner
Hi Scottie.
Late to parade for me so fizzer for me.The building for the M2a1 is outstanding.So much detail to catch the eye.
Really well done Paul.
Richard
No worries mate glad your here. Thanks very much for the kind words
 
Paul... fantastic details... i love the "shed" door it's super realistic.... and the woodwork is absolutely spot on.... the only thing that i'm not convinced is the yellow color of it.... for the rest FANTASTIC... i'm really looking forward to see the Halftrack in the diorama
Have a nice day
Greg
 
Hi Paul, loving the work you've done sir, especially on the shutters, those roof tiles look very good as well, keep up the good work.
Old Puffer Pete
 
Thread owner
Paul... fantastic details... i love the "shed" door it's super realistic.... and the woodwork is absolutely spot on.... the only thing that i'm not convinced is the yellow color of it.... for the rest FANTASTIC... i'm really looking forward to see the Halftrack in the diorama
Have a nice day
Greg
Greg,
Thanks mate, I must admit the more I look the more I have to agree with you, maybe should have gone for a different colour I should have gone blue. But to late now. Glad you like the rest of it.
 
Thread owner
I have spent the day fitting the roof tiles, the sections were made by sticking the individual tiles to sections of stiff black card. The main colours were then blocked in following a pre shade. When they had ben fitted thin plaster was added to the gap between the walls and tiles. Foil was added between the walls and the tiles to represent the flashing this will be painted up a bit later. Then I made a start on the guttering a section of pewter sheet was formed round some round evergreen then ends and details were added.
And the more I look at it I have to agree with Greg that yellow possibly was the right colour to go for.
View attachment 317625View attachment 317626View attachment 317627View attachment 317628View attachment 317629
 

Attachments

  • DSCF1539.JPG
    DSCF1539.JPG
    2.6 KB · Views: 0
  • DSCF1540.JPG
    DSCF1540.JPG
    3.5 KB · Views: 0
  • DSCF1538.JPG
    DSCF1538.JPG
    3.9 KB · Views: 0
  • DSCF1537.JPG
    DSCF1537.JPG
    3.8 KB · Views: 0
  • DSCF1536.JPG
    DSCF1536.JPG
    3.4 KB · Views: 0
Scottie,

If you are going to use the cobblestones what is the best way to do it. I like the idea of using the saw to create the grain effect i have used a wire brush in the past. Its always interesting to see what you do.

Marty
 
Thread owner
Scottie,

If you are going to use the cobblestones what is the best way to do it. I like the idea of using the saw to create the grain effect i have used a wire brush in the past. Its always interesting to see what you do.

Marty
Hi Marty,
On this occasion I am going to stick with the dirt road. There are various ways to create a cobble road. The most time consuming but strangely satisfying is to mould the bricks yourself or by pre moulded ones then lay them one by one. Or another way is to use and old brush remove all the bristles form the empty ferrule into a square, rectangle or even leave round and use it to press the stones into the foam or base of your choice. Following are 2 pictures the first the cast stones the second pressed in. HTH.
View attachment 317638View attachment 317640
 

Attachments

  • DSCF0367.JPG
    DSCF0367.JPG
    3.1 KB · Views: 0
  • DSCF0646.JPG
    DSCF0646.JPG
    2.3 KB · Views: 0
  • DSCF0906.JPG
    DSCF0906.JPG
    3.3 KB · Views: 0
Status
Not open for further replies.
Back
Top