Theme editor

Scale Model Shop

Making a brick wall from Depron -Finished-

Status
Not open for further replies.

Richi72

Active member
Joined
Sep 29, 2013
Messages
1,100
Reaction score
0
Points
36
1/3
Thread owner
Hi guy,s and girls,

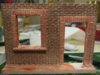
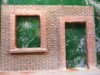
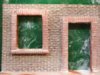
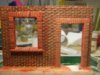
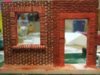
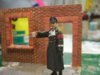
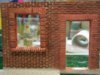
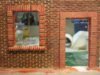
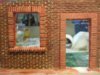
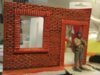
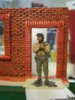
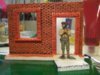
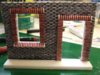
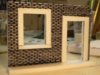
After a couple of questions about the walls of my Dutch building, I thought, I would show you how I did that. There are definitely a lot of other ways like pouring them with plaster making them out of wood buying a model like the Miniart ones or Verlinden and so on, but I like to scratch so I make them myself.

If anyone like to join in please do, and don’t hesitate to ask any related questions.

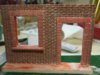
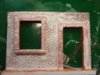
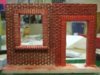
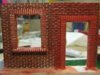
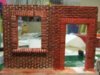
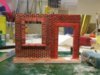
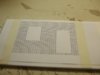
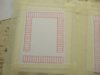
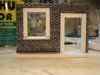
I made a little template for a brick wall with a window and a door in it.

You can download it for A4 and US Letter size

So now to the what do I need question,

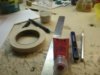
1. Piece of depron foam best is 6mm or blue foam or something that is equal to that.

2. Sharp knife or Scalpel

3. Some foam friendly glue

4. A ruler

5. adhesive tape

6. Some permanent markers with a small tip

7. Some paint, best is red for the bricks but any color will do

8. Plaster to make the mortar between the stones

That’s it

, and so we cut out the whole template.

here are the pictures

View attachment 73182

View attachment 73183


View attachment 73184


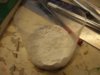
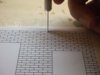
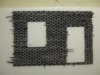
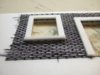
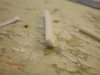
After printing out the templates we put them on the foam with some adhesive tape

View attachment 73185


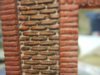
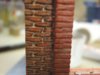
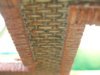
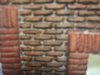
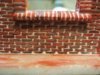
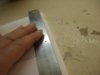
then we take the scalpel and cut in the small side of the stones not to deep 1MM is enough

View attachment 73186


now we put the ruler on the long side and cut again 1MM deep

View attachment 73187


View attachment 73188


after a couple of lines it would look like this

View attachment 73189


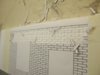
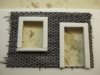
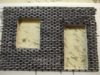
and wen we are done this is what it should look like

View attachment 73190


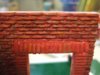
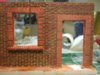
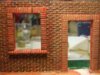
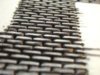
after cutting the whole wall we take the marker and we start to draw each brick separately.

more later on

Cheers Richi

View attachment 73180

View attachment 73181

View attachment 186203

View attachment 186204

View attachment 186205

View attachment 186206

View attachment 186207

View attachment 186208

View attachment 186209

View attachment 186210

View attachment 186211

View attachment 186212

View attachment 186213
 

Attachments

  • DSCF2114.jpg
    DSCF2114.jpg
    1.5 KB · Views: 0
  • DSCF2113.jpg
    DSCF2113.jpg
    1.2 KB · Views: 0
  • DSCF2112.jpg
    DSCF2112.jpg
    1.8 KB · Views: 0
  • DSCF2111.jpg
    DSCF2111.jpg
    1.9 KB · Views: 0
  • DSCF2110.jpg
    DSCF2110.jpg
    1.7 KB · Views: 0
  • DSCF2109.jpg
    DSCF2109.jpg
    2 KB · Views: 0
  • DSCF2108.jpg
    DSCF2108.jpg
    1.6 KB · Views: 0
  • DSCF2107.jpg
    DSCF2107.jpg
    2.5 KB · Views: 0
  • DSCF2106.jpg
    DSCF2106.jpg
    2.7 KB · Views: 0
  • Brick wall Training US Letter format.pdf
    Brick wall Training US Letter format.pdf
    14.2 KB · Views: 0
  • Brick wall Training A4 Format.pdf
    Brick wall Training A4 Format.pdf
    14.2 KB · Views: 0
Thread owner
Part 2

after drawing each brick separately your wall should be looking something like this

View attachment 73192


View attachment 73193


here we can see the purpose of the marker we see a clear stone but none of them are the same accept for size

View attachment 73194


View attachment 73196


we cut the window and door pieces

View attachment 73197


when this is all done we cut out the door and window out of the wall

View attachment 73198


we glue the window and door pieces to the wall

View attachment 73200


View attachment 73201


View attachment 73202


View attachment 73203


then we use the marker again to define the stones (this time in Red)

View attachment 73204


when the glue has set we can paint everything orange it doesn’t have to be pretty and it doesn’t have to be all covered.

View attachment 73205


View attachment 73206


View attachment 73207


so the wall needs to dry for a while, so i will be back later

Cheers Richi

View attachment 73195

View attachment 73199

View attachment 186215

View attachment 186216

View attachment 186217

View attachment 186218

View attachment 186219

View attachment 186220

View attachment 186221

View attachment 186222

View attachment 186223

View attachment 186224

View attachment 186225

View attachment 186226

View attachment 186227

View attachment 186228

View attachment 186229

View attachment 186230
 

Attachments

  • DSCF2137.jpg
    DSCF2137.jpg
    2.9 KB · Views: 0
  • DSCF2115.jpg
    DSCF2115.jpg
    2.4 KB · Views: 0
  • DSCF2116.jpg
    DSCF2116.jpg
    3 KB · Views: 0
  • DSCF2117.jpg
    DSCF2117.jpg
    2.5 KB · Views: 0
  • DSCF2119.jpg
    DSCF2119.jpg
    1.4 KB · Views: 0
  • DSCF2136.jpg
    DSCF2136.jpg
    3 KB · Views: 0
  • DSCF2135.jpg
    DSCF2135.jpg
    3 KB · Views: 0
  • DSCF2134.jpg
    DSCF2134.jpg
    3.2 KB · Views: 0
  • DSCF2133.jpg
    DSCF2133.jpg
    2.9 KB · Views: 0
  • DSCF2132.jpg
    DSCF2132.jpg
    2.7 KB · Views: 0
  • DSCF2131.jpg
    DSCF2131.jpg
    2.4 KB · Views: 0
  • DSCF2130.jpg
    DSCF2130.jpg
    2.5 KB · Views: 0
  • DSCF2129.jpg
    DSCF2129.jpg
    2 KB · Views: 0
  • DSCF2122.jpg
    DSCF2122.jpg
    3 KB · Views: 0
  • DSCF2121.jpg
    DSCF2121.jpg
    2.4 KB · Views: 0
  • DSCF2120.jpg
    DSCF2120.jpg
    1.3 KB · Views: 0
Thread owner
Part 3

After the paint is dry it would look something like this my orange is a little translucent but that’s fine.

View attachment 73271


Now we make a nice thin solution of plaster, it should have the consistency like a thin yogurt this is important because it has to flow a little

View attachment 73272


Here is the plaster on the wall; you can see that it is flowing a little so it can reach all the gabs

View attachment 73273


After a couple of minutes you take a sponge thingy and carefully wipe of the bricks don’t damage the plaster in the gabs. If you wipe the plaster out of the gabs you can put new plaster on it and try again.

View attachment 73274


Here are a couple of pictures with the plaster still wet. Because the plaster is a very thin solution (more water than usual) the plaster will sink in the gabs when it starts to dry, vaporizing water and so on but you know what I mean;).

View attachment 73275


View attachment 73276


View attachment 73277


View attachment 73278


View attachment 73279


View attachment 73280


Now we wait 2 to 3 hours until the plaster has dried and see what it looks like. :)

Cheers Richi

View attachment 186294

View attachment 186295

View attachment 186296

View attachment 186297

View attachment 186298

View attachment 186299

View attachment 186300

View attachment 186301

View attachment 186302

View attachment 186303
 

Attachments

  • DSCF2147.jpg
    DSCF2147.jpg
    3 KB · Views: 0
  • DSCF2146.jpg
    DSCF2146.jpg
    2.5 KB · Views: 0
  • DSCF2145.jpg
    DSCF2145.jpg
    2.8 KB · Views: 0
  • DSCF2144.jpg
    DSCF2144.jpg
    2.4 KB · Views: 0
  • DSCF2143.jpg
    DSCF2143.jpg
    2.8 KB · Views: 0
  • DSCF2142.jpg
    DSCF2142.jpg
    2.9 KB · Views: 0
  • DSCF2141.jpg
    DSCF2141.jpg
    3.1 KB · Views: 0
  • DSCF2140.jpg
    DSCF2140.jpg
    2.7 KB · Views: 0
  • DSCF2139.jpg
    DSCF2139.jpg
    2.4 KB · Views: 0
  • DSCF2138.jpg
    DSCF2138.jpg
    3.1 KB · Views: 0
Excellent tutorial Richie.

Nicely laid out and great stage by stage description.

Thanks for taking the time to post the thread.

Ron
 
Hi Richi,

I agree with Mr Ron, I found this very easy to follow...

Thank you...

Andy...
 
Looks like a wall! Which is... I think... The general idea :) :)

Great tutorial Richi, nice and easy step-by-step to follow with an impressive result.
 
Thread owner
Hi Colin,

well I got the inspiration from you. :)

simple, easy to copy and great potential, learned that from your easy diorama setup.

So thank you

Cheers Richi
 
Thread owner
Part 4

After the drying period I should like this

View attachment 73282


View attachment 73283


Then we take an old big brush and we use it to dust the wall of and it will look like this

View attachment 73284


Now we have a couple of options the left side is dry brushed with red and orange tones the gabs between the stones stay mostly the color of the plaster you use.

View attachment 73285


The right side is completely painted this includes the gabs between the stones.

View attachment 73286


Then we take some dark red, blue, yellow and any other color you like.

View attachment 73287


We start to paint single bricks in a different color, it looks better and most of all more realistic

View attachment 73288


close up

View attachment 73289


close up

View attachment 73290


well now we wait until it is dry again

next up is blending and washing

cheers Richi

View attachment 186305

View attachment 186306

View attachment 186307

View attachment 186308

View attachment 186309

View attachment 186310

View attachment 186311

View attachment 186312

View attachment 186313
 

Attachments

  • DSCF2150.jpg
    DSCF2150.jpg
    2.8 KB · Views: 0
  • DSCF2149.jpg
    DSCF2149.jpg
    2.9 KB · Views: 0
  • DSCF2148.jpg
    DSCF2148.jpg
    2.9 KB · Views: 0
  • DSCF2151.jpg
    DSCF2151.jpg
    3 KB · Views: 0
  • DSCF2152.jpg
    DSCF2152.jpg
    3 KB · Views: 0
  • DSCF2153.jpg
    DSCF2153.jpg
    3.1 KB · Views: 0
  • DSCF2158.jpg
    DSCF2158.jpg
    3 KB · Views: 0
  • DSCF2157.jpg
    DSCF2157.jpg
    2.7 KB · Views: 0
  • DSCF2154.jpg
    DSCF2154.jpg
    3.1 KB · Views: 0
Some excellent tip there Richi, well done and thanks for that, a big help to others wanting to create walls, houses or any other structures.

Si:)
 
hi Richie

Fantastic and Excellent tutorial, well done with the step by step very clear and easy to follow

thank you so very much its rely appreciated
 
Thread owner
Part 5

Well the walls are dry and now we try the wash and blending trick

A wash,

is used to put a shadow or fill up deeper parts in a model that should seem darker than the rest of the surroundings, well with the wall we can use the washing to fill in the gabs between the stones but this time we use a bright wash to define those gabs between the stones. Because the wash is thin it wouldn’t affect the stones as much as a blending would so we can achieve a nice mortar color.

The Blending

Is used to make the different colors of an object seem closer to each other, more in the same color pallet or let it look if it’s all together. I hope you understand what I mean can’t find a real good description for it but if we take a look at the pictures I hope it becomes clear what I mean.

Here is the wall completely dry

View attachment 73319


Here we used a wash of yellow on the left side we can see how nice the gabs have been filed.

View attachment 73320


On the right side we used a cement color not as thin as the wash, to blend all the stones together and as you see it files up the gabs to, it makes a nice gray mortar color.

View attachment 73321


stil wet

View attachment 73322


Almost dry

View attachment 73323


in part 6 we will do some little dry brushing and then i think the wall is done.

until later

Cheers Richi

View attachment 186342

View attachment 186343

View attachment 186344

View attachment 186345

View attachment 186346
 

Attachments

  • DSCF2171.jpg
    DSCF2171.jpg
    2.9 KB · Views: 0
  • DSCF2170.jpg
    DSCF2170.jpg
    2.8 KB · Views: 0
  • DSCF2161.jpg
    DSCF2161.jpg
    3 KB · Views: 0
  • DSCF2160.jpg
    DSCF2160.jpg
    3 KB · Views: 0
  • DSCF2159.jpg
    DSCF2159.jpg
    3.1 KB · Views: 0
Thread owner
Thanks a lot Guy,s and Girls,

So here we go with Part 5 and it’s the last part to

These last pictures shows a little dry brushing with some red, orange and white

With the dry brushing u can define the stones a little more to get some more dimensions in the wall.

View attachment 73373

View attachment 73374

View attachment 73375


And this one is Cheers. I am gone take a coke now.

View attachment 73376


Not my best work but I hope it was understandable and clear what I meant.

Cheers Richi

View attachment 186396

View attachment 186397

View attachment 186398

View attachment 186399
 

Attachments

  • DSCF2176.jpg
    DSCF2176.jpg
    2.8 KB · Views: 0
  • DSCF2174.jpg
    DSCF2174.jpg
    2.9 KB · Views: 0
  • DSCF2173.jpg
    DSCF2173.jpg
    2.9 KB · Views: 0
  • DSCF2172.jpg
    DSCF2172.jpg
    3 KB · Views: 0
Hi Richi,

This was brilliant and extremely helpful as well as very easy to follow, many thanks Sir...

Andy...
 
Thread owner
Thanks allot guy's

was lots of fun to, never done that, at least not for modeling.

so thanks again

Cheers Richi
 
Status
Not open for further replies.
Back
Top