Hi guys. I've been playing around with some simple dio stuff to get some practise. Part of that was to try and make a column which I could use in some sort of temple/city/ruin. This is what I came up with.
Materials:
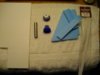
View attachment 115238
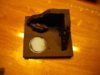
Some 3mm foamboard (basically it's foam with a layer of card on each side). I changed my mind and decided not to use this - but then I changed it back again now I've finished. I'm going to cut out a couple of squares to put on the top and bottom of my finished column. You could use just about any sheet material for this.
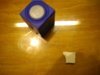
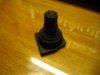
A length of plastic tubing - no idea where I got it from but it was just the right size to go with:-
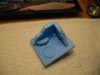
Two bottle tops from "Fruit Shoot". You need to remove the top and the white inner parts carefully with a pair of snips and leave just the blue bit (I left the clear retaining collar but that's up to you).
DON'T THROW THE OTHER BITS AWAY! PUT THEM IN YOUR SPARES BOX.
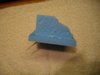
Some offcuts of 10mm insulating foamboard.
Some thin strips of plasticard.
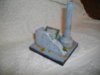
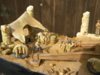
Cut out a base and walls from the foamboard. Shape them as you like and distress the surface by bashing it with whatever hard object comes to hand. Fix them together with PVA or hot glue. add a few bits to create rubble as required.
View attachment 115234
View attachment 115240
I used a couple of toothpicks to hold them together while the glue set.
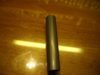
To make the column itself, cut the tubing to a suitable length. You could use any sort of tube/bottle top combination as long as the tube is a good fit inside the bottlecap.
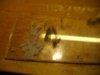
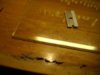
I wanted to add some features to the tube by fixing the thin strips of plasticard along the length. To make sure the strips were straight, I marked a series of lines along the length as shown:
View attachment 115236
View attachment 115237
I only used these lines to help me keep the strips parallel, but if you wanted to be precise, you could work out the angles and mark out exactly where the strips should go. I did mine using the standard Mk I eyeball and I think they'll be OK when painted.
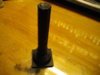
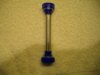
I used an elastic band around the tube to hold the strips in place while I lined them up. I cut eight strips originally thinking that would help out with the alignment, but they were too far apart so I ended up with nine. A touch with my liquid cement fixed them with no problems.
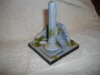
I had to chamfer the ends of the strips just a little to get the column to slide into the bottle caps, and I filled the gaps they created with superglue.
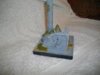
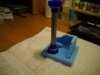
Done!
View attachment 115239
I'm going to add a square on the top and bottom as I don't think this is quite right yet. I'll post up the finished pictures when I've thrown some paint on it.
View attachment 115235
View attachment 228257
View attachment 228258
View attachment 228259
View attachment 228260
View attachment 228261
View attachment 228262
View attachment 228263
Materials:
View attachment 115238
Some 3mm foamboard (basically it's foam with a layer of card on each side). I changed my mind and decided not to use this - but then I changed it back again now I've finished. I'm going to cut out a couple of squares to put on the top and bottom of my finished column. You could use just about any sheet material for this.
A length of plastic tubing - no idea where I got it from but it was just the right size to go with:-
Two bottle tops from "Fruit Shoot". You need to remove the top and the white inner parts carefully with a pair of snips and leave just the blue bit (I left the clear retaining collar but that's up to you).
DON'T THROW THE OTHER BITS AWAY! PUT THEM IN YOUR SPARES BOX.
Some offcuts of 10mm insulating foamboard.
Some thin strips of plasticard.
Cut out a base and walls from the foamboard. Shape them as you like and distress the surface by bashing it with whatever hard object comes to hand. Fix them together with PVA or hot glue. add a few bits to create rubble as required.
View attachment 115234
View attachment 115240
I used a couple of toothpicks to hold them together while the glue set.
To make the column itself, cut the tubing to a suitable length. You could use any sort of tube/bottle top combination as long as the tube is a good fit inside the bottlecap.
I wanted to add some features to the tube by fixing the thin strips of plasticard along the length. To make sure the strips were straight, I marked a series of lines along the length as shown:
View attachment 115236
View attachment 115237
I only used these lines to help me keep the strips parallel, but if you wanted to be precise, you could work out the angles and mark out exactly where the strips should go. I did mine using the standard Mk I eyeball and I think they'll be OK when painted.
I used an elastic band around the tube to hold the strips in place while I lined them up. I cut eight strips originally thinking that would help out with the alignment, but they were too far apart so I ended up with nine. A touch with my liquid cement fixed them with no problems.
I had to chamfer the ends of the strips just a little to get the column to slide into the bottle caps, and I filled the gaps they created with superglue.
Done!
View attachment 115239
I'm going to add a square on the top and bottom as I don't think this is quite right yet. I'll post up the finished pictures when I've thrown some paint on it.
View attachment 115235
View attachment 228257
View attachment 228258
View attachment 228259
View attachment 228260
View attachment 228261
View attachment 228262
View attachment 228263

")
")