Thank you.Si!Coming along very nicely Artyom:thumb2:

You are using an out of date browser. It may not display this or other websites correctly.
You should upgrade or use an alternative browser.
You should upgrade or use an alternative browser.
Mannschaftstransportwagen Magirus ARW
- Thread starter Neo
- Start date
Thank you! I have drilled it. Making holes by punching gives me not very good results.Some top notch work Neo. Do you drill or punch your holes in the copper? PaulE.
Some fresh information. Welding is very boring process. I have started it. It seems to me I will need all next week to complete this work. Or maybe more.
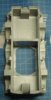
By the way. Good modeller from Armorama has mentioned that model hull has diffirent angles and forms . You can see it on comparasion photos.
View attachment 353434
View attachment 353435


By the way. Good modeller from Armorama has mentioned that model hull has diffirent angles and forms . You can see it on comparasion photos.
View attachment 353434
View attachment 353435
Attachments
Hello,Steve! Well I've just started. :smiling5: Much more to come. Thank you for support!Terrific work on the weld seams Neo. A true labour of love. Well done mate
- Joined
- Apr 27, 2018
- Messages
- 15,025
1/3
Great work on the weld beads
Greeting! I am on a half way with welds. Bottom of arches , turret box ,front and rear parts are ready. Now I have to weld sides. I have begun and I am satisfied with the results. It was long way to do it. Hard work with plastic , welds , special grooves for welds. Sorry for bad photos. I will make good ones when welds be ready.


- Joined
- Apr 27, 2018
- Messages
- 15,025
1/3
Excellent work on the welds mate. The time taken was well worth the effort.
Thank you,Scottie! This is very boring process but I like the resultExcellent work on the welds mate. The time taken was well worth the effort.
")
G
Guest
Guest
Nothing wrong with those photos — they clearly show your additions to the model, which looks very well done too.
Thank you! But in future I will do better photos.My second camera has been repaired.Nothing wrong with those photos — they clearly show your additions to the model, which looks very well done too.
Hello Jim and thank you! It wasn't easy but I satisfied. At lastHi Artyom
Excellent, neat welds done nicely to scale.
Jim
Hello friends! The work with hull welding has come to an end. I satisfied with the result.
View attachment 355057
View attachment 355018
View attachment 355019
View attachment 355020
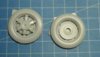
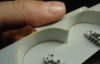
Next stage - wheels. They are terrible! Every wheels consist of two parts. And it is not a funny story to put them together because parts curves. I have seen the reception on Gleb Vasilliev's Magirus. He has put on some plastic between two parts. I've decided to do the same.
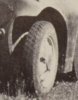
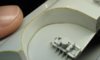
And I see this insert in the center of the wheel on photos. Take a look.
View attachment 355021
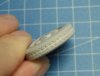
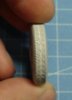
I still need to fill the gaps by putty.
View attachment 355022
View attachment 355023
View attachment 355024
View attachment 355057
View attachment 355018
View attachment 355019
View attachment 355020
Next stage - wheels. They are terrible! Every wheels consist of two parts. And it is not a funny story to put them together because parts curves. I have seen the reception on Gleb Vasilliev's Magirus. He has put on some plastic between two parts. I've decided to do the same.
And I see this insert in the center of the wheel on photos. Take a look.
View attachment 355021
I still need to fill the gaps by putty.
View attachment 355022
View attachment 355023
View attachment 355024
Attachments
- Joined
- Apr 27, 2018
- Messages
- 15,025
1/3
Great work.
Thanks,Scottie!Great work.
Hello,Steve! Thank you! Sorry. My answers are bit too late. Very busy at work. But when I have some free time I continue my work.Glad you have finished the "chore" of doing the welds. Well worth the hard work. Nice attention to detail on the wheels
Exhaust pipe and it's fixators. Resin,putty,brass,copper. I have drilled 1,5 mm wire to make a pipe. That was crazy :smiling5:


G
Guest
Guest
Are you sure you’re working 1:35 scale and not, oh, 1:8 or so? ")
I afraid yes :smiling5: I think somethingin 1:8 I can do for yearsAre you sure you’re working 1:35 scale and not, oh, 1:8 or so? :smiling3:
Legal Notice
scalemodelling.co.uk is a privately operated online discussion forum. All content posted by members reflects their own views and opinions and does not necessarily represent those of the forum owners or administrators. While reasonable efforts are made to moderate content, no responsibility is accepted for user-generated material. By using this site, you agree to comply with UK law and the forum rules.