Theme editor

Scale Model Shop

Matchbox Curtiss SBC4 Hell Diver on Deck

Status
Not open for further replies.
Richard .
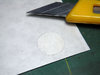
Thanks for the tip with the wet tissue.
As for the green, looks good to me . Very annoying though when you find out the colour was wrong. I'm quite good at that ! :worried:
John .
 
Vintage kits come with vintage decals that desintegrate right before your eyes in 5 seconds...talk about mission impossible.
I’ve read that spraying them with varnish will work, though you will need to cut them from the sheet much more closely so the varnish doesn’t stick the decal to the paper.
 
Good god, what an excellent build you've got going here,
I'm struggling to believe that's a Matchbox kit, mine never looked that good,

I really love the extra detail you're putting into this, can't wait to see more..:thumb2::thumb2::thumb2::thumb2::thumb2:
 
Thread owner
Hi John, Steve, Jakko and Chris, thanks.

I noticed how tissue can easily be teased into tight corners and can be fastened with water just like paper mache. Jakko, the decals refused to leave the backing paper so I photo copied the stencils in black and the stars were masked and sprayed. I love adding extra details to old kits like Matchbox...just enough to get it looking presentable. :smiling4:
Not only was it stuck it was hard to remove the tracing paper covering it.

View attachment 310302View attachment 310305

Tracing and masking was the only other solution but you will see I had problems with paint peeling from the first try...in hind sight I should have the red dot first.

View attachment 310216View attachment 310217View attachment 310218View attachment 310219

Looked like disaster but I kept a cool head and reversed the steps of masking and re-did the blue.

48-jpg.310303
49-jpg.310304


The rest of the stencils in black were photostated on decal paper.

View attachment 310221
52c-jpg.310220


Once all decals set I protected it with a layer of future and matt varnish.

Coming up next will be the carrier deck and figures.

Cheers,
Richard
 

Attachments

  • 50.jpg
    50.jpg
    6.2 KB · Views: 0
  • 47.jpg
    47.jpg
    7.6 KB · Views: 0
  • 53.jpg
    53.jpg
    7 KB · Views: 0
  • 52b.jpg
    52b.jpg
    5.4 KB · Views: 0
  • 52a.jpg
    52a.jpg
    5.4 KB · Views: 0
  • 52.jpg
    52.jpg
    5.5 KB · Views: 0
  • 51.jpg
    51.jpg
    6.6 KB · Views: 0
Thread owner
Hi Steve, I hope I wouldn't have to go through the decal debacle again. You're welcome.

Cheers,
Richard
 
Hi Richard
Great stuff. That wet tissue idea is one to remember. Love the detailing. Shame about the decals but you'll sort it.
Jim
 
Thread owner
Hi Jim, thanks, just remember to wet the tissue again when you remove it. In the end replaced the decals with my own photocopies on decal film and masking.

Cheers,
Richard
 
Thread owner
Moving onto the diorama part I had to look for references on American carrier decks of the Lexington. As I was going to do just a portion of it at the edge so was curious how it looked. The following images are for reference only and were helpful...

View attachment 310874 View attachment 310875View attachment 310876 View attachment 310877

The materials I used for my base is plywood, wood bidding, mounting boards and polycarb sheets. I wanted a raised platform for the deck which was formed with measured and cut mounting boards.

View attachment 310878 View attachment 310879

I usually don't composition perpendiculy and made a cut at the corner for the side walkways to the deck. I gave enough lip to the mounting boards to cover the polycarb sheet edges and had the sheet jut out a little for the deck edge.

View attachment 310880 View attachment 310881View attachment 310882 View attachment 310883

I fashioned the walkway structure from plastic sheet and rod with plustruct T braces. The same was done for the hull side structure.

View attachment 310884 View attachment 310885

Rivets were spots of thick white glue applied with a tooth pick and port holes were sliced plastic tubing. Pipes were from rod and lead wire.

View attachment 310886 View attachment 310887View attachment 310888 View attachment 310889

Squadron Green Putty filled areas that needed flushing with the raised side panels

View attachment 310890

The deck edge now primed revealing the rivet detail. At this time the plane was positioned to measure the rundown lines which I would be adding later as I didn't have any precised measurements...mostly eye-balling all the way.

View attachment 310893 View attachment 310895

Thanks for looking in.

Cheers,
Richard
 

Attachments

  • 76.jpg
    76.jpg
    5.9 KB · Views: 0
  • 59.jpg
    59.jpg
    5.6 KB · Views: 0
  • 58.jpg
    58.jpg
    3.8 KB · Views: 0
  • 57.jpg
    57.jpg
    4.1 KB · Views: 0
  • 56.jpg
    56.jpg
    2.9 KB · Views: 0
  • 55.jpg
    55.jpg
    4.3 KB · Views: 0
  • 60.jpg
    60.jpg
    5.4 KB · Views: 0
  • 61.jpg
    61.jpg
    5.7 KB · Views: 0
  • 74.jpg
    74.jpg
    5.8 KB · Views: 0
  • 71.jpg
    71.jpg
    2.3 KB · Views: 0
  • 70.jpg
    70.jpg
    2.3 KB · Views: 0
  • 69.jpg
    69.jpg
    2.5 KB · Views: 0
  • 68.jpg
    68.jpg
    2.4 KB · Views: 0
  • 67.jpg
    67.jpg
    5.5 KB · Views: 0
  • 66.jpg
    66.jpg
    5.7 KB · Views: 0
  • 65.jpg
    65.jpg
    5.1 KB · Views: 0
  • 64.jpg
    64.jpg
    5.2 KB · Views: 0
  • 63.jpg
    63.jpg
    5 KB · Views: 0
  • 62.jpg
    62.jpg
    5.9 KB · Views: 0
Thread owner
Hi, continuation where I left off...
There has always been a debate on whether the aircraft carrier decks were stained blue just after the start of WW2 or after the events of Pearl Harbour. As I wanted the contrast of the wood deck rather than the blue I scourd the internet and found this coloured image that helped a lot to detract rivet counters from the debate.

View attachment 311294
View attachment 311285 View attachment 311286

So brown it was and then I lined the planking with a pen and stained it with some oil and grease spills.

View attachment 311287 View attachment 311288View attachment 311289 View attachment 311290

I would later follow the deck markings with broad yellow from the reference.

View attachment 311291 View attachment 311292View attachment 311293

Cheers,
Richard
 

Attachments

  • tumblr_njiqww8LBR1tqk7p3o1_1280.jpg
    tumblr_njiqww8LBR1tqk7p3o1_1280.jpg
    3.3 KB · Views: 0
  • 85.jpg
    85.jpg
    6.2 KB · Views: 0
  • 84.jpg
    84.jpg
    6.4 KB · Views: 0
  • 83.jpg
    83.jpg
    6.6 KB · Views: 0
  • 82.jpg
    82.jpg
    5.7 KB · Views: 0
  • 81.jpg
    81.jpg
    6 KB · Views: 0
  • 80.jpg
    80.jpg
    6.2 KB · Views: 0
  • 79.jpg
    79.jpg
    5.8 KB · Views: 0
  • 78.jpg
    78.jpg
    6 KB · Views: 0
  • 77.jpg
    77.jpg
    5.8 KB · Views: 0
Thread owner
Hi Steve, I'm glad you're liking it and following the build.

Dr Frankenstein goes to work again...actually this was my first time working with Preiser figures. If you'll notice they are Luftwaffe figures. Modifications will be abundant.

View attachment 311575 View attachment 311576

The sprues are still full but after I had gone through them for the Walrus build, they're nearly all gone.

View attachment 311577 View attachment 311578

I like using Preiser as they come with extra arms and head fixtures. The plastic is soft to work with carving and cleaning

View attachment 311579 View attachment 311580

These are the selected patients waiting for suitable arms and heads.

View attachment 311581 View attachment 311582

All seam lines removed...I have already made a cut on the figure on the bottom right.

View attachment 311583 View attachment 311584View attachment 311585

Cheers,
Richard
 

Attachments

  • 87.jpg
    87.jpg
    6.3 KB · Views: 0
  • 86.jpg
    86.jpg
    6.3 KB · Views: 0
  • 88.jpg
    88.jpg
    6.8 KB · Views: 0
  • 89.jpg
    89.jpg
    7.1 KB · Views: 0
  • 96.jpg
    96.jpg
    5 KB · Views: 0
  • 95.jpg
    95.jpg
    4.9 KB · Views: 0
  • 94.jpg
    94.jpg
    4.9 KB · Views: 0
  • 93.jpg
    93.jpg
    5.1 KB · Views: 0
  • 92.jpg
    92.jpg
    5 KB · Views: 0
  • 91.jpg
    91.jpg
    5.3 KB · Views: 0
  • 90.jpg
    90.jpg
    5.3 KB · Views: 0
Thread owner
Hi, here are some test poses on the flight deck before I weathered the dio.

View attachment 312144

With two part putty I created detail like the Mae-west, parachute bags and headgear for the figures. As this was my first time working with detailing figures the detail was soft. The practice I got from these helped with the RE8 figure dio, UH-34 dio and the Walrus Catapult dio.

View attachment 312145 View attachment 312146 View attachment 312147 View attachment 312148

They look small against the side of Humbrol paint tinlets.

Cheers,
Richard
 

Attachments

  • 101.jpg
    101.jpg
    3.2 KB · Views: 0
  • 100.jpg
    100.jpg
    3.2 KB · Views: 0
  • 99.jpg
    99.jpg
    3.4 KB · Views: 0
  • 98.jpg
    98.jpg
    3.3 KB · Views: 0
  • 97.jpg
    97.jpg
    6.8 KB · Views: 0
Status
Not open for further replies.
Back
Top