Theme editor

Scale Model Shop

Model Build-A-Long with Wonwing from start to finish-de HAVILLAND PUSS MOTH

wonwinglo

New member
Joined
Apr 18, 2004
Messages
5,410
Reaction score
0
Points
0
1/3
Thread owner
Follow me during the construction of a new model,the basis for the construction is the Westwings de Havilland DH.80A Puss Moth kit,no longer available unless you can find some old stock,Westwings are no longer in business having ceased production some years ago.
Lets take a look at what is in the box,if you want to take your model building skills a bit further then these models will give you plenty to create with your own hands,along the way I will be showing you ways of improving parts,which tools to use and above all making the most of these basic but adequate printwood kits.

P1060215.JPG

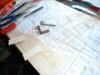
The all important plan showing all aspects of the construction.

P1060216.JPG

The printwood parts which are cut out with a craft knife,always use a new blade every new model they need to be sharp,XActo knives are ideal to do the job,cut out the parts over a few days doing a few at a time and store them during the build in flat card boxes.

P1060217.JPG

More printwood,this is a very simple kit to build having basic fuselage sides.

P1060218.JPG

The kit will contain carefully cut quality strip balsa,select which strips you need as you go along.

For gluing I use my favourite Aliphatic resin adhesive with a tube of balsa cement as well for nostalgic smell standby ! if you use balsa cement then always pre cement the joints first by smearing a bit on each half allowing to dry then re-coat for the final joint,this is because the cement sinks right into the grain of the balsa wood.

8646621844_4265e1cb37_b.jpg


This is what we are aiming for a flying model of this beautiful vintage aeroplane.
 
Thread owner
A dedicated session in cutting out the various parts from the sheets with them all neatly displayed in flat card trays for easy identification,now the build can start by laying down the first fuselage side,bring out the pins and adhesive and lets get started !

P1060228.JPG

Small pieces of scrap balsa hold down the longerons and cross vertical pieces,the first side of the fuselage is underway,time honoured proven constructional methods.

P1060229.JPG

The small fillets of aliphatic adhesive soak into the joints overnight.

P1060230.JPG

P1060226.JPG

P1060225.JPG

P1060223.JPG

These are the basic tools for cutting out the parts,sharp Xacto knife with plenty of fresh keen blades,warding file for cutting the slots,steel rule,tweezers and a pair of tweezers to pick up the parts with.
 
Thread owner
Once side one has been built the pins are removed and a piece of cellophane slid over side one to stop the sides from sticking together,pins are then driven either side of side 1 and side 2 is built directly over the top,once dry the sides are removed and given a light sanding,then two stringers are added either side to give the characteristic shape of the Puss Moth fuselage,these are lightly weighted while they cure out,once these are ready then its time to add the first formers to join the fuselage together to create the box.
This is a very delicate structure at this early stage and has to be treated gently until those formers are in place.

P1060231.JPG

The second side laid up over the first with cellophane in between to stop them sticking.

P1060232.JPG

P1060237.JPG

When building two identical pieces place them like this with the upper edges together,that way you will not build two identical sides ! you only do that once but never again,in my case I carved two propeller blades once the same orientation,hard lesson learned !
 
Thread owner
The two sides were completed today and are now joined together with a single former,a tiny gusset was added for some extra gluing strength at the corners,the pieces are still very flimsy and need careful handling.
Next job when fully dry is to crack the joint at the former and pull in the tail area,then additional former pieces will be added top and bottom.

P1060240.JPG

The two side frames with a main former added and allowed to dry.

P1060246.JPG

The two sides are joined together keeping them nice and square,a couple of small gussets were added for extra strength at this stage of the construction.

1434573999115.jpg

G-AEOA in an earlier colourscheme before it was fully restored in the beautiful silver/mid blue scheme.
 

Attachments

  • P1060241.JPG
    P1060241.JPG
    2.9 KB · Views: 0
Thread owner
The fuselage takes shape slowly with upper and lower rear formers added,this is a demanding little model that has to be done in careful stages.

P1060253.JPG

The longerons are cracked and strengthened at the point where the nose pulls in just aft of the cockpit framework,care has to be taken to ensure everything is in line,the Puss Moth is not a slab sider it turns in many different directions and the side stringers do not help matters either ! the front then tapers down at the engine cowl with a gradual twist to it,sanding will help that area once everything is fully set.

P1060250.JPG

Longerons cracked but awaiting the nose former now added as seen in picture one.
 
I've got to echo what Joe said earlier, i'm loving seeing these builds..
keep up the good work buddy.. :thumb2:
 
Thread owner
I've got to echo what Joe said earlier, i'm loving seeing these builds..
keep up the good work buddy.. :thumb2:
Really pleased that you enjoy them Chris,I enjoy doing them too and its a record of the building sequence for me too,lots more to come !
 
Thread owner
Last bits for today,the cockpit area framing was added plus a few other supporting parts that had to be made as they were missing,there was a slight hiccup where the top of the rear canopy line did not line up with the aft longerons,a workaround was to add some stripwood that can be blended in,also the cowling contour strips were missing so easy enough to make these were fabricated,these kind of things happen and only come to light during the build.
No more build for tomorrow as I am off to the Wings And Wheels display at North Weald aerodrome tomorrow early start from the Midlands.

P1060256.JPG

You can see the area aft of F6 which should blend in with the upper longerons,rectified with some packing,cabin frames in place and cowl side cheek missing parts,not far off now to a good sanding and a double check of all fine joints.

P1060254.JPG

P1060257.JPG

Placement of the lower longerons that will be pulled down at the rear when dry at the front.
 
Thread owner
Todays work on the Puss Moth firstly entailed a good overhaul sanding of the fuselage blending in the stringers,longerons and formers,in doing so I fitted some embellishments where the covering would need to be attached to,I have a thing about this in plans and kits where things are unsupported hanging in mid air ! with a bit of pre planning problems can be arrested before the covering goes on.

The nose block was shaped and carved then fitted but not before a modification to allow the hook with motor to fit through a square rather than a tiny nose button in the nose so two laminations of balsa plus a piece of ply were fashioned into a nose plug then a vintage brass bearing was screwed into place before the music wire shaft was formed and fitted to the supplied propeller,a teflon bearing was slipped into place for less friction behind the prop itself.

A nose cowl was made from printers litho plate and glued into place wrapped around the nose,this was followed by a dummy oil tank on the port side.

Then the undercarriage legs were formed from music wire and let into the fuselage sides,these were bound with thin brass jewellery wire and the joints glued with Pritt jewellery metal cement and left to cure out.

A start was made on the wings by pinning down the trailing edges after making slots to take the trailing edges of the wing ribs.

P1060264.JPG

Some wood was added aft lower of the cabin where the model is held for launching,this stops damage to tissue when the model is launchedand can be pinched with the fingers.

P1060267.JPG

Undercarriage in place after working the wire legs,the undercarriage drops into a saw cut under the fuselage which will be filled in.

P1060258.JPG

Showing nose button which will be used for trimming ie sidethrust/downthrust adjustments by gently carving out inside the nose insert.

P1060261.JPG

The printers litho is very light in such a small amount,nose weight normally needs adding anyway and my approach is always add strength rather than useless
ballast.

P1060262.JPG

Upper areas of cockpit,error has been rectified by adding a strip of wood blended in,the former was too short vertically,now everything flows and blends in fore and aft.

P1060265.JPG

View looking forward,a further strut will be added from the undercarriage to the wing forward of the leading edge once the wings are in place.

P1060266.JPG

P1060269.JPG

Dummy oil tank on the port side only.

P1060268.JPG

Tail skid spoon fashioned from wire and balsa scrap.

P1060270.JPG

Wing trailing edges pre slotted to take the ribs ready to build the wings.
 
Thread owner
Well the wings have now been completed after lots of essential structural modifications,the plans were vague in places but this did not matter because if I had built them as shown they would have snapped off on the first flight ! yes virtually nothing holding them at the centre section and very flimsy so I added soft balsa block infills,also the model has proper carved wingtips nicely blended in that will assist the covering stage as there is now something substantial to attach the tissue to.
I spent the day sanding and tidying up the wings and made a start on the tailplane and fin/rudder assembly,balsa strut material is currently outside soaking in medium cyno to give the struts strength when under compression.

P1060281.JPG

Wings mocked up to see what she will look like.

P1060282.JPG

There is slight aft sweepback on the Puss Moth,note beefed up centre section inboard panels and proper balsa carved wingtips.

P1060283.JPG

P1060278.JPG

The wings after a good sanding down

P1060272.JPG

Wings under construction in the early stages.

P1060274.JPG

On the bench outside just before the balsa wingtip blocks were added.

P1060275.JPG

A start is made on the tail.

P1060276.JPG

And the fin/rudder assembly.

P1060284.JPG


As the silver tissue has unknown qualities I am going to do a test piece on this old wing salvaged from the scrapping area,the joints have been reglued,I want to see how this silver tissue tightens up as it looks like standard silver gift wrap which does not tighten up from previous experience ! if it proves unsatisfactory then I will simply use standard Jap tissue that will be painted silver,better to try it on this old wing first rather than ruin the Puss Moth wings.

20037256486_e32caf083f_b.jpg

A solid model of the Puss Moth.
 
These are superb models you build Barry, I say build as unlike me welding plastic together that's what you do. Fascinating to watch them come together.
 
Thread owner
These are superb models you build Barry, I say build as unlike me welding plastic together that's what you do. Fascinating to watch them come together.
Thank you Mick for your kind remarks,yes I do enjoy very much the build process from the ground up and making everything myself with the various challenges along the way,I also see it as away of keeping old skills alive,the thrill of seeing them evolve day by day is something difficult to describe but I know you understand what I am saying,thank you for following the builds it is always good to know there is someone getting something positive from them,that itself means a lot.
 
Thread owner
Lots of progress with the Puss Moth and taking advantage of the good weather today to do some painting with real vintage model aeroplane colour dope,a rare thing these days.

P1060285.JPG

The wing struts and tail surfaces under construction,the struts were made from balsa soaked in cyno to give them strength.

P1060288.JPG

And fully shaped and sanded to aerofoil section.

P1060289.JPG

Experimental silver tissue covering as supplied in the kit which was tried out on an old wing,I found that by laying the tissue between a damp towel before fixing in place with Solvite overlap paste it tightened up reasonably well,happy with the test piece I proceeded to cover the Puss Moth wings.

P1060292.JPG

And here they are,reasonably happy with them,some small wrinkles exist but so do they on real aeroplanes.

P1060293.JPG

P1060295.JPG

Covering outboard panels of the underneath,the wings will be fitted and struts added then the inboard sections covered,this will give me something to hold onto at the wing root when fixing the wings in place,forward planning is important.

P1060296.JPG

Tailplane during covering with silver tissue,quite tricky with a lot of compound curves to have to deal with.

P1060300.JPG

Fuselage during painting interior cockpit green.

P1060301.JPG

Doping the nose area with mid blue.

P1060303.JPG
 
Thread owner
Most of the covering has now been completed and assembly is taking place slowly making sure everything is carefully set up and in line,the silver finish has still not been doped up as tests on the slave wing proved un-satisfactory so for the time being the finish is simply watershrunk,one rgistration transfer has been applied underneath the wing to see how it responds to the undoped surfaces,final results when its dry will determine any decisions to add dope.

P1060304.JPG

Wings in place with set dihedral angle.

P1060306.JPG


P1060318.JPG

In this heat those joints will soon be set ready to put the wing struts in place.

P1060307.JPG

'Ollie' & Puss Moth comparitive size.

P1060317.JPG
 
Pleased to see the quality inspector is keeping an eye on you!
Pete
 
Thread owner
Major components have been assembled on the Puss Moth,I think this tiny model flying model brings out the beauty of this delightful vintage aeroplane ,the model presented many challenges along the way,to fix the wings I used cocktail sticks embedded into the wing roots which made the tricky assembly easier,when you build something like this use the kit as a basis for something special and incorporate your own improvements into the build that way you will derive the best from the kit and rectify any shortcomings.

P1060319.JPG


P1060320.JPG

P1060322.JPG

P1060323.JPG

P1060325.JPG
 
Thread owner
First successful flight this evening of the Puss Moth.


vlcsnap-2019-07-07-22h43m51s754.png

Away she goes !

vlcsnap-2019-07-07-22h40m21s384.png

vlcsnap-2019-07-07-22h44m39s829.png


vlcsnap-2019-07-07-22h45m46s780.png

Atmospheric picture of the Puss Moth in flight.

vlcsnap-2019-07-07-22h43m14s744.png
 
Back
Top