
You are using an out of date browser. It may not display this or other websites correctly.
You should upgrade or use an alternative browser.
You should upgrade or use an alternative browser.
Monogram, 1/24 Huey.
- Thread starter eddiesolo
- Start date
- Status
- Not open for further replies.
G
Guest
Guest
looks good be looking in on progress !! cry !! cool
UPDATE:
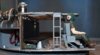
This is going slower than I thought, simple kit but seems to take forever lol.
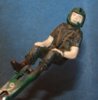
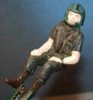
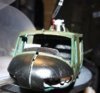
So, I have painted the pilot-then repainted him (thanks to Al for some advice) I hate figure painting...
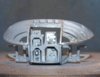
The interior has been started and test fit for items.
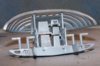
The outer skin has been primed, aluminium paint applied in places then salted and overcoated-knocked back. It has had a coat of matt varnish once all dried and decalled it will be weathered further and, hopefully get a more dull look.
Si")
View attachment 108396
View attachment 108397
View attachment 108398
View attachment 108399
View attachment 108400
View attachment 108401
View attachment 108402
View attachment 108403
View attachment 221419
View attachment 221420
View attachment 221421
View attachment 221422
View attachment 221423
View attachment 221424
View attachment 221425
View attachment 221426
This is going slower than I thought, simple kit but seems to take forever lol.
So, I have painted the pilot-then repainted him (thanks to Al for some advice) I hate figure painting...
The interior has been started and test fit for items.
The outer skin has been primed, aluminium paint applied in places then salted and overcoated-knocked back. It has had a coat of matt varnish once all dried and decalled it will be weathered further and, hopefully get a more dull look.
Si
View attachment 108396
View attachment 108397
View attachment 108398
View attachment 108399
View attachment 108400
View attachment 108401
View attachment 108402
View attachment 108403
View attachment 221419
View attachment 221420
View attachment 221421
View attachment 221422
View attachment 221423
View attachment 221424
View attachment 221425
View attachment 221426
Attachments

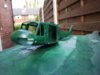
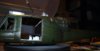
UPDATE:
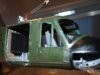
Slow going, but making good progress.
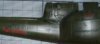
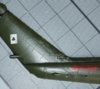
What's been done: The body has had a colour of olive drab, weathered and sealed. The nose has been coated in satin black.
I have added black leather look cloth on the seat and rear wall curtains-looks much better. The front radio rack has been fitted but is not fastened in, need to remove it to get the fibre optics up to the instrument panel. The instrument panels have been drilled awaiting the optics.
Exhaust has had be drilled to get the small flashing red light to fit through...this was a faf. The large light is orange and that has had to have the floor drilled so I can get the bulb and wiring up into the cabin.
Not pictured is the blades, all painted although I broke a piece...found it so that is too reattach. That's it for now.
Si
View attachment 108682
View attachment 108683
View attachment 108684
View attachment 108685
View attachment 108686
View attachment 108687
View attachment 108688
View attachment 108689
View attachment 221705
View attachment 221706
View attachment 221707
View attachment 221708
View attachment 221709
View attachment 221710
View attachment 221711
View attachment 221712
Slow going, but making good progress.
What's been done: The body has had a colour of olive drab, weathered and sealed. The nose has been coated in satin black.
I have added black leather look cloth on the seat and rear wall curtains-looks much better. The front radio rack has been fitted but is not fastened in, need to remove it to get the fibre optics up to the instrument panel. The instrument panels have been drilled awaiting the optics.
Exhaust has had be drilled to get the small flashing red light to fit through...this was a faf. The large light is orange and that has had to have the floor drilled so I can get the bulb and wiring up into the cabin.
Not pictured is the blades, all painted although I broke a piece...found it so that is too reattach. That's it for now.
Si
View attachment 108682
View attachment 108683
View attachment 108684
View attachment 108685
View attachment 108686
View attachment 108687
View attachment 108688
View attachment 108689
View attachment 221705
View attachment 221706
View attachment 221707
View attachment 221708
View attachment 221709
View attachment 221710
View attachment 221711
View attachment 221712
Attachments
G
Guest
Guest
Looking good
G
Guest
Guest
Looks great Si! I've often wondered what these kits are like with an eye to doing a " post-apocalyptic " version - kinda Mad Max in the air!
Cheers Joe, coming along steady.\ said:Yes, very nice work Si. The paint work is looking good already.
Ta Ray, glad you like it so far.\ said:Looking good
Si
They are okay Patrick, no major headaches-only issues are made by me in adapting a kit to accept other bits. Great scope for adding and painting various schemes-go on, should look awesome.\ said:Looks great Si! I've often wondered what these kits are like with an eye to doing a " post-apocalyptic " version - kinda Mad Max in the air!
Hmmm...faith...skills...be better off just getting a load of glue and the model and throw it in a bucket and see what sticks lol.\ said:Ahhh seee the LIGHT!!")
Looking good, Si!!
I have faith in your skills!!
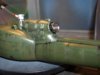
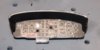
Right. There is a update but no piccies yet. I have added some internal work, fire extinguisher to rear wall, a small first aid box next to seat a blanket wrap on the opposite side, also added a small first aid pouch to inner frame wall. All these items are from the bits box and are 1/35-but they fit superbly.
I have also added some under window door grab handles-these are from the original USS Enterprise model...surprising what you can use.
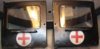
I have also added some decals to the pilots arm and helmet-red-crosses (1/76 scale after-market decals) on a white roundal. The doors have larger red crosses on white roundal and have added other decals-some would not go on right despite-microsol, decal fix (squeezed and the nipple end came out and I got a model full of decal fix!).
So, have left it for tonight before I swear anymore and the Police are called
I have also added some under window door grab handles-these are from the original USS Enterprise model...surprising what you can use.
I have also added some decals to the pilots arm and helmet-red-crosses (1/76 scale after-market decals) on a white roundal. The doors have larger red crosses on white roundal and have added other decals-some would not go on right despite-microsol, decal fix (squeezed and the nipple end came out and I got a model full of decal fix!).
So, have left it for tonight before I swear anymore and the Police are called
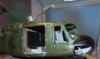
UPDATE:
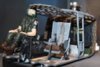
Some piccies of what I have done so far.
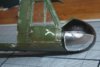
Added a first aid box and blanket wrap to either side if the rear bench seat, a small first aid pouch fastened to the floor/roof brace, also a fire extinguisher to the rear bulkhead.
Decals applied to the pilots sleeve and helmet.
Aftermarket decals applied to fuselage, terrible decals to apply.
Doors decalled and glazed, grab handles fitted courtesy of USS Enterprise warp nacelles.
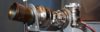
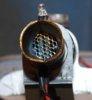
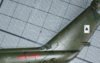
Rear engine exhaust given a burnt look and also added some mesh inside to hide the wiring.
Found a litter carrier that will be fastened to the side.
Si
View attachment 109157
View attachment 109158
View attachment 109159
View attachment 109160
View attachment 109161
View attachment 109162
View attachment 109163
View attachment 109164
View attachment 109165
View attachment 109166
View attachment 109167
View attachment 109168
View attachment 109169
View attachment 109170
View attachment 109171
View attachment 109172
View attachment 222180
View attachment 222181
View attachment 222182
View attachment 222183
View attachment 222184
View attachment 222185
View attachment 222186
View attachment 222187
View attachment 222188
View attachment 222189
View attachment 222190
View attachment 222191
View attachment 222192
View attachment 222193
View attachment 222194
View attachment 222195
Some piccies of what I have done so far.
Added a first aid box and blanket wrap to either side if the rear bench seat, a small first aid pouch fastened to the floor/roof brace, also a fire extinguisher to the rear bulkhead.
Decals applied to the pilots sleeve and helmet.
Aftermarket decals applied to fuselage, terrible decals to apply.
Doors decalled and glazed, grab handles fitted courtesy of USS Enterprise warp nacelles.
Rear engine exhaust given a burnt look and also added some mesh inside to hide the wiring.
Found a litter carrier that will be fastened to the side.
Si
View attachment 109157
View attachment 109158
View attachment 109159
View attachment 109160
View attachment 109161
View attachment 109162
View attachment 109163
View attachment 109164
View attachment 109165
View attachment 109166
View attachment 109167
View attachment 109168
View attachment 109169
View attachment 109170
View attachment 109171
View attachment 109172
View attachment 222180
View attachment 222181
View attachment 222182
View attachment 222183
View attachment 222184
View attachment 222185
View attachment 222186
View attachment 222187
View attachment 222188
View attachment 222189
View attachment 222190
View attachment 222191
View attachment 222192
View attachment 222193
View attachment 222194
View attachment 222195
Attachments
-
 P5147177.JPG2.9 KB · Views: 0
 -
 P5147178.JPG2.2 KB · Views: 0
 -
 P5147179.JPG1.4 KB · Views: 0
 -
 P5147180.JPG6 KB · Views: 0
 -
 P5147181.JPG2.3 KB · Views: 0
 -
 P5147182.JPG2.4 KB · Views: 0
 -
 P5147183.JPG1.7 KB · Views: 0
 -
 P5147184.JPG2.2 KB · Views: 0
 -
 P5147186.JPG1.5 KB · Views: 0
 -
 P5147187.JPG1.1 KB · Views: 0
 -
 P5147188.JPG1.6 KB · Views: 0
 -
 P5147189.JPG2.3 KB · Views: 0
 -
 P5147190.JPG2.8 KB · Views: 0
 -
 P5147191.JPG2.2 KB · Views: 0
 -
 P5147176.JPG3.8 KB · Views: 0
 -
 P5147192.JPG1.5 KB · Views: 0
G
Guest
Guest
Nice work Si like it so far.
scott
scott
You're correct Joe, I will see if I can hide it a bit better. You can see the wiring if you peer into it, no other way to wire it...hence the mesh.\ said:Great stuff Si, looks awesome so far. May I suggest painting that mesh black, would hide both it and the wiring as the exhaust is a straight through tube on the UH-1.
Glad you like it so far.
Si
- Status
- Not open for further replies.
Legal Notice
scalemodelling.co.uk is a privately operated online discussion forum. All content posted by members reflects their own views and opinions and does not necessarily represent those of the forum owners or administrators. While reasonable efforts are made to moderate content, no responsibility is accepted for user-generated material. By using this site, you agree to comply with UK law and the forum rules.