Theme editor

Scale Model Shop

Mossiepilots M901A1 ITV

Status
Not open for further replies.

mossiepilot

New member
Joined
Jul 17, 2011
Messages
2,272
Reaction score
0
Points
0
1/3
Thread owner
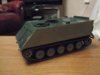
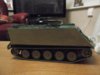
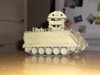
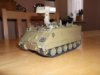
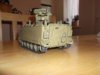
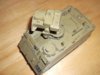
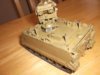
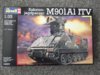
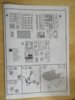
Hi guys, thought I'd have a go at this SIG, but instead of my usual aircraft, I thought I'd have a go at some armour.

This is what I'm going to have a go at -

View attachment 47091View attachment 47092View attachment 47093View attachment 47094View attachment 47095View attachment 47096View attachment 47097View attachment 47098View attachment 47099

Not my usual fodder, but I thought it would make a nice change. I haven't made an AFV since I was a kid.

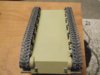
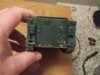
Any comments and help during the build would be gratefully received, as I don't know much about this subject.

Tony.

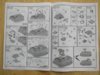
View attachment 50069

View attachment 50070

View attachment 50071

View attachment 50072

View attachment 50073

View attachment 50074

View attachment 50075

View attachment 50076

View attachment 50077

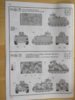
View attachment 163095

View attachment 163096

View attachment 163097

View attachment 163098

View attachment 163099

View attachment 163100

View attachment 163101

View attachment 163102

View attachment 163103
 

Attachments

  • aaa 006.jpg
    aaa 006.jpg
    3 KB · Views: 0
  • aaa 007.jpg
    aaa 007.jpg
    3.1 KB · Views: 0
  • aaa 008.jpg
    aaa 008.jpg
    2.7 KB · Views: 0
  • aaa 009.jpg
    aaa 009.jpg
    2.7 KB · Views: 0
  • aaa 010.jpg
    aaa 010.jpg
    2.1 KB · Views: 0
  • aaa 011.jpg
    aaa 011.jpg
    2.4 KB · Views: 0
  • aaa 012.jpg
    aaa 012.jpg
    2.4 KB · Views: 0
  • aaa 013.jpg
    aaa 013.jpg
    2.6 KB · Views: 0
  • aaa 014.jpg
    aaa 014.jpg
    2.6 KB · Views: 0
Nice one Tony just like me i don't normaly do armour will watch with interest
 
Thats a bit different. Are you going for the camouflage or the all over....

Ian M
 
Looks a nice piece of armour to build Tony, be interesting to see what you do with it ... stand alone or in a diorama do you think??

Not knowing anything about this vehicle, i trawled t'interweb for info and i'm a bit confused in the fact that the model has decals for German use but the they're not noted in the list of worldwide operators. (anyone know??)

It does, however, seem to be a tasty bit of equipment in what it does. :)
 
Thread owner
Thanks for all the good comments guys.

Ian, thought I'd do the plain one cos the camo one looks a bit difficult and the tank is worrying me enough.

Colin, I would like to sit it on a desert dio as the paint scheme I intend to do is from desert storm. Any advice about how to "do" 1:35 scale sand would be gratefully received.

More pictures soon.

Tony.
 
Thread owner
Bit of help please.

The links of the track come as lots of seperate bits which need to be built around the wheels.

Any advice about the best way to do this would be very helpful as I'm nervous about starting them.

Tony.
 
If they are the type that just click together, no problem. If they need glue to hold them together go for a glue that will give a bit of setting time. Liquid poly is normally OK. Use a very fine pointed brush to apply a tiny amount of glue. Glue a run of ten-fifteen, then start another. When you have two joint them together. Try to make a top run and a bottom run. Lay the top run onto the wheels and form the sag as required before glue is fully set. If it has set, a drop more will soften the join enough to form it. Leave to dry, Do the same with the bottom run.

When you have two tops and two bottoms, put them in place again and glue them together.....

Ian M
 
Thread owner
Thanks Ian, the track has some straight runs and some individual links that wrap around the front and rear wheels, I've put the sprue and instructions on here for you to look at - View attachment 47521View attachment 47522 the links don't clip together, so will need to be glued, and the top section is a flat run, so I'm not sure how to get it to drape. If I gently bend the flat top run will it work do you think.

I'll give it a go but as I've not done this before and am a bit nervous.

Thanks again,

Tony
 
The picture you posted don't work...

Link and length is a whole other thing.... I had a look at the box top shot you posted and you can only just see the top run. Remember, tracks that sag excessively are worn and need adjusting, so its not a be all and end all that yours sag. Yes a little sag is expected, They are heavy after all. If you feel the need you could try giving them a hot bath to soften them.

Ian M
 
Thread owner
Well the tracks are on, after much umming, ahhing, and scratching of head.

View attachment 47763View attachment 47764View attachment 47765View attachment 47766

When I was assembling them before putting them on I was surprised how light and delicate they were, this is a tank I thought to myself, everything should be heavy and chunky, anyway they're done.

Must admit, I've learned a lot with this build and think I'll definitely be doing another one.

Thanks for looking, more soon.

Tony.

View attachment 50648

View attachment 50649

View attachment 50650

View attachment 50651

View attachment 163674

View attachment 163675

View attachment 163676

View attachment 163677
 

Attachments

  • pics 010.jpg
    pics 010.jpg
    2.2 KB · Views: 0
  • pics 011.jpg
    pics 011.jpg
    2.4 KB · Views: 0
  • pics 012.jpg
    pics 012.jpg
    2.4 KB · Views: 0
  • pics 013.jpg
    pics 013.jpg
    2.6 KB · Views: 0
Thread owner
 

Attachments

  • tank 005.jpg
    tank 005.jpg
    2.4 KB · Views: 0
  • tank 006.jpg
    tank 006.jpg
    2.7 KB · Views: 0
  • tank 004.jpg
    tank 004.jpg
    1.9 KB · Views: 0
  • tank 003.jpg
    tank 003.jpg
    2.4 KB · Views: 0
  • tank 002.jpg
    tank 002.jpg
    2.5 KB · Views: 0
I'll tell thee what Tony, That is looking very good. And you say you cant do armour....!

Ian M
 
Thread owner
 

Attachments

  • tank2 004.jpg
    tank2 004.jpg
    2.3 KB · Views: 0
  • tank2 005.jpg
    tank2 005.jpg
    2.2 KB · Views: 0
  • tank2 006.jpg
    tank2 006.jpg
    2.3 KB · Views: 0
  • tank2 007.jpg
    tank2 007.jpg
    2.2 KB · Views: 0
  • tank2 008.jpg
    tank2 008.jpg
    2 KB · Views: 0
  • tank2 009.jpg
    tank2 009.jpg
    2.3 KB · Views: 0
  • tank2 010.jpg
    tank2 010.jpg
    2 KB · Views: 0
  • tank2 011.jpg
    tank2 011.jpg
    1.9 KB · Views: 0
  • tank2 012.jpg
    tank2 012.jpg
    2.2 KB · Views: 0
Thread owner
First coat of klear is on, and the decals are on, easy as there was only six of them. Waiting for them to dry before putting some last paint details and the final klear coat on.

Heres some pictures -

View attachment 48266View attachment 48267View attachment 48268View attachment 48269

After looking at the posted pictures, the weathering looks a bit heavy handed, but I wanted a scruffy, well used effect. Still I'm reasonably happy with it.

Comments and advice very welcome.

Tony.

View attachment 51132

View attachment 51133

View attachment 51134

View attachment 51135

View attachment 164158

View attachment 164159

View attachment 164160

View attachment 164161
 

Attachments

  • tank3 006.jpg
    tank3 006.jpg
    2.4 KB · Views: 0
  • tank3 007.jpg
    tank3 007.jpg
    2.2 KB · Views: 0
  • tank3 011.jpg
    tank3 011.jpg
    2.4 KB · Views: 0
  • tank3 016.jpg
    tank3 016.jpg
    2.5 KB · Views: 0
Hi Tony.

Looking good so far!! The weathering is Ok for me.

It's not a criticism!!! But I have a doubt ... probably it's the photo and the fund of the table in quoit. It looks like the very homogeneous painting...I know that are absent with somethings like pigments or others.

Remember!!!! It's really Ok!!!!

Cheers. Polux
 
Great weathering and a very interesting vehicle, yet another one that I fancy having a go at
 
Status
Not open for further replies.
Back
Top