Theme editor

Scale Model Shop

My First Destroyed Tiger

  • Thread starter Thread starter Guest
  • Start date Start date
Status
Not open for further replies.
G

Guest

Guest
Thread owner
Hello Guys,


been working on this for a few weeks now. (Been busy elsewhere so progress has been slow).


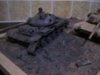
As per usual i have attached a preview and the rest can be seen on my website:


http://www.complete-models.com/completed-models/military-vehicles/172-pz-kpfw-vi-tiger-i-ausf-e/


I don't mean this negatively, but i get tired of people(not here, but in general) saying 'looks good' or 'fantastic' even when its obvious the modeler could do with some proper feedback. Please feel free to comment and provide any tips or advise. I welcome all criticism as its the only way i will learn. :)

View attachment 114335

View attachment 114337

View attachment 227358

View attachment 227360
 
Thread owner
Hi Josh.


The effect looks good to me....So...why you done it bigger?!? :)


I miss some more several weathering on the tracks. And a general wash or a pinwash over the Tiger.


These are my suggestions :)


The rest of the model and the base looks fine!


Polux
 
dose look good,


and i tend to agree with Polux,


that you could of give it a couple of washers for blending,


do like the hits,on it,you could add in the rest of the wheels,


and the guard on the ground scatted about,and maybe just


lighten ,to gray white a little and blend,


do like the base well done, ;)
 
Thread owner
Shrapnel and bits of metal kicking about?


Looks nice over all and its a nice dio base too
 
Josh, I've done a few wrecked Tigers on here....


I suggest you include the missing wheels strewn about or tucked under the tank body - or a least some of them. Also perhaps cut the ground up some more and sling a bit of dirt on the tank too. How about opening a hatch or two, which might have blown open due to an internal explosion or opened by the unfortunate crew whilst trying to escape?


Take a look at wrecked Tiger tanks on Google Images. I use this a great reference point.


Very nice base, but just a bit too clean for the subject....Get mucky!


Ron
 
Thread owner
Thank you very much guys !


I often see people asking for comments but only want to hear what they want to hear!


I will continue to have a play with it.


Question, I kept the wheels and guard but wasn't too sure how to display them... Do I just place on the grass verge ? Is so, would you suggest they be burt and how would the grass look around them ?


I need to find a tutorial for washes. Never too sure how to apply them
 
Hi Josh, firstly, the paint work looks great, nicely done.


Hints and tips: As the guys and gals have said the debris and wash. In that scale detail is minimum, you are highlighting instead of actually trying to create-it is easy to get out of scale. Use a pencil along edges, and hatches, this shows a dull wear. The smoke pattern looks too much, slightly blocky.


This is my 1.35, so although easier to do gives you an idea.


View attachment 114342


Smoke is more dirty/oily/sooty. You can see it on top right of the turret and hatch.


This shows the shell hits again you can see the dappled smoke effective.


View attachment 114343


The grey/ash you have used is great, on mine I use PVA with real ash for the effect shown here on the engine bay.


View attachment 114344


Again, I know that for scale it would be toned down and it detracts nothing from the build-it is a super little thing.


Si:)

View attachment 227365

View attachment 227366

View attachment 227367
 

Attachments

  • $_57.JPG
    $_57.JPG
    3.4 KB · Views: 0
  • $_57.JPG
    $_57.JPG
    2.4 KB · Views: 0
  • $_57.JPG
    $_57.JPG
    3.6 KB · Views: 0

Attachments

  • dscf3617-jpg.86312.jpg
    dscf3617-jpg.86312.jpg
    1.7 KB · Views: 0
  • dscf3619-jpg.86314.jpg
    dscf3619-jpg.86314.jpg
    2.3 KB · Views: 0
  • dscf3625-jpg.86316.jpg
    dscf3625-jpg.86316.jpg
    6.8 KB · Views: 0
\ said:
Question, I kept the wheels and guard but wasn't too sure how to display them... Do I just place on the grass verge ? Is so, would you suggest they be burt and how would the grass look around them ?
Think how the tank was hit, some debris would be under the tank or against the lower hull, maybe some smaller or lighter pieces would have been thrown aside in the blast.


Personally I wouldn't add anything to the grass as road wheels etc are heavy and the way you have the tank and damage already makes me think it is more localised fire damage.


If you did fancy putting a piece on the grass then really the rubber part of the wheels would burn, the grass would be scorched and burnt around the wheel. The grass would be shorter and blackened with a more brown look to the grass slightly further away...not too much.


Si:)
 
In general I like the premise, there nothing to fault there. I agree with everything mentioned above - they need to be considered.


With regards to the blast effect / damage...


You must think of the direction of the blast, what was the cause of the blast - land mine or artillery as they have different blast, damage and cratering characteristics.o_O


I think that this is a very important part of the story that you are telling in your mini dio.


There is my 5p, I hope you that was useful? ;)


G~)
 
Hi josh I think it looks fantastic,


In all seriousness I'm a newbie and I haven't done a tank as yet but it might be nice to see some more weathering as I think it looks to clean still.


Cheers


Phil
 
Ok,


My two penny worth ( and i aint the best) but;


1) where's the wheel gone, it wouldnt evaporate due to heat, would be fragments and why isnt it there, the round went in above the wheel.


2) with three shots that close on the turret, it must have been one hell of an accurate gunner (would think even by todays standards in tank warfare that would be pretty impressive)


3) with all the explosions in the turret, would have thought at the least the hatches would have blown sky high if not the turret itself


4) if this a 'few days' later destroyed tank, you would see the starting of rust shades from the burnt areas


Hope thats ok, not trying to be mean or 'discredit' your work, as its a great start.
 
Nice work Josh I think the others have covered what you could do to make it better. A very good first try
 
Thread owner
OMG Thanks guys... just pick apart my work.. i hate you all !!


No i'm joking. Thanks for all the advice. I will definitely take this into consideration and re-post once i have made some improvements.
 
\ said:
just pick apart my work.. i hate you all !!
Okay then Josh, it 'looks good' :P 
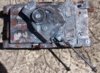
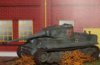
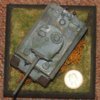
But seriously, I think all that's been said has been said, and it does look effective. Bearing in mind the previous comments, the smoke and burn effect you have achieved is convincing. Also it is nicely displayed.
 
Josh, a suggestion for the base framework.....


Although it's very neat, it sort of hits you and sticks out. The wood is too pale and detracts from the rest of the mini dio. Look at the tank and although you are not looking directly at the frame, it still takes over from the centre piece. Can I suggest you either stain the wood a dark colour or even paint it a shade of brown or green?


Doing the above will keep the eye of the viewer where it should be - on your excellent Tiger.


Cheers,


Ron
 
You asked for it , that's why I no longer really give advice or give a "critique" I know you're only kidding but some folks even though they say they want to hear it - they really don't


View attachment 114434


'

View attachment 227457
 

Attachments

  • 87394-f260ac0fa9d7a05fc750d47dd9e77b2c.jpg
    87394-f260ac0fa9d7a05fc750d47dd9e77b2c.jpg
    2.3 KB · Views: 0
Status
Not open for further replies.
Back
Top