Theme editor

Scale Model Shop

My first ever building ( scratch built )

Status
Not open for further replies.

Robert1968

New member
Joined
Mar 2, 2015
Messages
3,596
Reaction score
0
Points
0
1/3
Thread owner
well I've decided after watching Ralph's build to build my own building for my ""out of gas out of time"


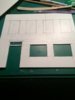
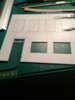
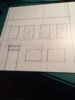
I'm going to build a simple 2 storey townhouse which will have some damage to the roof walls and floors.


It's going to be my first ever scratch building but with Ralph's advice and help I think it could work


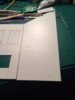
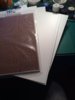
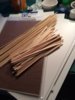
I'm using 2mm plastic card ( got 6 sheets in a deal) and I got Tamiya brickwork transfer.


I've used the 9mm to 1ft scale which should be 1/35.scale


I have ref pics to work from


Comments welcome


View attachment 247437

View attachment 247438

View attachment 247439
 

Attachments

  • image.jpeg
    image.jpeg
    2 KB · Views: 0
  • image.jpeg
    image.jpeg
    2.8 KB · Views: 0
  • image.jpeg
    image.jpeg
    1.7 KB · Views: 0
I'll be watching this always wanted to do a scratch build but never had the nerve to try
 
Go for it Robert. I am sure Ralph will be happy to see someone have a go after all the hard work he put into his excellent tutorial.
 
Thread owner
Thanks Steve, glad to have you on board.I'm hoping to make it the best I can ( 1st time ) and as I'm waiting for my compressor etc I can't do any spraying or painting so I'm just trying to get as many jobs done as possible so I'll be spraying overtime in a few weeks.mi plan on getting this done in maybe 2/3 weeks.


I'll try doing a best thread as possible on how I do things.


Robert
 
Thread owner
Thanks Graham I'll do my best to keep Ralph's tutorial close ( I'm aiming big to match him though)


Robert
 
very glad to see someone using,Ralph's tutorial,


and looks like a nice start so far, ;)
 
It is going to be great watching this Robert.


You are already off to a great start.


And remember you can ask as many questions as you like. :)
 
Thread owner
Thanks Monicaband glad to have you onboard ( I'm trying to follow Ralph's ideas and tutorial as best I can ( not to copy but have my own flair on it ) think my wallpaper may be nicer( Hahahahahaha)


However he is bloomin good at what he does!!!


Regards


Robert
 
Thread owner
\ said:
It is going to be great watching this Robert.
You are already off to a great start.


And remember you can ask as many questions as you like. :)
So if I pack it all in a Jiffy bag ( send it to you you build it etc etc ( send it back and I say ta da look what I've done ( Hahahahahaah)


Thanks Ralph I'm sure if I follow the guidelines and read the tutorial I'll be fine. next is the side of the building to mark out and cut


Regards


Robert
 
Looks like you are in good hands Robert, look forward to watching the progress. Derek
 
Thread owner
Step two


Cutting the windows out and door / side wall.


This took an eternity and still got 4 windows to cut out ( 2mm plastic board takes forever but with new blade it wasn't all that bad. This all from 1 A4 sheet of 2mm plastic card View attachment 247494


I'll get the rest cut out tomorrow after work


Pics . comments welcome


View attachment 247492

View attachment 247493
 

Attachments

  • image.jpeg
    image.jpeg
    2.1 KB · Views: 0
  • image.jpeg
    image.jpeg
    1.8 KB · Views: 0
  • image.jpeg
    image.jpeg
    2.2 KB · Views: 0
This is looking interesting, got my chair, my whskey and popcorn, I'm here for the duration
 
I shall be here watching as well you will have fun doing this I know I did when I did my barn.
 
Robert, with you deciding to use plastic card, you will find it will probably warp as you are cutting out the openings.


To get over this, once you have completed all the cutting on the face, turn the piece over and gently scour random cuts (more like heavy scratches) on the reverse side. This will straighten out your wall.


I hope this little tip will be of some use to you.


Ron
 
Thread owner
\ said:
Robert, with you deciding to use such very thin plastic card, you will find it will probably warp as you are cutting out the openings.
To get over this, once you have completed all the cutting on the face, turn the piece over and gently scour random cuts (more like heavy scratches) on the reverse side. This will straighten out your wall.


I hope this little tip will be of some use to you.


Ron
Thanks Ron for the tip.


Regards


Robert
 
coming along nicely ,always alot of work,


as I find it takes a long time to cut out the card,also if you drill a hole in the corner lets you get into that spot without,


going over your lines,


and that's why I use cardboard,as I like the use of my fingers, ;)
 
Thread owner
\ said:
coming along nicely ,always alot of work,
as I find it takes a long time to cut out the card,also if you drill a hole in the corner lets you get into that spot without,


going over your lines,


and that's why I use cardboard,as I like the use of my fingers, ;)
I hate to say this Monica but I just read your post as I was putting plaster on my thumb ( surprised myself on how deep a No 10a scalpel will in bed in your thumb( ouch ( yes I did swear a little )


Robert
 
Thread owner
\ said:
Robert, I hope you've saved the spilt blood - you can use it to weather your brickwork! :P
You know what I wanna do right now with your name Spanner!!!! ( swing it in your general direction!!!! Hahahahahhaahahah


I can't believe how much that bloomin hurt too but luckily I'm a first Aider and I patched it up no problem!!


Robert
 
Status
Not open for further replies.
Back
Top