Theme editor

Scale Model Shop

My first ever building ( scratch built )

Status
Not open for further replies.
Thread owner
Where I'm up to now


Got up at the crack of dawn ( wife said who's dawn??)


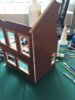
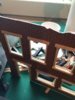
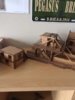
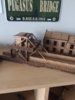
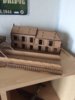
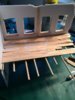
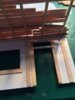
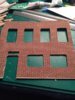
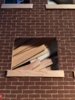
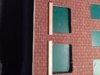
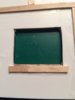
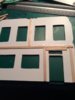
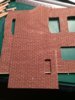
Got the Windows and doors cut out with scalpel and then went to work on the window frames.


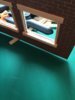
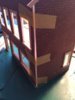
I got a good tip from Ron ( spanner570) and scored the inside of the plastic as 2mm card once cut into smaller areas does tend to bend. This scoring on internal walls brings the plastic back flat!


I have started making the lower part of the frames and this has been repeated inside aswell so when I come to making the ledges for the windowsill have a bigger area to work on.


Lots of measurements and lots of replicated wooden slats will build up the frames.Poppy keeps jumping up on the work table too!!( think she wants to play!!


I've also started on the dividing walls and made some framework internally ( this will give added support to structure and a starting area for when I come to the flooring beams/walls I secured using CA glue over PVA a much stronger I'm hoping.


( I now know why I never went into the building trade)


Pics and comments welcome


View attachment 247778

View attachment 247779

View attachment 247780

View attachment 247781

View attachment 247782

View attachment 247783

View attachment 247784
 

Attachments

  • image.jpeg
    image.jpeg
    2.8 KB · Views: 0
  • image.jpeg
    image.jpeg
    1.7 KB · Views: 0
  • image.jpeg
    image.jpeg
    2.9 KB · Views: 0
  • image.jpeg
    image.jpeg
    2.3 KB · Views: 0
  • image.jpeg
    image.jpeg
    1.8 KB · Views: 0
  • image.jpeg
    image.jpeg
    2.5 KB · Views: 0
  • image.jpeg
    image.jpeg
    2.5 KB · Views: 0
haha oh lol,just got to love theses moggy s :D


how sweet is that,like my vamp with a fat pink tummy as well, :)


looking good,was thinking if the brick sheets had a texture to them,and yes they do,


I do like the looks of them,maybe have to get some to tryout, ;)
 
Thread owner
\ said:
haha oh lol,just got to love theses moggy s :D
how sweet is that,like my vamp with a fat pink tummy as well, :)


looking good,was thinking if the brick sheets had a texture to them,and yes they do,


I do like the looks of them,maybe have to get some to tryout, ;)
If it's any help Monica


Ref No ( item 87168**360 Diorama Material sheet ( Brickwork ) by Tamiya


Robert
 
Thread owner
Thanks Terry. When I first started this I was quite unsure of what I was doing but I've had a good start and with help and guidance I'm rather enjoying the build ( learning lots too


Robert
 
Thread owner
Well that's the window frames nearly finished I'm going to double up on the tops and bottoms and sorry to pinch Ralph's idea I may even put some decorative parts on the outer frames.


The inner frames be got some evergreen strip styrene but I'll do some measurements before I fit.( bit tricky me thinks but I'll get there. Still got the windo sill to do aswell


I put a corner of roof beam on side to see the roof hang


I'll have to make guttering and drain/ down pipes too ( need to source this or scratch build from something.


Comments and advice most welcome


Pics


View attachment 247789

View attachment 247790

View attachment 247791

View attachment 247792
 

Attachments

  • image.jpeg
    image.jpeg
    2.8 KB · Views: 0
  • image.jpeg
    image.jpeg
    3 KB · Views: 0
  • image.jpeg
    image.jpeg
    2.4 KB · Views: 0
  • image.jpeg
    image.jpeg
    2.4 KB · Views: 0
I reckon you have done this before Robert;)


This is coming along real well and I bet you are getting a real buzz from doing this. ;)
 
Thread owner
The only building I have ever made was the Pegasus bridge wooden model/ card kit not that challenging


Regards


Robert
 
Looking good Robert.....I might be a bit late with this suggestion, but don't double up top and bottom - just the window cills. It doesn't matter that much, but the cills usually stick out more than the top stonework.
 
Thread owner
This as my last building but it was laser cut wood and just pop out and sand and wood glue together. Think it's more for war gaming but my wife bought it fo me once we visited it a few years back. A simple build but the bridge was quite intricate. So this will be my furst scratch build ( thanks for the ref guides Ralph and your continued support View attachment 247799

View attachment 247803

View attachment 247804
 

Attachments

  • image.jpeg
    image.jpeg
    2.4 KB · Views: 0
  • image.jpeg
    image.jpeg
    2.5 KB · Views: 0
  • image.jpeg
    image.jpeg
    2.3 KB · Views: 0
Thread owner
\ said:
Looking good Robert.....I might be a bit late with this suggestion, but don't double up top and bottom - just the window cills. It doesn't matter that much, but the cills usually stick out more than the top stonework.
Spot on that man Ron ( I thought about doubling up the wood on the top sills as well but then thought nah that wouldn't sit right especially with the ledges to go in would look silly.


I will be giving the brickwork some artexing of a kind ( want a few cracks and debris also some bullet holes in the brickwork.


Regards


Robert
 
looking good do like your progress,well done so far, :D


ta for the info ,on the brick sheet,


do know of a guy over hear who dose laser cutting and have asked him 3 times about making brick wall sheets and doors and windows


but he just has not answered, :(
 
Thread owner
Well little update


After chatting with Ralph I decide to put the two pieces together and think it's not a bad old fit ( there will be rendering so this will hide the joint.


I started on the upstairs flooring and this has been acheived by drilling pilot holes in the front beam and inserting skewers ( I'll trim these later ).I straightened out and trimmed some coffee stirrers which will represent floor boards. It is a suck it and see but I think it's not too bad. I coated the whole floor in PVA thinned with water to see if it will join all the pieces together ( later they will be painted and weaterhered.)Once the ground floor is similarly done I'll start on the dividing walls then roof ( that's gonna be fun )


View attachment 247921

View attachment 247922

View attachment 247923

View attachment 247924
 

Attachments

  • image.jpeg
    image.jpeg
    2.5 KB · Views: 0
  • image.jpeg
    image.jpeg
    2.9 KB · Views: 0
  • image.jpeg
    image.jpeg
    2.4 KB · Views: 0
  • image.jpeg
    image.jpeg
    2.7 KB · Views: 0
Thread owner
Thanks Ralph. I think this is going well, there were a few fit issues( hahahahaha ) but I'm still enjoying it.


Regards


Robert
 
Status
Not open for further replies.
Back
Top