G
Guest
Guest
This is beginning to look really good Robert. Hats off to you for having a go, really must pull my finger out.

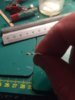
\ said:Well got me my last four/ five Windows cut out ( took me half the time but still nursing a throbbing thumb.
Next step I'll look at addressing the brickwork pattern ) Tamiya pre painted then I might attempt dry fitting the two pieces before I start on the wall partitions.Ill start making some tiles from the 2mm pieces cut out from the windows.
I have to build also framing for the Windows and ledges ( I'll be using 2mm plastic card and also wooden rods but I'll post pics of these once complete
Pics
Comments welcome
View attachment 147867 View attachment 147868 View attachment 147869 View attachment 147870
Looking really good Robert.\ said:Well got me my last four/ five Windows cut out ( took me half the time but still nursing a throbbing thumb.
Next step I'll look at addressing the brickwork pattern ) Tamiya pre painted then I might attempt dry fitting the two pieces before I start on the wall partitions.Ill start making some tiles from the 2mm pieces cut out from the windows.
I have to build also framing for the Windows and ledges ( I'll be using 2mm plastic card and also wooden rods but I'll post pics of these once complete
Pics
Comments welcome
View attachment 147867 View attachment 147868 View attachment 147869 View attachment 147870
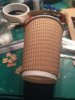
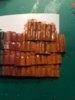
Thanks Ken I just can't wait to get some colour on those walls and start staining that wood ( still waiting on my Compresor coming in. I have made over 200 tiles for the roof and I'm thinking should I start at the top of the roof to lay ( never laid tiles before)\ said:Looking good,
Thanks Stuart\ said:Looking really good Robert.
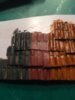
The build is really coming together nicely and I must say you have the patience of a saint with those tiles
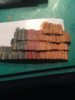
You need to start with the bottom layer of tiles and work your way upwards.That way you overlap the tiles by putting them on top of each other\ said:Thanks Stuart
As I said to Ken I gave over 200 tiles to lay but think I'm going to dark stain the roof wood first ( paint thinner coats of wood colours to stain the wood.
I've never laid roof tiles in my life but looking from ref pics it's start at the top row and overlap?
Regards
Robert
")
I'm glad you asked me that one Ralph\ said:What a clever idea of your wife.
I think when they are all on and painted they would look great.
Why don't you make a test roof and paint it and weather it and then you will know for sure.
I have been watching the build and it's coming along nicely.\ said:Well little update
After chatting with Ralph I decide to put the two pieces together and think it's not a bad old fit ( there will be rendering so this will hide the joint.
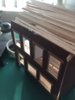
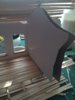
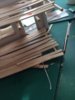
I started on the upstairs flooring and this has been acheived by drilling pilot holes in the front beam and inserting skewers ( I'll trim these later ).I straightened out and trimmed some coffee stirrers which will represent floor boards. It is a suck it and see but I think it's not too bad. I coated the whole floor in PVA thinned with water to see if it will join all the pieces together ( later they will be painted and weaterhered.)Once the ground floor is similarly done I'll start on the dividing walls then roof ( that's gonna be fun )
View attachment 148119 View attachment 148120 View attachment 148121 View attachment 148122
scalemodelling.co.uk is a privately operated online discussion forum. All content posted by members reflects their own views and opinions and does not necessarily represent those of the forum owners or administrators. While reasonable efforts are made to moderate content, no responsibility is accepted for user-generated material. By using this site, you agree to comply with UK law and the forum rules.
")