Theme editor

Scale Model Shop

New Bedford Whaler - circa 1835

Status
Not open for further replies.

spanner570

New member
Joined
May 26, 2009
Messages
15,599
Reaction score
613
Points
0
1/3
Thread owner
I know there's not a great deal of interest in ships and boats, but it's nice to see more folks having a go at building one, so here's another to add to the ever increasing pile!


First, thanks to Derek for suggesting this model for me to have a crack at.....It has had excellent reviews.


It's a 1/200 scale by Academy. It's a great little kit with loads of detail, yet relatively few parts...suits me fine! I like trying different aspects of our game, so being a sailing ship, it will be new to me.


As I'm 'dipping my sailing ship toes' I didn't want to tackle anything bigger - I doubt I would have the resolve to finish it anyway.


Just like the Severn Lifeboat build I posted on here, it's going to be a trilogy. - In harbour / at sea, hunting....and ?! (I'll leave that one a secret)


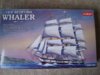
Here's the box art....


View attachment 124239


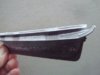
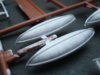
Scale comparison....The hull is about 6" long.


View attachment 124240
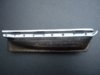
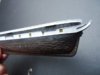
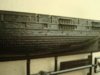


Nice hull detail...


View attachment 124241


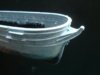
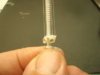
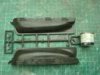
First off, I've made a start on the rat lines.....


In most plastic kits these are awful, but the ones with this are far better, so much so that I decided to file them down even thinner. I'm happy with the result and once painted, will do fine. I could have fiddled about and made my own, but I didn't see the point.


Here's the before and after...The 'after' is on the left!!!


View attachment 124242


That's it for now. Thanks for looking in.


Ron

View attachment 237130

View attachment 237131

View attachment 237132

View attachment 237133
 

Attachments

  • New Bedford Whaler 006.jpg
    New Bedford Whaler 006.jpg
    2.8 KB · Views: 0
  • New Bedford Whaler 001.jpg
    New Bedford Whaler 001.jpg
    1.8 KB · Views: 0
  • New Bedford Whaler 005.jpg
    New Bedford Whaler 005.jpg
    2.5 KB · Views: 0
  • New Bedford Whaler 003.jpg
    New Bedford Whaler 003.jpg
    2.7 KB · Views: 0
Hi Ron.


I have a great interest in ships,so will be watching this.


You have done an excellent job on the rat lines and you can clearly see the difference.


I have made about 4 ships this year and still have a few in the stash including the Academy 1/350 USS Indianappolis,deluxe version.


Here is a pic of the Academy 1/700 Titanic I did this year with toms detail set.


All the best.


Ralph.


View attachment 124243


View attachment 237134
 
Nice job on the rat lines Ron, as you say 90% of these with kits are just so bad, so out of scale an not a lot you can do with them.


Nice hull detail too, is that copper sheet on the lower hull?
 
Thread owner
Thanks for the comments chaps....


Nice Titanic Ralph.


Yes Si, it is copper and nicely detailed for a hull that's only 6" long.
 
That looks a really nice kit Ron, lovely hull detail; look forward to it's progress. How about a little detailed explanation on how you paint the Whaler as you progress, for us meer mortals. I would love to be able to hand paint. Derek
 
Ahoy there....More tiny work one day I will get the guts to buy one and start it..Look forward to seeing you get Underway.
 
Interesting subject Ron.


And excellent start as well, the work on the rat lines looks great ;)
 
it is nice to see some boats/ships,always have liked them,


nice start ,


and I have some think on the way as well,but will be different from this type, :D
 
Nice start so far Ron. I would probably have tried to make my own ratlines from thread using the kit ones as a template, but even that would be oversize at 1/200 scale. Once yours are installed and have had a coat of paint I'll bet they're going to be fine.
 
I like this Ron, really small scale with a great level of detail, work on the ratlines is great.


Interest in ships and boats or not doesn't really matter, it's all interesting full stop.


I have a long term project underway.......a model slipway Maggie M trawler, 50% done, working on the upperworks, wheelhouse is done. Came to a stop building her due to a house move 8 months ago, the Maggie is in storage at my dads, I must go and rescue her soon.


I must cut down in what interests me! :) ;)
 
Thread owner
Thanks for your encouraging posts folks....


As the weather has been a bit naff, I've been able to do a bit of work on the whaler.....


First coat on the cutters. See how by doing across strokes the weathering is already showing......


View attachment 124627


This paint scheme is a great example of the brush painter's creed...I know I've banged on about it in the past, but always remember dark colours over light. It's easy to brush paint a dark colour over a light one, but try it the other way around!


So here is the white first coat...slap it on all over and don't fiddle.


View attachment 237519


After the three thin coats of white comes the black. I've read on here people have used that many coats of brush applied paint , the detail vanishes.....I can only assume incorrect thickness paint was used, because with only the three coats of white I've obliterated a very, very dark piece of plastic.


The black.....Now is the time to be careful. When cutting in never hold your breath.....(Yes you do!) Doing so makes your heart thump and your hand shake, and if held for too long you will certainly die!


So breathe normally....


I use a rigger brush to cut into the white line, then a larger flat headed one to infill.


See how the initial white coat is showing through here and there on the lower hull? Don't worry, it all helps in the end......


View attachment 237520


Here I have given the copper plating a first diluted coat of metallic, don't be too fussy where it meets the black timber. I like the paints to blend in where weather and water are key players. Put plenty of paint on so it runs down the hull to give a 'hit and miss' look. Also, I've painted the ports using a cocktail stick dipped in the paint...


View attachment 237521


Apart from final weathering and a bit of work on the copperwork, here is the finished hull. The faint flecks of white can just be seen below the waterline, and is starting to give a sort of patchwork to the copper sheathing.....Although not too noticable, I have given the sheathing a well watered down coat of black matt paint to dull the copper a bit.


View attachment 237522


The finished bow-sprit, masts and cutter davits...


View attachment 237523


Showing some nice detail on so small a kit......


View attachment 237524


The kit only has standing rigging, i.e the ropes that keep the masts etc. upright. I intend to rig the model with running rigging too. For ye land lubber swabs, running rigging and halyards etc are for, amongst other things, raising, lowering the sails - any rope that can be hauled up and down really! So I'm going to add some of this to the general whaler rigging. Also, the cutter davits will need some rope work too.....


I've been well impressed with the fit and detail on this very small scale ship.


Next up I will have a go at the deck and sail halyards before I fix the masts into position and also finish painting the cutters.


Thanks for look in.


Ron

View attachment 237518
 

Attachments

  • New Bedford Whaler 024.jpg
    New Bedford Whaler 024.jpg
    2 KB · Views: 0
  • New Bedford Whaler 022.jpg
    New Bedford Whaler 022.jpg
    1.9 KB · Views: 0
  • New Bedford Whaler 007.jpg
    New Bedford Whaler 007.jpg
    1.6 KB · Views: 0
  • New Bedford Whaler 008.jpg
    New Bedford Whaler 008.jpg
    1.9 KB · Views: 0
  • New Bedford Whaler 015.jpg
    New Bedford Whaler 015.jpg
    1.8 KB · Views: 0
  • New Bedford Whaler 016.jpg
    New Bedford Whaler 016.jpg
    1.8 KB · Views: 0
  • New Bedford Whaler 009.jpg
    New Bedford Whaler 009.jpg
    3 KB · Views: 0
The Master at work.....thanks for the painting guide notes Ron, much appreciated. I think with the complex cameo scheme in the Scharnhorst, I will have to do some hand brushing, so your guidance is very timely. Much appreciated. Derek
 
Thread owner
Thanks Derek, glad to be of some help and thanks also for messaging me about the whaler kit....


What is the paint scheme on your Scharnhorst? Is it on Google Images?
 
View attachment 237527

Hi Ron, I hope it will look something like this when I am finished. It's all the raised surfaces and projecting PE on the superstructure that will be fun. Derek
 
Thread owner
Thanks for posting the cammo picture Derek. She'll look very impressive....


Cheers Ian. I'm glad you like it so far.


Here's an update....


The kit doesn't have any running rigging, so I've done my own using sewing cotton.


I needed something to fasten the rigging ends to and the coils of rope, so I scratch made 3 of these out of thin plastic card and fixed them to the bottom of the masts......


View attachment 237799


Here is the first mast complete with rope coils.


View attachment 237800


On the left loosely slotted into the deck, and on the right, the three finished masts temporarily in position.


View attachment 237801

View attachment 237802


A closer shot of the finished running rigging - a bit blurred, sorry.


View attachment 237803


It's probably not authentic, but serves my purpose...and is better than 'nowt!


Cheers,


Ron
 

Attachments

  • New Bedford Whaler 031.jpg
    New Bedford Whaler 031.jpg
    2.2 KB · Views: 0
  • New Bedford Whaler 028.jpg
    New Bedford Whaler 028.jpg
    1.9 KB · Views: 0
  • New Bedford Whaler 025.jpg
    New Bedford Whaler 025.jpg
    1.9 KB · Views: 0
  • New Bedford Whaler 030.jpg
    New Bedford Whaler 030.jpg
    1.4 KB · Views: 0
  • New Bedford Whaler 032.jpg
    New Bedford Whaler 032.jpg
    2.3 KB · Views: 0
Cracking work Ron, are you going to verdigris the copper slightly? Those masts looks superb great rigging work.
 
Thread owner
Thanks Si.


Plenty of weathering both to the upper and lower hull to go yet including the verdigris, and as these ships were at sea for up to 3 years at a time, I'll be adding a bit of marine growth here and there too - obviously not on the copper!


It was my intention to hack off most of the hull below the water line, but I decided to keep it whole for now. We'll see.......


I'm adding extras to the hull, so I'll leave the final hull painting until I'm about to fit the deck and masts....Otherwise I'm sure to clout the bl**dy things!


Thanks for your input.
 
Status
Not open for further replies.
Back
Top