Theme editor

Scale Model Shop

Next Build - Airfix Sherman Tank Firefly - 1:72

pjgtech

SMF Supporters
Joined
Dec 28, 2023
Messages
1,555
Reaction score
1,358
Points
113
Age
61
Location
Kent, UK
1/3
Thread owner
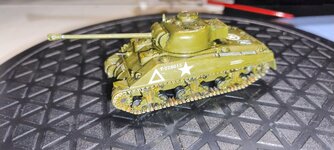
So next up on the desk is the Airfix starter set, in 1:72 scale, Sherman Tank Firefly.
Looks really simple, only two sprues, comes with the obligatory 3 tubs of paint and a paintbrush.
I bought a few of these cheap kits a while back when they were on sale in Lidl (or Aldi?), only a few pounds each kit.

I have a lovely 1:35 scale German half track to build, but I am putting it off for a while, as I am trying out my build technique/painting technique/weathering, etc on these smaller kits, before I get onto the bigger and more detailed half track sd kfz.

These smaller ones are my "learning kits", so not too bothered if I muck them up, but hopefully will not.
Pics of the kit, sprues, box, etc.....
Sherman tank 1_72 (1).jpg
Sherman tank 1_72 (2).jpg
Sherman tank 1_72 (3).jpg
Sherman tank 1_72 (4).jpg
Sherman tank 1_72 (5).jpg
Sherman tank 1_72 (6).jpg
Sherman tank 1_72 (7).jpg
Sherman tank 1_72 (8).jpg
Sherman tank 1_72 (9).jpg
 
A good choice. Always like a Sherman and with a big British gun even better. Seeing the tracks and wheels as one piece will make life much easier.
 
Thread owner
Ok, little update....
The kit went together very well and very easy, (well sub assemblies did) helps that there were not that many parts!
Click image for larger version  Name:	Sherman tank 1_72 first pics 10nov24 (3).jpg Views:	1 Size:	399.7 KB ID:	1240011
Started the priming process, after a quick clean of the parts, see I'm learning...
Click image for larger version  Name:	Sherman tank 1_72 first pics 10nov24 (3).jpg Views:	1 Size:	399.7 KB ID:	1240011
Seems to have dried ok after priming....
Click image for larger version  Name:	Sherman tank 1_72 first pics 10nov24 (3).jpg Views:	1 Size:	399.7 KB ID:	1240011
1st top coat....messy....
Click image for larger version  Name:	Sherman tank 1_72 first pics 10nov24 (7).jpg Views:	1 Size:	293.4 KB ID:	1240012
2nd top coat, much neater, even managed to get the tools on the tank body highlighted!
Click image for larger version  Name:	IMG_20241111_171948476_AE.jpg Views:	1 Size:	283.0 KB ID:	1240013
Not dry yet, I don't think it will need a 3rd coat as its quite "flat" and smooth. We'll see.....
Being a bit more patient now too. Primed last night, left it overnight.
Then did the first coat this morning and left it a good 8hrs before the 2nd coat.
Will probably leave it now till tomorrow, but its against my nature to be patient....!
Just wanna get on with it..... Lol
 
Last edited:
Thread owner
Update: Nearly done....

Ok so now built the little Sherman, went together really well.
Put a gloss coat on late last night.
Put transfers on this morning.
NB: did notice on the photos that I missed a bit on the rear of the turret when glossing!
But, overall, I have to say I am really happy with this little tank.

Its not quite finished yet, as I am still debating whether to weather it a little, especially panel lines, etc as it would be nice to highlight those and make them pop a bit more. And it will need a final matt varnish. I am so pleased with it I don't want to ruin it by overdoing it!

Thanx mainly to the peeps on this forum, I can visibly see that my builds are slowly getting better.
When I build a kit now, I sit down, look through the kit and instructions, and I have a structured plan for the build.
For example I am now building the sub sections and priming and painting in sections rather than trying to do it all in one go.

On this one I am really happy with the transfers. The first couple of models I did were horrendous, I split some, lost some, wrinkled some. I can see why you guys use micro set and micro sol, makes it so much easier.
And I am just learning to slow down, take my time, be patient, work methodically, etc.

Enough waffle, some pics.....
IMG_20241112_101346294_AE.jpg
IMG_20241112_101355892_AE.jpg
IMG_20241112_101402718_AE.jpg
IMG_20241112_101410974_AE.jpg
IMG_20241112_101309431_AE.jpg
IMG_20241112_101421512_AE.jpg
 
Sherman looks good. It will look even better once the gloss is gone. The main thing is you're enjoying the hobby.
 
Very nice.....these modern airfix kits are a delight arnt they

What washes are you going to try?

I wouldnt think of braille scale kits as 'practice' for 1/35 scale......they are harder than they look cos of the size.....especially when it comes to weathering...easy to over do it.......theŕs plenty of cheapo 1/35 out there (looks at tamiya pzr 2 and 4 and panther 🥸🤣 )
 
Thread owner
Very nice.....these modern airfix kits are a delight arnt they
What washes are you going to try?)

Yep, as a relative beginner, they are great for learning good technique.
Regarding the wash, I am going to use Ammo Panel line wash, just to try to bring out the details.
Then a coat of matt and bosh, job done....
I think that will be it, don't think I'm going to weather this one, just keep it nice and simple.
Cheers
 
Its worth developing your patience Peter, you will get better results in the long run. Some lads will often have more than one model on the bench at any one time so that they can move onto the other model while they are waiting.
 
Thread owner
Final pics for this one I think.
Applied some panel liner, some bits came up well, eg: tools, etc.
Also applied some very light rust wash and track wash, but I did go very light.
Then applied a final matt coat to finish.
Cheers
sherm tnk final pics 12nov24 (2).jpg
sherm tnk final pics 12nov24 (7).jpg
sherm tnk final pics 12nov24 (6).jpg
sherm tnk final pics 12nov24 (4).jpg
sherm tnk final pics 12nov24 (5).jpg

sherm tnk final pics 12nov24 (1).jpg
sherm tnk final pics 12nov24 (3).jpg
 

Attachments

  • sherm tnk final pics 12nov24 (1).jpg
    sherm tnk final pics 12nov24 (1).jpg
    308.8 KB · Views: 0
Nicely done Peter.Ive got 3 or 4 of these and i swap bits around with other kits to make different Shermans.
Onwards and upwards..
Richard
 
Back
Top