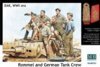
Just ordered a set of DAK figures from Masterbox. They will be surgically altered for my finished representation of a dead crew ( fingers crossed ) but I won't be using good old Erwin
View attachment 239557
View attachment 239557

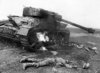
I totally understand the concept of the scene I want to create. This won't be gruesome in any shape or form. My aims are simple to practice my skills and learn new skills at painting Armour. With this journey I will hopefully learn new skills in diorama and figure painting.\ said:Hi Robert it will be interesting to see what you do with this, a thought if you don't mind, be careful when applying the blood too much and it looks tacky and insensitive, there is a citadel paint called blood for the blood god it gives an accurate representation of blood, but apply it in small amounts and not nessecarily to the figures to give the full effect without going over the top, as I say just a thought I've got my chair ready.
scott
Good luck Robert you got me interested mate and I have my popcorn at the ready.\ said:I totally understand the concept of the scene I want to create. This won't be gruesome in any shape or form. My aims are simple to practice my skills and learn new skills at painting Armour. With this journey I will hopefully learn new skills in diorama and figure painting.
I've never really felt happy just building kits to display and then moving onto the next kit. Maybe I'm finally understanding more about what I'm aiming to achieve in model building
Anyone know how to open the front hatches on the Panzer IV ( I know it's going to involve surgery but the easiest way please ??\ said:Just seen this one Robert and you've got my attention, I will join in and watch this.
")
Most thankful Patrick any help would be grand. I've ordered the Tamiya tool set anyway x 2 but on a read of the italeri kit it lacks certain detail and well yes I can scratch build from photos but getting the right look is all important as I'm sure you understand.\ said:I might have a few pioneer tools lurking about the place Robert - but they'll likely to be Dragon ones without the clasps. Although I probably have some spare PE clasps?
Smoke dischargers ... there just might be some in my Panzer III box! They might fit ...
I'll have a rummage!
No worries mate!\ said:Most thankful Patrick any help would be grand. I've ordered the Tamiya tool set anyway x 2 but on a read of the italeri kit it lacks certain detail and well yes I can scratch build from photos but getting the right look is all important as I'm sure you understand.
Not sure I know why they would have a grenade rack at the rear of the panzer ( 1 being near the exhaust) 2 near a hot engine ( heat and explosives surely don't mix?
Do you have any pics of this grenade rack/ box as my searches have come up empty so far.
Cheers
Robert
") dunno if they'll be of any help.
dunno if they'll be of any help.I have some Tamiya German Jerry cans and fuel drums (Tamiya set 186) you can have if you want them Robert. I've used a few but you're welcome to the rest.\ said:Ok I'm looking beyond the build now and looking towards accessories in tools. The kit comes with a few jerry cans the odd helmet but the tools are needing upgrading plus also there is a grenade box that is missing from the kit ( does not include one but the F1/F2 had this feature on the rear of the tank?
Also smoke discharges on the turret. Any help there?
Have ordered Tamiya on vehicle stowage ( Italieri stuff getting put in spare drawer )
Thanks Peter that would be very handy ( there are 3 I think with this kit but a few more couldn't do any harm.\ said:I have some Tamiya German Jerry cans and fuel drums (Tamiya set 186) you can have if you want them Robert. I've used a few but you're welcome to the rest.
scalemodelling.co.uk is a privately operated online discussion forum. All content posted by members reflects their own views and opinions and does not necessarily represent those of the forum owners or administrators. While reasonable efforts are made to moderate content, no responsibility is accepted for user-generated material. By using this site, you agree to comply with UK law and the forum rules.