Theme editor

Scale Model Shop

'Pharos' A 1/200 card model ship. (Peter's Injection free G.B,2024)

spanner570

New member
Joined
May 26, 2009
Messages
15,599
Reaction score
613
Points
0
1/3
Thread owner
Here I go again!
i was determined never to build one of these devil's creations ever again, and yet....

........in some sadistic way I did sort of enjoy the experience when I built this 1/250 MacBraynes Ferry 'Bute'.

Click image for larger version  Name:	Bute Ferry....Card model 046.jpg Views:	0 Size:	42.1 KB ID:	1244429

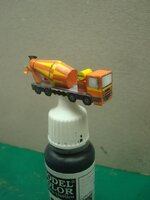
Part of the ferry's cargo
Click image for larger version  Name:	Bute Ferry....Card model 042.jpg Views:	0 Size:	102.6 KB ID:	1244431
Click image for larger version  Name:	Bute Ferry....Card model 044.jpg Views:	0 Size:	89.6 KB ID:	1244437


But I digress.
Here is my effort at another card model.
I gave up making full hull ships. I just couldn't get the hulls good enough. When I do need my torture fix, I stick to 1/250 scale waterline. These are a nice manageable 14"/16" length.

Although small, they are tricky to build. Total accuracy is paramount, there is no room for error. They will have you cursing, sweating and wishing you had never started the thing!....Yes, you will. Trust me.

So here we go.
Click image for larger version  Name:	P1340802.jpg Views:	0 Size:	126.9 KB ID:	1244432
Click image for larger version  Name:	P1340803.jpg Views:	0 Size:	161.1 KB ID:	1244433

Click image for larger version  Name:	P1340804.jpg Views:	0 Size:	197.6 KB ID:	1244434 Click image for larger version  Name:	P1340806.jpg Views:	0 Size:	242.4 KB ID:	1244436

Click image for larger version  Name:	P1340806.jpg Views:	0 Size:	242.4 KB ID:	1244436

That's just some of the cards.

Cheers.
Ron
 

Attachments

  • Bute Ferry....Card model 044.jpg
    Bute Ferry....Card model 044.jpg
    89.6 KB · Views: 0
Last edited:
Interesting project Ron, looks like a lot of small and complicated parts but you did manage the previous card models well, so have fun! Cheers
 
Thread owner
Two choppers,Matron!....


Someone is sure to spot I've got the scale wrong in the title. I've writted 1/200. It should be 1/250.
Once I'd spotted my error, the short editing timer has prevented me from altering things. Can the mods alter it for me please?

Ron
 
Rather you than me Ron. You did make a cracking job of the Calmac ferry. I tried to build a very simple card model and gave up pretty quickly.
 
Thread owner
Update.

To anyone daft enough to have ago at these infernal things i found that if you glue the flat base parts to summat solid like plywood or MDF then everything is held rigid and doesn't wobble and warp. Particularly the waterline.

Box section bulkheads done.
P1350125.jpg P1350126.jpg P1350127.jpg P1350128.jpg P1350129.jpg P1350130.jpg

Just make sure the parts are cut precisely, folded the correct way and are neat and sharp, are the right way up and facing the bow or stern and dead on to any guide lines. Simple enough....!

Cheers.
Ron
 
Just make sure the parts are cut precisely, folded the correct way and are neat and sharp, are the right way up and facing the bow or stern and dead on to any guide lines. Simple enough....!
That's why your's is looking very neat and precise and has not found it's way into the nearest skip!! I imagine that any inaccuracies just become magnified as the build progresses.
 
Thread owner
Thanks Jim, but I hope folks who read my " Simple enough" statement see it as a huge tongue in cheek bit of nonsense.

These things really do try a modeller's patience....From the word go!
 
Thread owner
Slowly ,slowly, catch de monkey!
Main deck cut out and glued in place. Then the first part of the superstructure.

P1350131.jpg

P1350132.jpg

Tabs bent to allow gluing of the hull sides at a later stage
P1350133.jpg

Superstructure sides cut out and ready to be bent.
P1350134.jpg

Bent!
In the kit you get optional 'extras' Here they supply little doors to stick on the sides to add a bit of relief.
P1350135.jpg

P1350136.jpg

P1350139.jpg

P1350140.jpg

P1350143.jpg

Next, I'll add more to the superstructure.

Cheers.
Ron
 
All looking very neat and quite some progress. Mind you "de monkey", after two months, has had it away on it's toes and is up a tree in the next forest :)
 
Thread owner
Thanks for the encouraging comment and I apologise for my long delayed replies. Sorry boys.....

Long delayed update too....

Click image for larger version  Name:	P1350149.jpg Views:	0 Size:	244.1 KB ID:	1260546


I decided to cut out all the windows.
Click image for larger version  Name:	P1350151.jpg Views:	0 Size:	184.0 KB ID:	1260547

...and replace with clear plastic to try and replicate window glass.
Click image for larger version  Name:	P1350152.jpg Views:	0 Size:	172.7 KB ID:	1260548


Glued on to the lower level deck. Note the bow helipad deck reinforcing card disc.
Click image for larger version  Name:	P1350153.jpg Views:	0 Size:	120.6 KB ID:	1260549

Click image for larger version  Name:	P1350154.jpg Views:	0 Size:	193.1 KB ID:	1260550

Ready for the next deck level.

Cheers.
Ron.
 
Thread owner
Next level.

Card cut outs of heli-deck ready to glue together.

Click image for larger version  Name:	P1350156.jpg Views:	0 Size:	204.6 KB ID:	1260593


Some larger areas on these card models need a bit of thickening to prevent dips in the deck areas.

Scrap card glued in place.

Click image for larger version  Name:	P1350158.jpg Views:	0 Size:	169.8 KB ID:	1260594

Ready to glue in. Note the turned down tabs.
Click image for larger version  Name:	P1350159.jpg Views:	0 Size:	188.6 KB ID:	1260595

A bit more scrap card reinforcing.
Click image for larger version  Name:	P1350160.jpg Views:	0 Size:	138.3 KB ID:	1260596

Deck glued on.
Click image for larger version  Name:	P1350161.jpg Views:	0 Size:	215.1 KB ID:	1260597


A closer view of the tabs. One set up, and one set down. all need straightening, Then the hull sides glue on to these.

P1350162.jpg

Ready for a further set of superstructure to cut and glue into position.

The hull sides goes on after this.

Then the fiddly bits start!

Cheers.
Ron
 
Back
Top