
You are using an out of date browser. It may not display this or other websites correctly.
You should upgrade or use an alternative browser.
You should upgrade or use an alternative browser.
- Status
- Not open for further replies.
rickoshea52
Active member
1/3
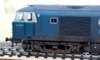
When using Mig pigments I use their fixing solution applied by airbrush at 10-12 psi so that you don't blow the pigments away. As you are doing a tank you can use the fixing solution to push the pigments around and into any nooks and crannies on the model, it also makes a nice light crusty build up of dirt.
Here is a photo of a loco I weathered using pigments on the under frame and bogies.
View attachment 258604
Here is a photo of a loco I weathered using pigments on the under frame and bogies.
View attachment 258604
Attachments
I agree with Rick, I use pigments and use the fixer-this fixes the pigment meaning it doesn't rub off or wash up, also it means you can reactivate the pigment late on by adding more fixer.
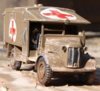
Here are some of my models with rust, dust and mud pigments.
View attachment 258607
View attachment 258608
View attachment 258609
Also I use oil paint, thinned downed is great for staining and a general grime wash.
View attachment 258610
View attachment 258611
View attachment 258612
Here are some of my models with rust, dust and mud pigments.
View attachment 258607
View attachment 258608
View attachment 258609
Also I use oil paint, thinned downed is great for staining and a general grime wash.
View attachment 258610
View attachment 258611
View attachment 258612
Attachments

G
Guest
Guest
Firstly Leo, do be sure to give the acrylics plenty of time to cure before applying the lacquer coat. As I'm sure you know, any lacquer based product is chemically "hot", so there's always a risk of it affecting an acrylic paint.
The other thing is that a lacquer coat takes much longer to cure than an equivalent acrylic product. So although fixing your pigments with alcohol (IPA?) shouldn't be a problem, patience is needed.
I steer clear of lacquer varnish these days simply because in my experience it took at least a week before it was ready to add anything over them.
HTH
Patrick
G
Guest
Guest
Thanks a lot guys for the replies and helps. This means I have to buy their own fixer to keep the pigments and also patience is needed. Thanks lads
G
Guest
Guest
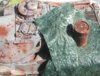
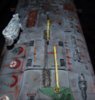
Here is my little box. Its 3 cm long (long edge). After painting with acrylic (Vellejo), I dropped particles of Mig rust pigments here and there (as in the image) after looking at real-life examples. Using the side of the end of a cocktail stick I pressed the pigment on to the box so it stuck temporarily. I blew the surplus away and sprayed a coat of matt varnish to fix it. An advantage of this method is that if you don't like the result you can blow off all the pigment and start again (before adding the varnish of course) although a little will remain. In any case, I experimented on trial pieces of poly sheet.
As part of my experiments I tried painting on a a varnish or Humbrol Clearcote and when wet dropped particles of the rust, and and moved therm around with a brush. The particles were not crushed (as above) and gave a rough surface. That gives a different type of rust, and also I think that is good on a bigger model where the patches of rust can be bigger. Someone in a post some time ago used plaster to build up a knobbly surface which when treated with pigments etc. looked very like a bad attack of rust on some thick steel or iron like an abandoned car engine or other machinery.
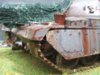
It is extremely important (as in all modelling) to study examples of rust to see how it gathers (in crevices) and flows down from bits (like rivets). If you are doing something like the side of a truck with the door in it, don't put a rust patch which covers both the edge of the door and the part of the panel next to it. Rust does not leap even small discontinuities. Put patches on both sides, that's ok, but not opposite each other.
https://www.google.co.uk/webhp?sourceid=chrome-instant&ion=1&espv=2&ie=UTF-8#q=pictures of rustView attachment 260057
As part of my experiments I tried painting on a a varnish or Humbrol Clearcote and when wet dropped particles of the rust, and and moved therm around with a brush. The particles were not crushed (as above) and gave a rough surface. That gives a different type of rust, and also I think that is good on a bigger model where the patches of rust can be bigger. Someone in a post some time ago used plaster to build up a knobbly surface which when treated with pigments etc. looked very like a bad attack of rust on some thick steel or iron like an abandoned car engine or other machinery.
It is extremely important (as in all modelling) to study examples of rust to see how it gathers (in crevices) and flows down from bits (like rivets). If you are doing something like the side of a truck with the door in it, don't put a rust patch which covers both the edge of the door and the part of the panel next to it. Rust does not leap even small discontinuities. Put patches on both sides, that's ok, but not opposite each other.
https://www.google.co.uk/webhp?sourceid=chrome-instant&ion=1&espv=2&ie=UTF-8#q=pictures of rustView attachment 260057
- Status
- Not open for further replies.
Legal Notice
scalemodelling.co.uk is a privately operated online discussion forum. All content posted by members reflects their own views and opinions and does not necessarily represent those of the forum owners or administrators. While reasonable efforts are made to moderate content, no responsibility is accepted for user-generated material. By using this site, you agree to comply with UK law and the forum rules.