DarthVehement
New member
1/3
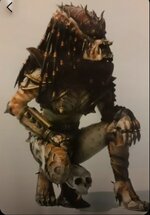
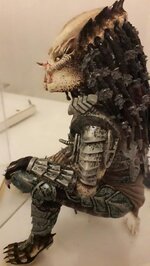
Reshape Predette 1×6 Resin/White Metal Model Kit
This was a limited release,
solid resin kit with white metal accessories which require pinning with cut down nails and 1mm copper wire before assembly. I used nails for the body and arms, due to the weight of the pieces.
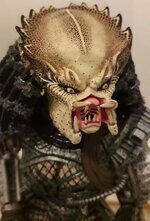
Not very much clean up required, however, with resin kits, I find they tend to be more air bubbles left in the casting which means more filling and sanding! There was some on this kit, but due to the skin texture, not much work was needed to achieve a good result. Some filling was required on the armour, where bubbles left areas incomplete, the horns around the head needed reconstruction and also, there were deep seams where the resin parts are joined in the mould, these required sanding and blending. I sanded the top of her head smooth, as to match the other creatures features.
Due to the posture of the figure, some of the parts were painted and finished before general assembly, such as the arms and torso.
The colours and design are similar to the original predator creature with similar markings to the 2nd creature.
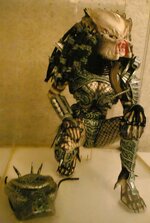
I decided to create an alloy effect for the armour, metallic green with an organic effect of black and silver veining.
Black wire mesh is painted to the skin, as per the other predators.
The helmet is scratch built from another casting from the mould of predator 2's, I altered the shape for originality and to seem a good fit for the face.
Spikes also added, along with connecting pipes.
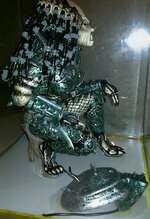
Once the components are ready, I prepared the perspex base to mount the figure.
I didn't use the prop supplied with the figure, instead, I decided to use perspex with a groove cut to fit the loincloth and pins to fit on the base for support. This allows a better view of the figure and makes the display less "busy".
After test fitting and assembling everything, final assembly is ready to commence.
I used superglue and two part epoxy for adhesive, pinning and applying the parts together.
After the figure is together and fixed to the base, I finished painting the joins and the figure is completed.
Totally brush painted, Humbrol and Revel enamels were used.
Unfortunately, the white metal dreadlocks seem to have reacted with the paint causing expansion and fillamentation to spoil the shapes and paint work! Perhaps they are a poorer quality material, as the other parts remain stable.
There are alterations to the original kit, mainly features of the head. (See original box picture) I discarded the horns to keep continuity of the appearance of the species.
I also added spikes to the knee and spine armour.
This was a limited release,
solid resin kit with white metal accessories which require pinning with cut down nails and 1mm copper wire before assembly. I used nails for the body and arms, due to the weight of the pieces.
Not very much clean up required, however, with resin kits, I find they tend to be more air bubbles left in the casting which means more filling and sanding! There was some on this kit, but due to the skin texture, not much work was needed to achieve a good result. Some filling was required on the armour, where bubbles left areas incomplete, the horns around the head needed reconstruction and also, there were deep seams where the resin parts are joined in the mould, these required sanding and blending. I sanded the top of her head smooth, as to match the other creatures features.
Due to the posture of the figure, some of the parts were painted and finished before general assembly, such as the arms and torso.
The colours and design are similar to the original predator creature with similar markings to the 2nd creature.
I decided to create an alloy effect for the armour, metallic green with an organic effect of black and silver veining.
Black wire mesh is painted to the skin, as per the other predators.
The helmet is scratch built from another casting from the mould of predator 2's, I altered the shape for originality and to seem a good fit for the face.
Spikes also added, along with connecting pipes.
Once the components are ready, I prepared the perspex base to mount the figure.
I didn't use the prop supplied with the figure, instead, I decided to use perspex with a groove cut to fit the loincloth and pins to fit on the base for support. This allows a better view of the figure and makes the display less "busy".
After test fitting and assembling everything, final assembly is ready to commence.
I used superglue and two part epoxy for adhesive, pinning and applying the parts together.
After the figure is together and fixed to the base, I finished painting the joins and the figure is completed.
Totally brush painted, Humbrol and Revel enamels were used.
Unfortunately, the white metal dreadlocks seem to have reacted with the paint causing expansion and fillamentation to spoil the shapes and paint work! Perhaps they are a poorer quality material, as the other parts remain stable.
There are alterations to the original kit, mainly features of the head. (See original box picture) I discarded the horns to keep continuity of the appearance of the species.
I also added spikes to the knee and spine armour.