Thanks Joe and Monica, Monica the weld lines were done by using tape to mask where you want the lines then spread tamiya putty over the gap and use a hobby knife to make vertical lines in the putty. Then pull the tape up, You have to work quickly with tamiya putty because it dries really fast. It's really easy.

You are using an out of date browser. It may not display this or other websites correctly.
You should upgrade or use an alternative browser.
You should upgrade or use an alternative browser.
Pzkpfw 1 Ausf C
- Thread starter aaron
- Start date
- Status
- Not open for further replies.
")
G
Guest
Guest
Looks great Aaron, the weld seams came out nicely, cant wait to see the paint on it.
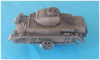
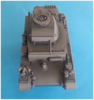
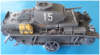
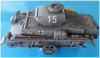
Base coat done, this took a while because I was struggling with painting it in panzer grey and not dark yellow but I thought meh box art it is.
View attachment 100713
View attachment 100714
View attachment 100715
View attachment 100716
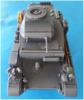
I have a blue filter for panzer grey but I don't want to darken it up any more than it already is plus it is blue enough to my eye.
View attachment 213736
View attachment 213737
View attachment 213738
View attachment 213739
View attachment 100713
View attachment 100714
View attachment 100715
View attachment 100716
I have a blue filter for panzer grey but I don't want to darken it up any more than it already is plus it is blue enough to my eye.
View attachment 213736
View attachment 213737
View attachment 213738
View attachment 213739
Attachments
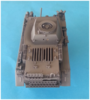
Here is my test piece using the same colors but with the blue filter added. To me it's too blue and dark so no filter for my panzer.View attachment 100717
View attachment 213740
View attachment 213740
Attachments
G
Guest
Guest
subscribed
G
Guest
Guest
You've got this colour modulation thing down to a fine art Aaron! Excellent paintwork ")
I agree with what you say regarding the blue filter - I'm not a fan of them myself.
I agree with what you say regarding the blue filter - I'm not a fan of them myself.

G
Guest
Guest
Liking the look of this! Am yet to tackle german armour, but soon come...
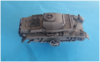
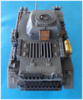
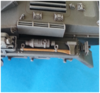
I'm still plodding along with this, here's where it sits at the moment.
View attachment 101473
View attachment 101474
View attachment 101475
View attachment 101476
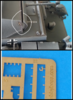
I found out I had knocked off a p.e hook so 1 point for the carpet monster but the model gods smile on me with the one and only spare p.e piece being the piece I lost.
View attachment 101478
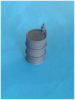
I also tried my luck with wood grain on the tools.
View attachment 101479
Lots to go with a few snafus to cover in later weathering steps. Cheers for taking a look.
View attachment 214496
View attachment 214497
View attachment 214498
View attachment 214499
View attachment 214501
View attachment 214502
View attachment 101473
View attachment 101474
View attachment 101475
View attachment 101476
I found out I had knocked off a p.e hook so 1 point for the carpet monster but the model gods smile on me with the one and only spare p.e piece being the piece I lost.
View attachment 101478
I also tried my luck with wood grain on the tools.
View attachment 101479
Lots to go with a few snafus to cover in later weathering steps. Cheers for taking a look.
View attachment 214496
View attachment 214497
View attachment 214498
View attachment 214499
View attachment 214501
View attachment 214502
Attachments
G
Guest
Guest
Cheers for sharing, looks great so far, glad you had a spare pe part too haha
- Status
- Not open for further replies.
Legal Notice
scalemodelling.co.uk is a privately operated online discussion forum. All content posted by members reflects their own views and opinions and does not necessarily represent those of the forum owners or administrators. While reasonable efforts are made to moderate content, no responsibility is accepted for user-generated material. By using this site, you agree to comply with UK law and the forum rules.