Theme editor

Scale Model Shop

Revell 1/32 Grumman F4F-4/ Martlet mkV ( Wildcat

Status
Not open for further replies.

Robert1968

New member
Joined
Mar 2, 2015
Messages
3,596
Reaction score
0
Points
0
1/3
Thread owner
Well I got some good advice of other people some on here somim away to start the above.


I've decided to make the Martlet as I've seen a few 1/32 Wildcars about and I'll be honest I am not 100% sure of shades of Pacific blue that I have that I could convincingly pull one off.


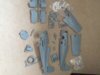
Anyway on with the kit ( it's old but with old things it can be fixed to make a half decent kit)


Unlike the Avro Vulcan I got as I think I'm gonna have to spend a lot of money on getting that part near a decent kit.


Anyway their are a few sink marks in the kit but nothing that can't be fixed. Not sure of port and starboard but on the left wing root there is a lovely Revell stamp needs to be sanded away but with careful sanding there are no loss of panel detail


Raised panel detail but there is a nice look to it the wings and tail have good engraving and panels are crisp and clear.


CAnopy is a little thick but I'm gonna stick with it and I have the eduard masks for this


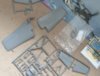
Undercarriage looks simple enough a few seam lines but a fair amount of detail ( there is a number under one of the Oleos you wil need to carefully scrape or sand ( bought some after market weighted wheels too


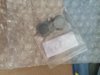
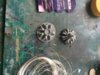
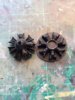
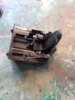
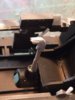
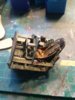
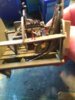
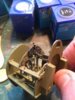
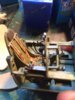
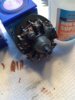
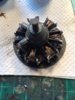
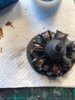
eNgine detail is basic so I'm going to tart this up with rod and wire etc to make it a bit more realistic although it will be mainly covered.


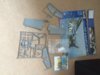
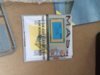
Decals look clean and crisp and in registry although I may decide to look elsewhere than the kits featured aircraft.


I may need help when it comes to invasion stripes as I don't think I'll use the kits and might paint them on.


Cockpit is basic but has some nice detail but I have some after market belts and will make a seat cushion and give the cockpit a good amount to look at.


Right on with the pics I started on the engine last night


View attachment 122105

View attachment 122106

View attachment 122107

View attachment 122108

View attachment 122109

View attachment 122110


View attachment 234996

View attachment 234997

View attachment 234998

View attachment 234999

View attachment 235000

View attachment 235001
 

Attachments

  • image.jpeg
    image.jpeg
    2 KB · Views: 0
  • image.jpeg
    image.jpeg
    2.6 KB · Views: 0
  • image.jpeg
    image.jpeg
    2.2 KB · Views: 0
  • image.jpeg
    image.jpeg
    2.3 KB · Views: 0
  • image.jpeg
    image.jpeg
    2.2 KB · Views: 0
  • image.jpeg
    image.jpeg
    3 KB · Views: 0
I missed a bargain one of these on ebay the other day. So I'm looking forward to yours looks to be a decent kit. Cheers John
 
I'll be watching too Robert as I just got one of these at Newark on sunday ! Its a kit ive been after at the right price for a while now , and like most of the old Revell 1/32 mouldings can be made into a very nice model with a little bit of extra fettling . Nice start on the engine - thats exactly what I mean , with a bit of plastic rod and some fuse wire the engine goes from a basic moulding to every bit as good as an aftermarket replacement , great stuff! Keep the updates coming , cheers tony
 
Hi Robert, I will be watching this one with interest as I have literally just started work on my hobbyboss wildcat that I will be turning into a wildcat mk VI.


I have purchased some really nice aftermarket decals which is forcing me away from a scheme without invasion stripes which I'm gutted about.


I painted the invasion stripes on my spitfire over the top of some fairly dark late camo and it came out a treat. I found revell Aqua matt White went down real well in a few light coats then I added the black stripes after.


Cheers


Phil
 
Thread owner
Not sure if the Revell can get close to the Hobbyboss version but what I aim to do is try and get the cockpit looking half decent ( bits of wiring here and there ( ref pics used ) getting the Radial half acceptable although it's mainly covered by the cowling, due to the raised panel lines I'm going to try pre and past shading and yes I'll be spraying my own invasion stripes ( thanks fir the Revell Aqua Matt idea ( I use a variety of acrylics Revell Aqua, tamiya, Vallejo, and citadel


Busy night on engine tonight pics to follow


Robert
 
Thread owner
Update


Sorry not too much progress as I spent half last night on the floor looking for the ignition wires


I scaled them so they are 1cm long and each one is kinked and bent 28 needed but I did 40 ( in case I lose some, ( they need painting too ) so I placed them on a black background to show you. They are made from .05mm wire thread and will be c a glue into position. Lightly primed the whole kit last night


Now my question is I'm thinking would it be better to paint the engine cylinders the metallic silver and weather before I add the ignition wires as I think it's going to ne hard doing it the other way round.


Started on the cockpit a bit too adding some extra wiring etc n fuse wire differing thickness( realised there was no control stick ( joystick so I has to fashion one from some sprue and shave it down ( cut my thumb 3 times in doing so ) I might make another as not too convinced it's correct I'll paint the cockpit tomorrow and srtart detailing and weathering there.


Comments as always welcome


View attachment 122173

View attachment 122174

View attachment 122175

View attachment 122176

View attachment 122177


View attachment 235064

View attachment 235065

View attachment 235066

View attachment 235067

View attachment 235068
 

Attachments

  • image.jpeg
    image.jpeg
    2.8 KB · Views: 0
  • image.jpeg
    image.jpeg
    2.2 KB · Views: 0
  • image.jpeg
    image.jpeg
    2.8 KB · Views: 0
  • image.jpeg
    image.jpeg
    2.6 KB · Views: 0
  • image.jpeg
    image.jpeg
    2.8 KB · Views: 0
Looking good Robert, that time will pay off I'm sure. Struggled to find cockpit pics have you got any you can share?
 
Thread owner
Well I made some progress on the F4F as I got the office done ( I'm sorry for the painting as I did the colour as ref suggest and got my a/b working ( compressor fixed ) but my hands shake a bit after my strokes so I hope you'll forgive this.


Right I made my very own seat belts scratch built from tape and fine bits of old PE in the spares drawer left over then painted over brown and brass for the buckles ( not bad after first attempt I think ) learning to not buy after market which in a way is cheating View attachment 122454


Once fine painting done gave a light brown wash ( the cockpit although as best I can get it will mostly be hidden in the small cockpit area but I think I had to give it a decent try


Now on with the engine ( I started painting last night but I'll admit small painting is very taxing as once you start shaking it's hard to get back in the mojo


Anyway comments welcome


View attachment 122450

View attachment 122451

View attachment 122452

View attachment 122453


View attachment 235341

View attachment 235342

View attachment 235343

View attachment 235344

View attachment 235345
 

Attachments

  • image.jpeg
    image.jpeg
    3.2 KB · Views: 0
  • image.jpeg
    image.jpeg
    3 KB · Views: 0
  • image.jpeg
    image.jpeg
    3.2 KB · Views: 0
  • image.jpeg
    image.jpeg
    3.2 KB · Views: 0
  • image.jpeg
    image.jpeg
    3.3 KB · Views: 0
Great stuff Robert , the cockpits looking fantastic and top job on the belts . Its very satisfying making something from scratch isnt it?! Cheers tony
 
Thread owner
Update


Got the engine finally done where I'm happy to be able to install in the engine bay.


15amp fuse wire cut to 1cm bent and then glued ( ignition wires then painted copper. Their is plastic 1mm rod to enhance the arm struts. Took me ages to get it all right to what I'm saying acceptable. Given a brown wash over the cylinders. Think it's turned out ok. I tried to give a well used looking engine but once cowling on you won't see much


Comments welcome as usual


View attachment 122721

View attachment 122722

View attachment 122723


View attachment 235612

View attachment 235613

View attachment 235614
 

Attachments

  • image.jpeg
    image.jpeg
    2.8 KB · Views: 0
  • image.jpeg
    image.jpeg
    2.9 KB · Views: 0
  • image.jpeg
    image.jpeg
    2.9 KB · Views: 0
Thread owner
Well sealed the two half of fuselage together today and although a not bad fit there is a lot of filling I can see on the seam ( mr surfacer etc ) due to the raised panel lines it's going to be a long careful sanding process so not to lose too much detail . I have test fitted the wings that are still themselves getting fixed and are a snug fit which I think once set they will require little filler. On the wings I had to take out the exterior .50 cal as the Martlet 5 was a FM2 and only carried 4 x .50 cal . Squadron white took care of them fir me


Few pics for you and comments welcome


View attachment 122754

View attachment 122755

View attachment 122756


View attachment 235645

View attachment 235646

View attachment 235647
 

Attachments

  • image.jpeg
    image.jpeg
    2.5 KB · Views: 0
  • image.jpeg
    image.jpeg
    2.6 KB · Views: 0
  • image.jpeg
    image.jpeg
    2.8 KB · Views: 0
I was searching what you build last lately and i found this amazing detailed airplane u made here.


For a revell kit u made it very good....!!!


Those kits are a hell sometimes and you proof that made something better on this one.


Good luck with the painting here i wanna see it on his end :)
 
How's the martlet going Robert?


Something interesting I found out about the viewing Windows below the cockpit were that they wasn't very useful in real life. I'm going to weather slightly over the top of mine to bolster the fact that once they realised their lack of usefulness they were somewhat neglected


Cheers


Phil
 
Thread owner
\ said:
How's the martlet going Robert?
Something interesting I found out about the viewing Windows below the cockpit were that they wasn't very useful in real life. I'm going to weather slightly over the top of mine to bolster the fact that once they realised their lack of usefulness they were somewhat neglected


Cheers


Phil
Hi Phil you are exactly correct in the lower Windows which were originally installed for aiding on landing but they didn't prove very effective and this was noted in a comment when an mk 2 martlet was being test flown. I believe that the RAF left them to get mucky inside ( stains etc ) so what your proposing would be valid.


On my Martlet I've primed the whole aircraft now and am in process of putting on the d day stripes ( painting my own


Will have some pics on soon maybe next week


Robert
 
I notice you use the revell Aqua colours (or whatever their called).


I'm not a massive fan but I painted my spitfire entirely and left the invasion stripes till last and used revell Aqua Matt White and Matt black and it went down a treat!


My martlet is awaiting last couple of decals and then some weathering will take place. I might post some pics tonight if I get chance.


Cheers


Phil
 
Status
Not open for further replies.
Back
Top