Theme editor

Scale Model Shop

Revell 1/72 VIIC/41 'Atlantic Version' German U. Boat

Status
Not open for further replies.

spanner570

New member
Joined
May 26, 2009
Messages
15,599
Reaction score
613
Points
0
1/3
Thread owner
Now the longer hours of darkness are nearly here, I'm slowly and with a slight reluctance, starting to throw the autumn leaves over me and returning to the bench.

I've had this kit staring at me for a number of years now from a corner of my den, so now's as good a time to finally start it! In any case sub. building is my favourite type of model making.

I much prefer the '41' version as it has a far more interesting conning tower than the VIIC. You might remember I built a 1/144 '41 version earlier this year being attacked by a Liberator bomber. Apparently there are errors with this 1/72 kit but as I just build what's in the box and have fun, such things are of no interest to me.

The finished model is about 37"- 93.4 cm long and due to the large area of plastic I shall be using cheap 'Poundshop' acrylics and save my 'Good' paints for the detail work. I'll probably build the full hull then angle grind the thing in half and fit the top half in some water - I'll see.

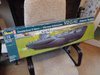
Here's the box art and a few of the parts.......

View attachment 317608

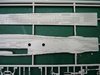
View attachment 317609

Very nice deck detail. You might know my thoughts on after market 'wooden decks'!
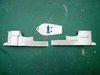
View attachment 317610

Loose fit of conning tower sides.
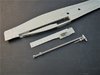
View attachment 317611
I hope we can have some crack and banter along the way. It keeps me going!

Run silent, run deep....

Ron
 

Attachments

  • P1200756.JPG
    P1200756.JPG
    3.1 KB · Views: 0
  • P1200408.JPG
    P1200408.JPG
    3.9 KB · Views: 0
  • P1200407.JPG
    P1200407.JPG
    2.9 KB · Views: 0
  • P1200405.JPG
    P1200405.JPG
    2 KB · Views: 0
Nice one Ron, got the same kit in the stash, so I’ll join in and watch this one.
 
Thread owner
Thanks Ian. Get below and stash your gear.....Don't choose a bunk below Jim though! :cold-sweat:
 
Dive!! Dive!! Dive!! Just in time to watch you work your magic. Good luck Ron and great to see you back at the bench
 
Hi Skipper permission to come aboard and store my gear, engine room please nice and cosy and warm.Good luck with the build.
Old Puffer Pete.
 
Thread owner
Welcome Pirate Pete. The engine room it is. Due to the war effort you will have to bring your own ear plugs.
 
A nice seat next to the engine please Ron. Have my sea legs ready. Can I bring the parrot, he's well behaved.
LJ Silver.
Aka 453 Race .
 
Oh goody! More water! Lifejacket and whistle at the ready!

Had you thought of doing some sort of dio - p'raps replenishing from an eboat or surrendering to an MTB? There's kits available, and it would give added interest to have two floaty things to look at - and you're gonna have to have quite a big base anyway ......
 
Thread owner
Welcome aboard L. J. Silver Race 453. Yes sir, you can bring your parrot aboard, but keep the b****y thing muzzled. I don't want the crew upset by bad language! However, Miss Purity will have to stay ashore though to look after The Admiral Benbow pub.

Stashitis Dave - Glad you could come along with the other motley crew members. Good suggestions too. I'll give them both some serious thought. Problem is, it's a potentially big base to start with.....
 
Thread owner
The rag tag crew is assembled so let's start the patrol.....

The first job for anyone modelling a U. Boat is to drill out all the water vent openings, of which there are many. This has to be done whatever the scale or I think the boat just won't look right. Your choice whether to or not. If a waterline model is required then just drill out the ones which will be seen. Choose open or shut forward torpedo outer doors (Mine are closed) then join the hull halves.

Opened out ready for tidying up.
View attachment 317670


See the two large openings? Don't open these out. I did by mistake, and yes I've lashed myself with a knotted rope soaked in sea water - Very nice too!
View attachment 317671


Here's a good tip for any ship model that has slot-in decks. See the two hull stiffeners? Before fixing them, file away some of the plastic edges from 9&3 o'clock to the top of the pieces. Not too much, just enough to show a very small gap between them and the outer hull. Then once the hull and stiffeners are glued together the deck will now be ever so slightly oversized. This will allow you to file the deck to a perfect fit. The other, rougher method is to fit the deck then fill any gaps with filler....Nah!

View attachment 317672

Thanks for showing me that trick Dad.....Miss you.

Cheers.
Ron
 

Attachments

  • P1210202.JPG
    P1210202.JPG
    1.9 KB · Views: 0
  • P1210203.JPG
    P1210203.JPG
    1.9 KB · Views: 0
  • P1210204.JPG
    P1210204.JPG
    2 KB · Views: 0
Hi Ron
See the two hull stiffeners? Before fixing them, file away some of the plastic edges from 9&3 o'clock to the top of the pieces. Not too much, just enough to leave a very small gap between them and the outer hull. Once the hull and stiffeners are a tight fit and glued together the deck will now be ever so slightly oversized. This will allow you to file the deck to a perfect fit. The other, rougher method is to fit the deck then fill any gaps with filler....Nah!
One for my notebook definitely. Filler anywhere near a wooden deck is a recipe for disaster/loads of work/ much swearing etc!!
Jim
 
‘Roger the cabin boy’ on board for this one!. Great start Ron. I fancy do one of these as a change from things with wings.
 
Thread owner
A fine body of assembled men, that's for sure.....ready for anything Tommy can throw at them!

Right, I've quietly assembled the snorkel and its associated gear. It works too, but be careful with the glue.
View attachment 317733

Cheers.
Ron
 

Attachments

  • P1210205.JPG
    P1210205.JPG
    2.2 KB · Views: 0
Status
Not open for further replies.
Back
Top