Theme editor

Scale Model Shop

Rick's Airfix 1/72 Harrier GR3 - engine change & crew in

Status
Not open for further replies.
Thread owner
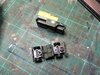
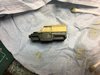
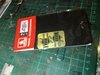
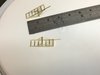
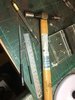
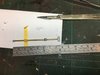
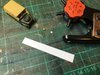
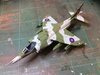
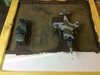
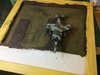
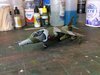
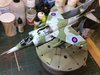
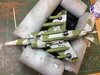
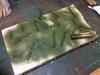
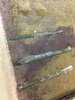
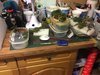
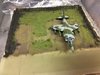
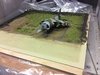
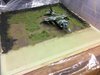
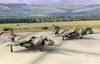
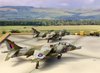
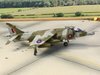
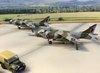
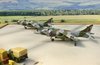
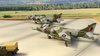
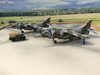
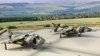
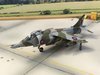
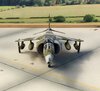
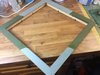
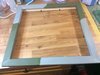
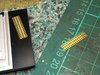
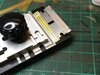
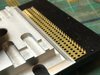
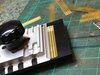
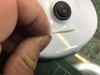
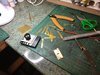
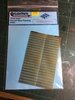
Now that I have my workbench more or less back in action I have been picking at some of my stalled builds. It is about time I had a go at the brass work, particularly the PSP from Flightpath, it wasn’t as tedious as I first thought. With a good light source, magnifier, scissors, sanding pad and a decent folding tool I made light work of about half the PSP in less than an hour, the planks can be cut in half so that you can get an evenly laid area...and they even interlock together per the real thing. Painting next and some base board work then I can get them laid out.


View attachment 303578View attachment 303579View attachment 303580View attachment 303581View attachment 303581View attachment 303583View attachment 303584
 

Attachments

  • C1B81F9D-5218-4F0E-86D0-FA829A916266.jpeg
    C1B81F9D-5218-4F0E-86D0-FA829A916266.jpeg
    3.3 KB · Views: 0
  • 4A372EB0-836F-4EA5-92C9-0C62AFCF8D51.jpeg
    4A372EB0-836F-4EA5-92C9-0C62AFCF8D51.jpeg
    3.3 KB · Views: 0
  • 21DEE8DF-85BA-481C-87F6-B6EA346FF5F0.jpeg
    21DEE8DF-85BA-481C-87F6-B6EA346FF5F0.jpeg
    3.3 KB · Views: 0
  • 4E503F2C-10A1-48BF-92C3-45F00DBC83EF.jpeg
    4E503F2C-10A1-48BF-92C3-45F00DBC83EF.jpeg
    3.2 KB · Views: 0
  • 6BAE67D2-C4B9-4632-B8B9-CF834AA32429.jpeg
    6BAE67D2-C4B9-4632-B8B9-CF834AA32429.jpeg
    2.5 KB · Views: 0
  • 6872184A-BAB2-47DD-B9A2-656E4B14EB49.jpeg
    6872184A-BAB2-47DD-B9A2-656E4B14EB49.jpeg
    3.3 KB · Views: 0
  • 500F385F-17CB-4D73-9637-DED51D8D4AEF.jpeg
    500F385F-17CB-4D73-9637-DED51D8D4AEF.jpeg
    2.8 KB · Views: 0
Thread owner
The 1/2 ton Land Rover from Oxford Diecast has begun its transformation from UN & Commando markings to Royal Air Force green with yellow stripes. I began with painting out the printed on markings but it quickly became clear this would look crap so the acrylic paint was washed off. Then I had a light bulb moment and remembered my railway modeller trick for removing tampo printed markings - T-Cut. I used to renumber my locos and rolling stock using this method to remove the factory printed numbers and it worked a treat on this model too, the bonus with this method is it leaves a shiny surface for the yellow RAF stripes to be applied to. The only drawback is I can’t use T-Cut to remove the Commando dagger on the tail fender without also removing the other printed detail.

View attachment 303587View attachment 303588View attachment 303589
 

Attachments

  • C168F6C9-A7E6-4C56-A894-787E7EB52406.jpeg
    C168F6C9-A7E6-4C56-A894-787E7EB52406.jpeg
    2.8 KB · Views: 0
  • 194F1341-A734-4119-9ADC-F9ED664A3C4D.jpeg
    194F1341-A734-4119-9ADC-F9ED664A3C4D.jpeg
    3.1 KB · Views: 0
  • 337C71BD-9BAA-44BC-9CB3-89058CF02399.jpeg
    337C71BD-9BAA-44BC-9CB3-89058CF02399.jpeg
    2.8 KB · Views: 0
Rick.
Not normally a wingy man , but living near Wittering we had Harriers flying around here for years, so thought I would look in .
Some great work , more so for that scale, love the etch, you've done a superb job on that . Looking forward to seeing the set up .
John .
 
Thread owner
I'm going to use the Flightpath airfield accessories set towing arm, what a pain. The brass rod supplied has an internal diameter too small for the cast fittings, after cutting the rod to the lengths required a session of filing the id with a round needle file and drilling was needed. The case fittings and rod have been superglued together and left to set. The ruler and tools are for scale and the other photo shows the tools used, yes, a hammer.
View attachment 303616View attachment 303617View attachment 303619
 

Attachments

  • IMG_0908.JPG
    IMG_0908.JPG
    3.2 KB · Views: 0
  • IMG_0910.JPG
    IMG_0910.JPG
    2.3 KB · Views: 0
  • IMG_0909.JPG
    IMG_0909.JPG
    2.9 KB · Views: 0
Thread owner
The Land Rover has a yellow disc on the front grill which is really thick and over scale so it has been replaced by a white disc cut from thin plasticard using a set of hole cutting pliers. I have no idea what the yellow disc means or indeed a white one but it will stay white (it is hiding the locating hole in the grill!)
On another note, the Commando dagger formation badge on the rear fender came off by scraping gently with a number 11 scalpel.

View attachment 303620
 

Attachments

  • IMG_0906.JPG
    IMG_0906.JPG
    3.2 KB · Views: 0
I'd forgotten all about this one Rick, nice to see you back on it. Nice work with the PE.
 
Pierced steel planking! That is on my to buy list!! Wonderful build Rick. I will keep an eye on this one
 
Thread owner
Pierced steel planking! That is on my to buy list!! Wonderful build Rick. I will keep an eye on this one

You can get bases with the PSP already laid but you don’t have the flexibility of the brass stuff that I am wrestling with.
 
That's a lot of PE for the PSP Rick, but nice work on that, the adder, and the recycled Land Rover.
 
Thread owner
PSP painted in dark green but I will vary the shades and paint some in different colours in a later session - the crew access ladders were painted too.
The Harriers themselves are almost done with just a few minor paint touch ups to do. I used Vallejo gloss varnish - utter rubbish finish and loads of airbrush blockages but the decals went on ok and a pin wash for the panels makes them pop out. The matt coat is AK ultra matt - awesome! I’m a convert. You might also see a Vulcan drying on the paint stand, this is my daughter’s and has been coated in Alclad aqueous gloss - double awesome! Another convert.
When the Harriers were assembled with their landing gear and out riggers I found that the flat surface of the base was too narrow so a quick bit of tissue and pva mix was added, painted and scatter applied; the white strip will be a section of concrete road. There is also a parking bay for some MT - maybe a bowser, Unimog etc.

View attachment 304923View attachment 304924View attachment 304925View attachment 304926View attachment 304927View attachment 304928View attachment 304929
 

Attachments

  • E2156F66-D7A1-47C1-B117-1FA3F9BB54DA.jpeg
    E2156F66-D7A1-47C1-B117-1FA3F9BB54DA.jpeg
    2.8 KB · Views: 0
  • 41C2799A-DF40-4D4E-BA1C-9E3660E6465A.jpeg
    41C2799A-DF40-4D4E-BA1C-9E3660E6465A.jpeg
    2.7 KB · Views: 0
  • 124BBEE5-87D3-4DC4-A3CB-86BA8D241B5E.jpeg
    124BBEE5-87D3-4DC4-A3CB-86BA8D241B5E.jpeg
    2.8 KB · Views: 0
  • 5783A86C-EF56-48EF-9105-BB1B07D9BB9B.jpeg
    5783A86C-EF56-48EF-9105-BB1B07D9BB9B.jpeg
    3 KB · Views: 0
  • 5EFDA6FB-49F0-40EA-A917-E987BBD25252.jpeg
    5EFDA6FB-49F0-40EA-A917-E987BBD25252.jpeg
    3.6 KB · Views: 0
  • D1A4A58E-AED6-460D-BEEE-8C678CA6F2AF.jpeg
    D1A4A58E-AED6-460D-BEEE-8C678CA6F2AF.jpeg
    3.4 KB · Views: 0
  • 2194C327-3B4A-4054-B7A9-CD201F5D5232.jpeg
    2194C327-3B4A-4054-B7A9-CD201F5D5232.jpeg
    2.9 KB · Views: 0
Thread owner

Attachments

  • 79865507-7B9D-4FAC-A6AE-023F3FEA1451.jpeg
    79865507-7B9D-4FAC-A6AE-023F3FEA1451.jpeg
    2.7 KB · Views: 0
  • A99FEA45-4780-4B52-928C-89933AC16FB5.jpeg
    A99FEA45-4780-4B52-928C-89933AC16FB5.jpeg
    3.2 KB · Views: 0
Thread owner
Some more ground work with different shades of scatter, tufts and a bit more mud effect. The white spots are wet pva that will dry clear and the dark scatter will shaken down to remove the excess and saved for reuse.
One thing was bothering me about the last photos I posted of this Harrier on the base mocked up, it was a bit of overspray just behind the cockpit, this has been corrected. View attachment 307584View attachment 307585View attachment 307586

And some trees and scenic material that I am using.
View attachment 307589
 

Attachments

  • 8FA0E2C1-DFC5-4E83-AD20-F850235F6215.jpeg
    8FA0E2C1-DFC5-4E83-AD20-F850235F6215.jpeg
    3.7 KB · Views: 0
  • 0B32D36B-1BD5-4883-B013-C3D32838373E.jpeg
    0B32D36B-1BD5-4883-B013-C3D32838373E.jpeg
    2.7 KB · Views: 0
  • D312691D-F380-454D-8164-1CE0CCE03B16.jpeg
    D312691D-F380-454D-8164-1CE0CCE03B16.jpeg
    3 KB · Views: 0
  • 013A6BBD-AEF6-46A2-880D-729C9BA29094.jpeg
    013A6BBD-AEF6-46A2-880D-729C9BA29094.jpeg
    2.9 KB · Views: 0
Thread owner

Attachments

  • 1DE24E25-1EEC-4081-A19E-7A48A658BE00.jpeg
    1DE24E25-1EEC-4081-A19E-7A48A658BE00.jpeg
    2.1 KB · Views: 0
  • 16F54769-93EF-4715-B8E8-C888BD17FF42.jpeg
    16F54769-93EF-4715-B8E8-C888BD17FF42.jpeg
    2.4 KB · Views: 0
  • 76B8C2E6-F25D-4EA7-AC74-F1753D70E076.jpeg
    76B8C2E6-F25D-4EA7-AC74-F1753D70E076.jpeg
    2.8 KB · Views: 0
  • 5CD6F0CD-AB38-4EEF-99B7-3C96453BD759.jpeg
    5CD6F0CD-AB38-4EEF-99B7-3C96453BD759.jpeg
    2.8 KB · Views: 0
  • D7826188-B45F-46C0-A210-A764B778437B.jpeg
    D7826188-B45F-46C0-A210-A764B778437B.jpeg
    2.7 KB · Views: 0
  • 7E881AA0-B1E5-4AAD-BE3F-41DFEB4BD36C.jpeg
    7E881AA0-B1E5-4AAD-BE3F-41DFEB4BD36C.jpeg
    2.5 KB · Views: 0
  • A2DD93D3-418D-4440-9545-4F2B3145C9C6.jpeg
    A2DD93D3-418D-4440-9545-4F2B3145C9C6.jpeg
    2.2 KB · Views: 0
  • 92776B7F-D84F-4250-B12B-00A5CCC262CC.jpeg
    92776B7F-D84F-4250-B12B-00A5CCC262CC.jpeg
    2.3 KB · Views: 0
  • D01995DE-0AD5-4490-A84D-CFBE100BA6C4.jpeg
    D01995DE-0AD5-4490-A84D-CFBE100BA6C4.jpeg
    2.3 KB · Views: 0
  • 62A11112-AB5B-4E68-8A01-08E5853B9F2C.jpeg
    62A11112-AB5B-4E68-8A01-08E5853B9F2C.jpeg
    2.8 KB · Views: 0
  • DEDB4354-D917-49A3-A3FF-816C46B8A234.jpeg
    DEDB4354-D917-49A3-A3FF-816C46B8A234.jpeg
    3.2 KB · Views: 0
Rick, those two Harriers look fantastic.:thumb2:
Love the Land Rover too, nice conversion.
 
Thread owner
Struggling to find the time and willpower at the moment for modelling. Instead of a plain wood effect base frame I thought I would have a go at painting it the same (ish) colours as the Harrier that will sit on it. A quick visit to my local Hobbycraft for some Tamiya paint on the way home and I just slapped it on and came up with this. If I can find a black paint pen I am considering adding some stencil markings too.

View attachment 316113View attachment 316114
 

Attachments

  • 26C62EF1-7B29-499B-8170-C51FB64C1EA7.jpeg
    26C62EF1-7B29-499B-8170-C51FB64C1EA7.jpeg
    3.1 KB · Views: 0
  • AA1AB89A-799D-498B-8B6C-B5466AB51721.jpeg
    AA1AB89A-799D-498B-8B6C-B5466AB51721.jpeg
    2.8 KB · Views: 0
Rick.
Just looked it to see how it was going. Looks really fine, love the idea with the frame. Hope you get the mojo back with the time constraints, as I'm looking forward to seeing the final show.
John.
 
Great work on the harriers Rick they look fantastic, and a great idea with painting the frame too.
 
Status
Not open for further replies.
Back
Top